Love this? Save it for later!
Share the inspiration with your friends
My niece looked up from the cookbook I’d left on the counter, her finger marking a page. “Auntie, why can’t you just use the peppers like they are? You know, like little green bodies?” I started to explain why that wouldn’t work — that stuffed peppers need to be cut a certain way, that the filling would spill out, that it wasn’t how you’re supposed to do it. Then I stopped. She was holding a pepper sideways, and honest to goodness, it already looked like a tiny, lumpy creature. I mean, she wasn’t wrong. So I grabbed a second pepper, sliced the top off, and held it up next to hers. “Okay,” I said, “let’s see what happens.”
That’s how these Spooky Mummy Stuffed Peppers were born. Not from a carefully planned recipe testing session, but from a Tuesday afternoon in late October when I was supposed to be making a regular dinner and instead got completely derailed by a seven-year-old’s imagination. We raided the fridge for cheese strips and olives, and by the time we were done, we had four peppers wrapped in mozzarella “bandages” staring back at us from the baking sheet. My sister walked in, took one look, and said, “Those are going on the blog.”
Honestly, this is the kind of Halloween dinner that actually works. It’s not just a gimmick — the peppers get perfectly tender, the filling stays juicy, and the cheese gets all melty and golden. You know that feeling when you’re scrambling for a Halloween meal that isn’t candy-based or completely terrifying to make? These mummy peppers are it. They’ve become our official Halloween Eve tradition, and I keep making them because they’re genuinely delicious, not just cute. Though, let’s be real — the cute part helps.
Why You’ll Love This Recipe
I’ve tested this recipe six times to get the cheese-to-pepper ratio just right. The first batch was a gooey disaster. The second used too much filling. But by batch number four, I knew we had something special. These Spooky Mummy Stuffed Peppers aren’t just Halloween decoration — they’re a legit dinner that happens to look like it crawled out of a tomb.
- Quick & Easy: From fridge to table in about 45 minutes. No complicated techniques, no special equipment. If you can chop an onion, you can make these.
- Simple Ingredients: Ground beef, rice, cheese, peppers, and a few pantry spices. You probably have most of this already, minus maybe the bell peppers.
- Perfect for Halloween: Whether it’s a spooky dinner party, a kids’ Halloween gathering, or just a fun weeknight meal, these fit right in. No carving required.
- Crowd-Pleaser: Kids love the mummy look. Adults love that it’s actual food. Everyone loves the melted cheese.
- Unbelievably Delicious: The filling is seasoned with garlic, cumin, and a touch of smoked paprika. The peppers get sweet and tender in the oven. And that cheese? It gets crispy at the edges. I mean, come on.
What makes this different from other stuffed pepper recipes is the presentation, sure, but also the technique. I pre-cook the filling just enough so it stays moist, and I use part-skim mozzarella strips that hold their shape without turning into a puddle. The “bandages” are actually functional — they keep the filling tucked in while adding that perfect stretchy cheese pull. This isn’t just another version of stuffed peppers. It’s the one that makes your kids actually eat their vegetables on Halloween night.
There’s something about serving these that makes everyone at the table smile. Even the teenagers who claim they’re too cool for Halloween. It’s comfort food with a sense of humor — healthier than a candy bar, faster than a costume, and somehow more satisfying than both.
What Ingredients You Will Need
This recipe uses simple, wholesome ingredients that come together to create something that tastes like you spent hours in the kitchen. Most of these are pantry staples, and the substitutions are easy if you need them.
- 4 large green bell peppers — Look for peppers that are squat and round, not tall and pointy. They look more like mummy bodies. Red or yellow work too, but green has that slightly creepy, earthy look.
- 1 lb ground beef (85/15) — The fat keeps the filling moist. Ground turkey or chicken works, but add a tablespoon of olive oil to the pan.
- 1 cup cooked white rice — Leftover rice is perfect here. Brown rice or quinoa work too, but adjust cooking time slightly.
- 1 small yellow onion, finely diced — About 1 cup. Don’t skip this — it adds sweetness and texture.
- 3 cloves garlic, minced — Fresh is best. The jarred stuff works in a pinch, but use double.
- 1 can (14.5 oz) diced tomatoes, drained — Fire-roasted adds a nice smoky depth. Drain well so the filling isn’t watery.
- 1 teaspoon ground cumin — Warm, earthy, essential.
- 1 teaspoon smoked paprika — Regular paprika works, but smoked gives that subtle campfire vibe.
- ½ teaspoon dried oregano — Mexican oregano if you have it.
- Salt and black pepper to taste — I use about 1 teaspoon salt and ½ teaspoon pepper.
- 8 ounces part-skim mozzarella cheese, sliced into thin strips — This is your mummy wrapping. Part-skim melts better without getting greasy. I recommend Sargento or Boar’s Head for consistent slicing.
- 12-16 black olive slices — For the eyes. Two per mummy, plus a few extras for mistakes. (I always eat one or two.)
- 2 tablespoons olive oil — For sautéing. Avocado oil works too.
- Optional: ¼ cup shredded cheddar cheese — For the filling, if you want extra cheesiness. I add this about half the time.
Substitution Notes: For a vegetarian version, use 1½ cups cooked black beans and ½ cup finely chopped mushrooms instead of beef. For gluten-free, ensure your rice is certified gluten-free and skip any store-bought seasoning blends. For a lower-carb option, replace rice with 1 cup riced cauliflower — squeeze it dry in a clean kitchen towel first.
I’ve made these with ground lamb once, and honestly, it was incredible. The gaminess paired beautifully with the smoked paprika. Just a thought if you’re feeling adventurous.
Equipment Needed
Nothing fancy here. You probably own most of this already.
- Large skillet or frying pan — For cooking the filling. A 12-inch nonstick works great, but stainless steel is fine too. Just watch for sticking.
- Baking dish (9×13 inch) — Large enough to hold 4 peppers without crowding. A glass Pyrex dish works perfectly. If you only have a metal pan, reduce oven temperature by 25°F.
- Sharp knife and cutting board — For slicing peppers and dicing onions. A serrated knife helps cut the pepper tops cleanly.
- Small spoon or melon baller — For scooping out pepper seeds and membranes. A regular spoon works, but a melon baller makes it faster.
- Measuring cups and spoons — Standard set. Nothing fancy.
- Mixing bowl — For combining the filling ingredients.
- Tongs or spatula — For handling the peppers when they’re hot.
- Toothpicks (optional) — If your mozzarella strips want to slide off, a toothpick or two can help hold them in place. Just remind everyone before they bite in.
Budget-Friendly Tip: Don’t have a 9×13 dish? A cast iron skillet works beautifully. Just arrange the peppers snugly. I’ve even used a foil-lined baking sheet in a pinch — the peppers just need to stay upright.
I once made these in a friend’s kitchen using a butter knife and a cereal bowl because she was mid-move. It took longer, but the peppers still turned out great. So don’t stress about having the perfect tools.
Preparation Method
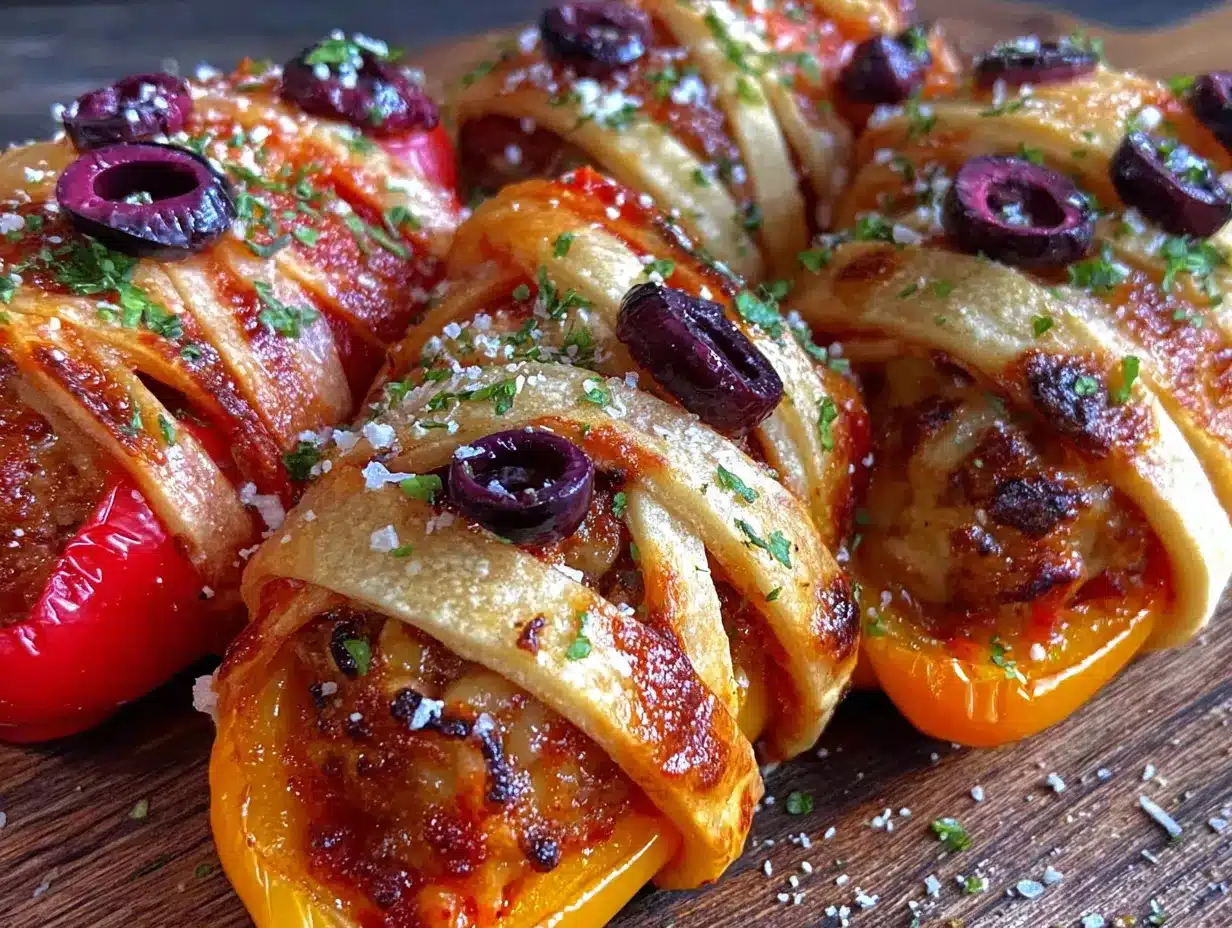
Let’s get into the actual cooking. This looks more complicated than it is — I promise.
- Preheat your oven to 375°F (190°C). Get this going first so it’s ready when you are. While it heats, start the filling.
- Cook the rice if you don’t have leftovers. Bring 1 cup of water to a boil, add ½ cup uncooked rice, cover, reduce heat to low, and cook for 15 minutes. Fluff with a fork. You need 1 cup cooked. Pro tip: Make extra and use it for lunch tomorrow.
- Prepare the peppers. Wash and dry 4 bell peppers. Using a sharp knife, slice the top off each pepper about ½ inch from the stem. Set the tops aside — you can chop them up and add to the filling if you want less waste. Use a small spoon to scoop out the seeds and white membranes from inside each pepper. Rinse briefly to remove any stray seeds. Pat dry inside and out with a paper towel. Stand the peppers upright in your baking dish. If they wobble, slice a tiny sliver off the bottom to create a flat surface — but don’t cut through, or the filling will leak.
- Start the filling. Heat 2 tablespoons olive oil in a large skillet over medium heat. Add the diced onion and cook for 4-5 minutes until translucent and starting to brown at the edges. Add the minced garlic and cook for 30 seconds — just until fragrant. Do not let the garlic burn, or it will taste bitter.
- Brown the meat. Add the ground beef to the skillet. Break it up with a wooden spoon or spatula. Cook for 6-8 minutes, stirring occasionally, until no longer pink. If there’s excess fat, spoon most of it out, leaving about 1 tablespoon for flavor. Your kitchen is going to smell amazing right now.
- Season and combine. Stir in the drained diced tomatoes, cooked rice, cumin, smoked paprika, oregano, salt, and pepper. If using cheddar cheese, stir it in now until melted. Cook for 2-3 minutes until everything is heated through and well combined. Taste and adjust seasoning — I usually add a pinch more salt here. The filling should be moist but not wet. If it looks dry, add 2 tablespoons of tomato juice or water.
- Stuff the peppers. Spoon the filling into each pepper, packing it gently but firmly. Don’t overstuff — leave about ¼ inch of space at the top for the cheese. Mound the filling slightly if needed. You should use all the filling evenly across the 4 peppers. If you have extra, just spoon it into the dish around the peppers — it’ll cook and become delicious.
- Create the mummy wrappings. Take your mozzarella strips and lay them across each pepper, crisscrossing to look like bandages. Leave small gaps for the eyes. The cheese should cover most of the filling. Don’t wrap too tightly — loose wraps look more authentic, like a mummy that’s been shuffling around for centuries. Tuck the ends of the strips down into the dish so they don’t curl up while baking.
- Add the eyes. Press 2-3 black olive slices into the exposed gaps in the cheese on each pepper to create eyes. Push them gently into the filling so they stay put. You can position them close together for a cute mummy or far apart for a derpy one. Both are valid choices.
- Bake. Place the baking dish in the preheated oven and bake for 25-30 minutes. The peppers should be tender when pierced with a fork, and the cheese should be melted, bubbly, and starting to brown in spots. If you want darker, more toasted cheese, switch the oven to broil for the last 2 minutes — but watch it carefully. Cheese goes from golden to burnt very quickly.
- Rest and serve. Remove from the oven and let the peppers rest for 5 minutes. This helps the filling set and makes them easier to handle. Use tongs to transfer each pepper to a plate. Spoon any extra filling from the dish alongside. Serve warm, watching your kids’ faces light up when they see dinner staring back at them.
Cooking Tips & Techniques
I’ve made these enough times to know what can go wrong. Let me save you the trouble.
Blanch the peppers first. If you prefer softer peppers, blanch them in boiling water for 3 minutes before stuffing. I actually prefer them with a bit of crunch — they hold up better and don’t collapse. But if you’re serving picky eaters who like their vegetables practically mush, blanch away. My second batch was too soft because I blanched them too long. They looked like deflated mummies. Not a good look.
Don’t skip draining the tomatoes. This was my biggest mistake in batch one. The extra liquid made the filling soupy, and the cheese slid right off. Drain them well, and if they’re still wet, give them a gentle squeeze over the sink. Your filling will thank you.
Cheese placement matters. I learned this the hard way. If you lay the mozzarella strips straight across, they’ll stay put. If you try to get fancy with diagonal wraps, they’ll slide off during baking. Keep it simple. Also, use room-temperature cheese — cold cheese doesn’t melt evenly and takes longer to brown. Let it sit out while you prepare the filling.
Timing is everything. Get the filling done, then stuff the peppers, then wrap them. If you try to assemble everything first and then bake, the peppers sit around getting soggy. Work in sequence. I usually start the rice, prep the peppers while it cooks, then make the filling while the peppers wait in the dish. Multitasking makes this a 45-minute meal.
Watch the olive eyes. Olives can dry out and get tough in the oven. If you’re worried about this, add the olive eyes halfway through baking instead of at the beginning. I’ve done it both ways, and honestly, I prefer adding them early — they soften slightly and blend in better. Just don’t use pre-sliced olives from a can. They’re too thin and get lost. Get whole pitted olives and slice them yourself.
One time I forgot to set a timer and the peppers baked for almost 40 minutes. The cheese was dark brown and the peppers were collapsing. They still tasted good, but they looked more like zombie mummies than cute ones. So set that timer. Trust me.
Variations & Adaptations
This recipe is surprisingly flexible. Here are some ways I’ve adapted it over the years.
Vegetarian Mummy Peppers: Replace ground beef with 1½ cups cooked black beans and ½ cup finely chopped mushrooms. Sauté the mushrooms first to release their moisture, then add the beans and spices. The texture is different but equally satisfying. My vegetarian sister-in-law requests these every year.
Spicy Mummy Peppers: Add 1 diced jalapeño (seeds removed unless you want heat) to the onion mixture, and substitute ½ teaspoon cayenne pepper for the smoked paprika. Use pepper jack cheese for the wrappings instead of mozzarella. These have a nice kick without being overwhelming. My brother-in-law adds hot sauce to his, but I think that distracts from the flavor.
Breakfast Mummy Peppers: Yes, really. Use scrambled eggs, cooked breakfast sausage, and shredded cheddar as the filling. Wrap with provolone slices and bake for 15 minutes instead of 25. Serve with salsa. We did this for a Halloween morning brunch, and the kids lost their minds. It’s now a tradition.
Low-Carb Mummy Peppers: Replace rice with 1 cup riced cauliflower. Squeeze it dry in a clean kitchen towel before adding to the filling. The texture is slightly different, but the flavor holds up. I’ve also used chopped spinach (thawed and squeezed dry) mixed with cream cheese for a keto-friendly version.
Cheese-Only Mummy Peppers: For a super simple version, skip the filling entirely and just stuff the peppers with a mixture of ricotta, mozzarella, and Parmesan. Season with garlic powder and Italian herbs. Bake for 20 minutes. These are great as a side dish or light dinner.
I once tried a Greek-inspired version with ground lamb, feta cheese, and oregano instead of cumin. The mummy wrappings were halloumi, which holds its shape beautifully. It was incredible, but halloumi is expensive, so I save that for special occasions. The point is, this recipe is a canvas. Paint whatever flavor profile you want.
Serving & Storage Suggestions
These peppers are best served warm, straight from the oven. The cheese is stretchy, the filling is hot, and the peppers are tender. But here’s how to handle leftovers and make-ahead situations.
Serving Temperature: Serve immediately after the 5-minute rest. If you’re hosting a Halloween party, you can keep them warm in a 200°F oven for up to 30 minutes. Just cover loosely with foil so the cheese doesn’t dry out. I’ve also served them at room temperature for a buffet — they’re still delicious, just less dramatic.
Presentation Ideas: Arrange the peppers on a platter lined with fresh basil or parsley to look like a spooky graveyard. Add some “dirt” made from crushed black olives or dark sesame seeds around the base. For extra Halloween flair, use a small knife to carve a few spiderweb patterns into the cheese before baking — just don’t cut too deep.
What to Serve With: A simple green salad with a tangy vinaigrette balances the richness of the cheese and beef. Roasted broccoli or asparagus works well too. For a full Halloween spread, serve alongside pumpkin soup or roasted sweet potato wedges. I always put out a bowl of extra black olives because someone always eats the eyes first.
Storage: Store leftover peppers in an airtight container in the refrigerator for up to 4 days. The peppers will soften further, and the cheese won’t be as stretchy, but the flavor actually improves as the spices meld. I’ve eaten these cold straight from the fridge and enjoyed them.
Reheating: The best way to reheat is in a 350°F oven for 10-15 minutes, covered with foil. The microwave works in a pinch (2 minutes on high), but the peppers will be softer and the cheese won’t be as nice. If using the microwave, place the pepper on a paper towel to absorb excess moisture. I don’t recommend freezing these — the peppers get mushy when thawed, and the cheese texture suffers. Make them fresh or eat leftovers within the week.
Make-Ahead Tip: You can prepare the filling up to 2 days in advance and store it in the fridge. Stuff the peppers and wrap with cheese just before baking. You can also prep the peppers (cleaned and de-seeded) a day ahead — just store them in a ziplock bag in the fridge. This makes Halloween night so much easier.
Nutritional Information & Benefits
Here’s the approximate nutritional breakdown for one stuffed pepper (using ground beef, white rice, and part-skim mozzarella). Values are estimates and will vary based on specific ingredients and portion sizes.
| Nutrient | Amount Per Serving |
|---|---|
| Calories | 385 |
| Protein | 28g |
| Fat | 18g |
| Saturated Fat | 8g |
| Carbohydrates | 24g |
| Fiber | 5g |
| Sugar | 8g |
| Sodium | 620mg |
| Vitamin C | 150% DV |
| Vitamin A | 35% DV |
| Calcium | 30% DV |
| Iron | 20% DV |
Health Benefits: Bell peppers are packed with vitamin C — one pepper provides more than a full day’s requirement. They’re also rich in antioxidants like beta-carotene and lutein. The protein from beef and cheese keeps you full, while the fiber from peppers and rice supports digestion. Using part-skim mozzarella reduces saturated fat without sacrificing flavor. This is a balanced meal with vegetables, protein, and complex carbohydrates. For a lower-sodium version, use no-salt-added diced tomatoes and reduce added salt.
Dietary Considerations: This recipe is naturally gluten-free (check your spice blends for cross-contamination). For dairy-free, use vegan mozzarella shreds — they won’t melt the same way, but they’ll still look like bandages. For a lower-calorie version, use ground turkey and reduce the cheese by half. This is not suitable for vegan diets without significant modifications.
I’m not a nutritionist, but I do pay attention to what goes into my family’s meals. These peppers feel indulgent without being heavy. That’s a win in my book.
Conclusion
These Spooky Mummy Stuffed Peppers are the Halloween dinner you didn’t know you needed. They’re fun enough for a party, simple enough for a weeknight, and delicious enough that everyone will ask for the recipe. Honestly, I’ve made them for non-Halloween dinners too — just skip the olive eyes and call them cheesy stuffed peppers. They’re that good.
What I love most about this recipe is how it brings people together. My niece still talks about “the night we made mummy peppers.” She’s twelve now and thinks she’s too cool for everything, but she still asks if we’re making them this year. That’s the kind of recipe this is — one that creates memories, not just meals.
I’d love to hear how yours turn out. Did your kids help with the olive eyes? Did you try a wild variation? Drop a comment below and let me know. And if you share a photo on Pinterest, tag me — I want to see your mummy creations. They might be cuter than mine, and that’s totally fine. Happy Halloween, and happy cooking!
Frequently Asked Questions
Can I make these Spooky Mummy Stuffed Peppers ahead of time?
Yes! Prepare the filling up to 2 days in advance and store it in the refrigerator. You can also clean and de-seed the peppers ahead of time. Stuff them and add the cheese wrappings just before baking. This makes Halloween night much less stressful.
Can I use different colored bell peppers?
Absolutely. Red, yellow, or orange peppers work great. They’re sweeter than green peppers, which some people prefer. Just note that the “mummy” look is less spooky with bright colors — they look more like festive mummies than creepy ones. Green is best for the full Halloween effect.
How do I keep the mozzarella from sliding off during baking?
Make sure the cheese strips are at room temperature before wrapping. Cold cheese doesn’t stick as well. Also, tuck the ends of the strips under the pepper or into the baking dish. If they’re still sliding, use a toothpick to secure them — just remind everyone before they eat.
Can I freeze these stuffed peppers?
I don’t recommend freezing them. The peppers become mushy when thawed, and the cheese texture changes significantly. They’re best made fresh or eaten within 4 days as leftovers. If you need to prep ahead, just make the filling and freeze that separately.
What can I use instead of rice in the filling?
Quinoa, cooked lentils, or riced cauliflower all work well. For a grain-free option, use finely chopped mushrooms or cooked sweet potato. Just adjust the moisture level — if using cauliflower, squeeze it dry first. If using sweet potato, mash it slightly before adding.
Pin This Recipe!
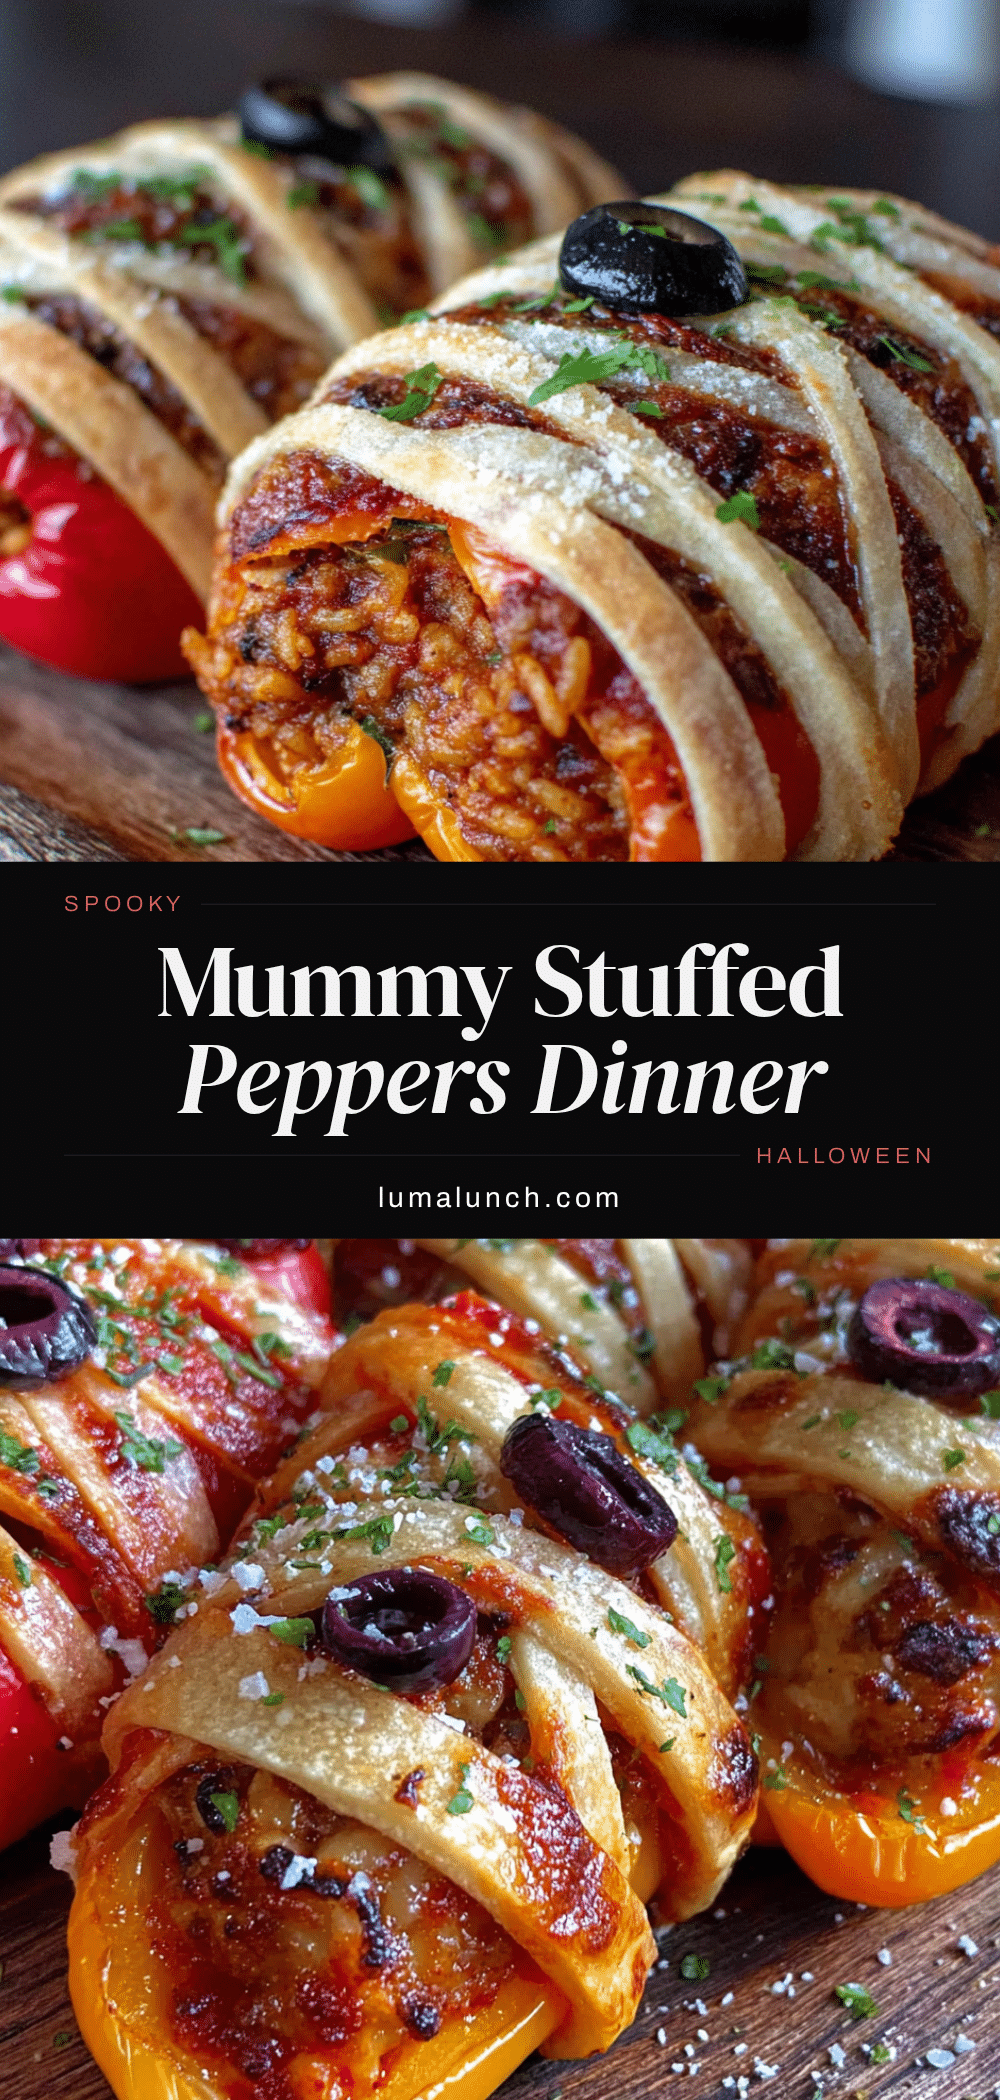
Spooky Mummy Stuffed Peppers: Best Halloween Dinner
These Spooky Mummy Stuffed Peppers are a fun and delicious Halloween dinner that kids and adults will love. Bell peppers are stuffed with a savory beef and rice filling, wrapped in mozzarella ‘bandages,’ and baked until tender and cheesy.
- Prep Time: 15 minutes
- Cook Time: 30 minutes
- Total Time: 45 minutes
- Yield: 4 servings 1x
- Category: Main Course
- Cuisine: American
Ingredients
- 4 large green bell peppers
- 1 lb ground beef (85/15)
- 1 cup cooked white rice
- 1 small yellow onion, finely diced
- 3 cloves garlic, minced
- 1 can (14.5 oz) diced tomatoes, drained
- 1 teaspoon ground cumin
- 1 teaspoon smoked paprika
- ½ teaspoon dried oregano
- Salt and black pepper to taste
- 8 ounces part-skim mozzarella cheese, sliced into thin strips
- 12–16 black olive slices
- 2 tablespoons olive oil
- Optional: ¼ cup shredded cheddar cheese
Instructions
- Preheat your oven to 375°F (190°C).
- Cook the rice if you don’t have leftovers. Bring 1 cup of water to a boil, add ½ cup uncooked rice, cover, reduce heat to low, and cook for 15 minutes. Fluff with a fork. You need 1 cup cooked.
- Prepare the peppers. Wash and dry 4 bell peppers. Using a sharp knife, slice the top off each pepper about ½ inch from the stem. Set the tops aside. Use a small spoon to scoop out the seeds and white membranes from inside each pepper. Rinse briefly to remove any stray seeds. Pat dry inside and out with a paper towel. Stand the peppers upright in your baking dish. If they wobble, slice a tiny sliver off the bottom to create a flat surface.
- Start the filling. Heat 2 tablespoons olive oil in a large skillet over medium heat. Add the diced onion and cook for 4-5 minutes until translucent and starting to brown at the edges. Add the minced garlic and cook for 30 seconds until fragrant.
- Brown the meat. Add the ground beef to the skillet. Break it up with a wooden spoon or spatula. Cook for 6-8 minutes, stirring occasionally, until no longer pink. If there’s excess fat, spoon most of it out, leaving about 1 tablespoon for flavor.
- Season and combine. Stir in the drained diced tomatoes, cooked rice, cumin, smoked paprika, oregano, salt, and pepper. If using cheddar cheese, stir it in now until melted. Cook for 2-3 minutes until everything is heated through and well combined. Taste and adjust seasoning.
- Stuff the peppers. Spoon the filling into each pepper, packing it gently but firmly. Leave about ¼ inch of space at the top for the cheese. Mound the filling slightly if needed.
- Create the mummy wrappings. Take your mozzarella strips and lay them across each pepper, crisscrossing to look like bandages. Leave small gaps for the eyes. Tuck the ends of the strips down into the dish so they don’t curl up while baking.
- Add the eyes. Press 2-3 black olive slices into the exposed gaps in the cheese on each pepper to create eyes. Push them gently into the filling so they stay put.
- Bake. Place the baking dish in the preheated oven and bake for 25-30 minutes. The peppers should be tender when pierced with a fork, and the cheese should be melted, bubbly, and starting to brown in spots. If you want darker, more toasted cheese, switch the oven to broil for the last 2 minutes.
- Rest and serve. Remove from the oven and let the peppers rest for 5 minutes. Use tongs to transfer each pepper to a plate. Spoon any extra filling from the dish alongside. Serve warm.
Notes
For softer peppers, blanch them in boiling water for 3 minutes before stuffing. Don’t skip draining the tomatoes to avoid a soupy filling. Use room-temperature cheese for even melting. Add olive eyes halfway through baking if you prefer them less dry. Leftovers can be stored in an airtight container in the refrigerator for up to 4 days. Reheat in a 350°F oven for 10-15 minutes.
Nutrition
- Serving Size: 1 stuffed pepper
- Calories: 385
- Sugar: 8
- Sodium: 620
- Fat: 18
- Saturated Fat: 8
- Carbohydrates: 24
- Fiber: 5
- Protein: 28
Keywords: Halloween dinner, stuffed peppers, mummy peppers, spooky dinner, kid-friendly, Halloween recipe


