Love this? Save it for later!
Share the inspiration with your friends
I wasn’t expecting baking advice from my plumber, but there I was, knee-deep in a kitchen renovation disaster, listening to Mario describe exactly how to make red velvet crinkle cookies. The man had just fixed a pipe that had sprayed water all over my pantry, and instead of handing me a bill, he handed me a recipe scribbled on the back of a receipt. “My wife makes these for Christmas,” he said, wiping his hands on his coveralls. “They disappear before the ham is even carved.” Honestly, I was skeptical. Red velvet was for cakes, right? Layer cakes with cream cheese frosting and fancy piping. Not cookies. But Mario was so earnest about it, and honestly, I needed a win that day. The kitchen was a mess, the floor was wet, and I had flour everywhere from a failed attempt at something else entirely.
So that evening, after the pipes were fixed and the chaos settled down, I found myself staring at that receipt. The instructions were minimal—just ingredients and a few scribbled notes. No oven temperature. No chilling time. Just a lot of trust. I figured, what did I have to lose? I mean, the guy fixed my sink in record time, so maybe his baking advice was solid too. I gathered the ingredients, made a few educated guesses on the missing details, and crossed my fingers.
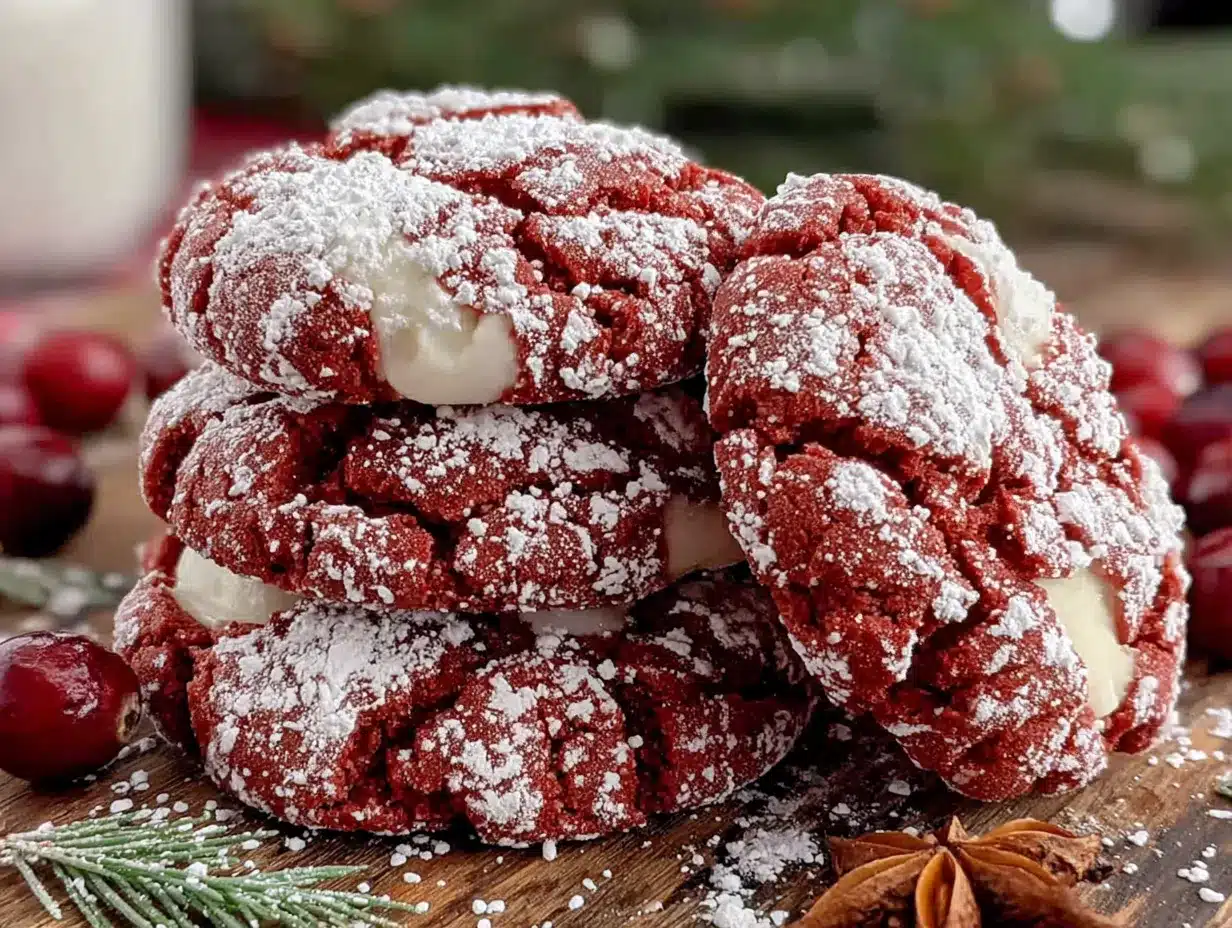
The first batch came out of the oven, and let me tell you—I actually laughed out loud. They were perfect. Crackled on top, soft in the middle, with that unmistakable red velvet color against the powdered sugar snow. I texted Mario a photo, and he replied with a single thumbs-up emoji. That was three years ago, and I haven’t stopped making them since. Maybe you’ve been there too—finding a recipe in the most unlikely place, from the most unlikely person, and realizing it’s exactly what you needed. These Perfect Red Velvet Crinkle Cookies are that recipe for me.
Why You’ll Love This Recipe
Let’s be real for a second. There are a million cookie recipes out there, and red velvet can be a tricky flavor to get right. Too much cocoa and it’s bitter, too little and it’s just red-colored sugar. But these crinkle cookies? They hit that sweet spot perfectly. After testing this recipe about a dozen times (and sending way too many cookies to my neighbors), I can confidently say this is the version you want.
- Quick & Easy: From start to finish, these cookies come together in about 45 minutes. Most of that is chilling time, so the actual hands-on work is minimal. Perfect for those last-minute cookie cravings or unexpected guests.
- Simple Ingredients: You probably have most of these in your kitchen right now. No weird extracts or hard-to-find specialty items. Just pantry staples that come together beautifully.
- Perfect for Holidays & Gifting: The red color with the snowy powdered sugar makes these cookies look like they belong on a Christmas cookie platter. But honestly, I make them year-round. Valentine’s Day, birthdays, Tuesday afternoons—they always fit the occasion.
- Crowd-Pleaser: I’ve brought these to potlucks, cookie swaps, and office parties, and they are always the first plate to empty. Kids love the color, adults love the flavor, and everyone loves the texture.
- Unbelievably Delicious: The edges are slightly crisp, the centers are soft and fudgy, and that classic red velvet flavor—subtle cocoa with a hint of tang—is absolutely perfect. It’s comfort food in cookie form.
What makes this recipe different from the rest? It’s the technique. Most red velvet crinkle cookies turn out cakey or dry, but this version uses a higher fat ratio and a specific chilling method that guarantees that soft, chewy texture every single time. I’ve tested it with different flours, different cocoa powders, and different chilling times. This is the Goldilocks version—everything is just right.
This recipe isn’t just good—it’s the kind that makes you close your eyes after the first bite. It’s nostalgic and new all at once, with the same soul-soothing satisfaction of a classic cookie but with a little extra flair.
What Ingredients You Will Need
This recipe uses simple, wholesome ingredients to deliver that perfect red velvet flavor and that signature crinkled texture. Most of these are pantry staples, so you might not even need a trip to the store.
For the Cookie Dough
- 1 ½ cups all-purpose flour (spooned and leveled—don’t scoop directly from the bag or you’ll pack it too tight)
- ¼ cup unsweetened cocoa powder (I prefer natural cocoa for this recipe, not Dutch-processed. It gives a better crinkle. Hershey’s works great, or try Guittard for a richer flavor)
- 1 teaspoon baking powder (make sure it’s fresh—test it by dropping a bit in hot water; if it fizzes, it’s good)
- ¼ teaspoon salt (fine sea salt or table salt, not coarse kosher)
- ½ cup unsalted butter, softened to room temperature (if you only have salted butter, just reduce the added salt to ⅛ teaspoon)
- ¾ cup granulated sugar (plus extra for rolling if needed)
- 1 large egg, room temperature (cold eggs don’t cream as well with the butter)
- 1 teaspoon vanilla extract (pure vanilla, not imitation—trust me on this one)
- 1 tablespoon milk (any kind works—dairy or plant-based)
- 1 tablespoon red gel food coloring (this is crucial—liquid food coloring won’t give you that vibrant red without making the dough too wet. I use Americolor Super Red or Wilton Red-Red)
- ½ teaspoon white vinegar (this is the secret ingredient—it reacts with the baking powder to create that tender crumb and helps set the red color)
For Rolling
- ½ cup powdered sugar (confectioners’ sugar—sift it first if it’s lumpy for the prettiest finish)
Ingredient Selection Tips: When choosing your cocoa powder, look for one that’s not too dark. Natural cocoa gives a slightly lighter color that contrasts beautifully with the red dough and white powdered sugar. For the food coloring, I cannot stress this enough—use gel. I learned this the hard way when I tried liquid coloring and ended up with pink-ish brown dough that tasted like chemicals. Gel gives you that rich, bakery-style red without messing with the dough consistency.
Substitution Guidance: If you need a gluten-free option, swap the all-purpose flour for a 1:1 gluten-free baking flour blend (I like King Arthur’s Measure for Measure). For a dairy-free version, use plant-based butter and your favorite non-dairy milk. The texture will be slightly different, but still delicious. And if you’re out of white vinegar, you can use apple cider vinegar in a pinch—just know it might add a tiny hint of flavor.
Equipment Needed
You don’t need a fancy bakery setup for these cookies. Here’s what you’ll actually use:
- Mixing bowls: One medium bowl for dry ingredients, one large bowl for wet ingredients. I use glass or stainless steel—both work fine.
- Hand mixer or stand mixer: A hand mixer is perfectly fine. If you’re using a stand mixer, use the paddle attachment. You can also do this by hand with a wooden spoon if you’re feeling old-school and need a little arm workout.
- Rubber spatula: For scraping down the bowl and folding in the dry ingredients. A silicone one is best—it won’t scratch your bowls.
- Baking sheets: I use light-colored aluminum baking sheets. Dark sheets can cause the bottoms to brown too quickly.
- Parchment paper or silicone baking mat: Parchment paper is my go-to. It prevents sticking and makes cleanup a breeze. Silicone mats work too, but cookies might spread a tiny bit more.
- Cookie scoop: A 1.5-tablespoon scoop (about the size of a walnut) gives you evenly sized cookies. If you don’t have one, just use a regular spoon and try to keep them consistent.
- Cooling rack: Essential for letting the cookies cool properly. If you leave them on the hot baking sheet, they’ll continue to cook and might over-bake.
- Small bowl for powdered sugar: For rolling the dough balls. Trust me, you want a dedicated bowl for this—it gets messy.
Budget-Friendly Options: Don’t have a cookie scoop? No problem. Two spoons work just fine. No hand mixer? A whisk and some elbow grease will do the job—just make sure your butter is really soft. And if you don’t have parchment paper, you can lightly grease the baking sheet, though the cookies might spread a bit more.
Preparation Method
Alright, let’s make some cookies. I’ve broken this down step by step so you can follow along without any guesswork. Take your time with each step—rushing is the number one reason cookies don’t turn out right.
- Preheat your oven to 350°F (175°C). Line two baking sheets with parchment paper. I like to do this at the very beginning so the oven is fully heated by the time I’m ready to bake. Ovens can be liars—use an oven thermometer if you have one. I learned this after burning three batches of cookies in an oven that ran 25 degrees hot.
- Whisk the dry ingredients together. In a medium bowl, whisk together 1 ½ cups all-purpose flour, ¼ cup unsweetened cocoa powder, 1 teaspoon baking powder, and ¼ teaspoon salt. Whisk for about 20 seconds to make sure everything is evenly distributed. Set this aside for now.
- Cream the butter and sugar. In a large bowl, beat ½ cup softened unsalted butter with ¾ cup granulated sugar until light and fluffy. This should take about 2-3 minutes with a hand mixer on medium speed. You’re looking for a pale, creamy texture. Scrape down the sides of the bowl halfway through. Don’t rush this step—proper creaming incorporates air that helps the cookies rise.
- Add the wet ingredients. Beat in 1 large egg, 1 teaspoon vanilla extract, and 1 tablespoon milk until well combined. The mixture might look a little curdled at this point—that’s totally normal. Don’t panic.
- Add the red food coloring and vinegar. Add 1 tablespoon red gel food coloring and ½ teaspoon white vinegar. Mix on low speed until the color is evenly distributed. The dough should be a vibrant, deep red. If it looks more pink than red, add another ½ teaspoon of coloring. I’ve had batches where the color looked perfect in the bowl but baked up a little dull—so don’t be shy with the gel.
- Fold in the dry ingredients. Add the flour mixture to the wet ingredients in two additions, mixing on low speed just until combined. Use a rubber spatula to scrape the bottom of the bowl—sometimes flour hides down there. The dough will be soft and slightly sticky. That’s exactly what you want.
- Chill the dough. Cover the bowl with plastic wrap and refrigerate for at least 30 minutes. This is non-negotiable. Chilling firms up the butter, which prevents the cookies from spreading too much in the oven. It also allows the flavors to meld together. I’ve tested this with 15 minutes of chilling versus 45 minutes, and the difference is dramatic. Chilled dough gives you that perfect crinkle top.
- Prepare the powdered sugar. While the dough chills, place ½ cup powdered sugar in a small bowl. Sift it if it’s clumpy—nobody wants lumps of sugar on their cookies.
- Shape and coat the cookies. Using a cookie scoop or spoon, portion out about 1.5 tablespoons of dough. Roll each portion into a smooth ball. Then roll each ball generously in the powdered sugar, making sure it’s completely coated. Don’t be shy here—the sugar creates that beautiful crinkled crust as the cookies bake. Place the coated dough balls on the prepared baking sheets, spacing them about 2 inches apart.
- Bake. Bake for 10-12 minutes. The cookies should look puffed and cracked on top, and the edges should be set but not browned. The centers will look slightly underdone—that’s good. They’ll continue to set as they cool. I usually check at the 10-minute mark and go from there. Every oven is different, so trust your eyes more than the timer.
- Cool. Let the cookies cool on the baking sheet for 5 minutes. This allows them to firm up enough to transfer without breaking. Then move them to a wire cooling rack to cool completely. The crinkles will become more pronounced as they cool.
Sensory Cues: When you take the cookies out of the oven, you should see distinct cracks across the top with the red dough peeking through the white sugar. The cookies will look puffy and soft. If you gently touch the edge, it should feel set but not hard. The smell—oh, the smell. It’s chocolatey and sweet with a hint of that tangy red velvet undertone. It’s the kind of smell that makes people wander into the kitchen asking what you’re baking.
Personal Tip: I like to bake one test cookie first to check the spread and crinkle. If it spreads too much, I chill the dough for another 15 minutes. If it doesn’t spread enough, I let the dough sit at room temperature for 5 minutes before baking the rest. It’s a small step that saves you from ruining a whole batch.
Cooking Tips & Techniques
After making these cookies more times than I can count, I’ve collected a few hard-won lessons. Let me save you some trouble.
The Chilling Secret: I cannot overstate how important chilling is. The first time I made these, I was impatient and skipped the chilling step. The cookies spread into flat, ugly discs with barely any crinkle. They still tasted okay, but they looked nothing like the photos. Now I chill for at least 30 minutes, and sometimes I’ll even chill the shaped dough balls on the baking sheet for 10 minutes before they go in the oven. That extra step guarantees the perfect crinkle every time.
The Powdered Sugar Coating: Here’s something I learned the hard way—roll the dough balls twice in powdered sugar. Roll them once, then roll them again. The first layer absorbs into the dough slightly, and the second layer stays on the surface, creating that beautiful snowy crust. Also, make sure the dough balls are smooth before coating. Any bumps or cracks will cause the sugar to clump in those spots.
Don’t Overbake: This is the most common mistake with crinkle cookies. People see the cracks forming and think the cookies are done, but they pull them out too early. Or they wait until the edges start browning and pull them out too late. The sweet spot is when the edges are set and the tops are cracked, but the centers still look slightly soft and underdone. The cookies will continue to bake on the hot baking sheet after you take them out. Trust the process.
Room Temperature Ingredients Matter: I know, I know—every recipe says this. But it really matters here. Cold butter won’t cream properly with the sugar, which means less air in the dough and denser cookies. Cold egg can cause the butter to seize up. Take the time to let everything come to room temperature. Set your butter and egg out about 30 minutes before you start baking.
My Biggest Failure: I once tried to double the batch and used liquid food coloring instead of gel because that’s all I had. The dough turned into a sticky, reddish-brown mess that wouldn’t hold its shape. The cookies spread into puddles and the color was more “rust” than “red velvet.” I had to throw the whole batch away. Learn from my mistakes—gel coloring only, and don’t try to double the recipe without adjusting the flour ratio.
Variations & Adaptations
One of the best things about this recipe is how adaptable it is. Here are some variations I’ve tried and loved:
Classic Cream Cheese Filling
For an extra-special treat, make a cream cheese filling. Beat 4 oz softened cream cheese with 2 tablespoons powdered sugar and ½ teaspoon vanilla. Freeze small dollops on a parchment-lined tray, then wrap each dollop in a portion of red velvet dough before rolling in powdered sugar. Bake as directed. The cream cheese center stays soft and tangy—it’s like a red velvet cupcake in cookie form.
White Chocolate Chunk Version
Fold in ½ cup white chocolate chips or chunks after combining the dry and wet ingredients. The white chocolate adds little pockets of sweetness that complement the subtle cocoa flavor perfectly. I made these for a cookie swap last December and they were the first to disappear.
Gluten-Free Adaptation
Substitute the all-purpose flour with a 1:1 gluten-free baking flour blend. I’ve tested this with King Arthur’s Measure for Measure and Bob’s Red Mill 1:1, and both work well. The texture is slightly more tender and a little less chewy, but the crinkle effect still works beautifully. Add an extra tablespoon of milk to compensate for the drier gluten-free flour.
Vegan Version
Use plant-based butter (I like Miyoko’s or Country Crock Plant Butter) and a flax egg (1 tablespoon ground flaxseed mixed with 3 tablespoons water, let sit for 5 minutes). Use your favorite non-dairy milk. The texture is a bit more delicate, so handle the dough gently and chill for a full 45 minutes. The crinkle might be slightly less pronounced, but the flavor is still spot-on.
Peppermint Red Velvet
Add ½ teaspoon peppermint extract along with the vanilla. Crush a few candy canes and sprinkle the tops of the cookies right after baking. This is my favorite holiday variation—the peppermint adds a cool freshness that pairs beautifully with the chocolatey red velvet base.
Serving & Storage Suggestions
These cookies are best served at room temperature, straight from the cooling rack. The contrast between the slightly crisp exterior and the soft, fudgy interior is at its peak within the first few hours. If you’re serving them for a party or holiday gathering, arrange them on a platter with a light dusting of extra powdered sugar for that snowy effect.
What to Serve With Them: A cold glass of milk is the classic pairing, and for good reason—it cuts through the sweetness perfectly. For a grown-up twist, try them with a cup of coffee or a glass of cold brew. The slight bitterness of the coffee balances the cocoa and sugar. If you’re feeling fancy, serve them alongside a scoop of vanilla bean ice cream for an easy dessert that looks impressive.
Storage Instructions: Store the cookies in an airtight container at room temperature for up to 5 days. Place a piece of bread in the container to keep them soft—the bread absorbs excess air and releases moisture. Replace the bread every other day. I learned this trick from my grandmother, and it works like magic.
Freezer Instructions: These cookies freeze beautifully. Place cooled cookies in a single layer in a freezer-safe container or zip-top bag, separating layers with parchment paper. They’ll keep for up to 3 months. To thaw, let them sit at room temperature for about 30 minutes. You can also freeze the unbaked dough balls—roll them in powdered sugar, place them on a baking sheet, freeze until solid, then transfer to a freezer bag. Bake directly from frozen, adding 2-3 minutes to the baking time.
Reheating Tips: If you want that just-baked texture back, pop a cookie in the microwave for 10-15 seconds. It softens the center and makes it taste fresh out of the oven. For a crisper edge, reheat in a 300°F oven for 3-4 minutes.
Flavor Development: Here’s something interesting—these cookies actually taste better the next day. The flavors meld together overnight, and the texture evens out. So if you’re planning for a party, bake them a day ahead. Just store them properly and dust with a little extra powdered sugar before serving.
Nutritional Information & Benefits
Let’s be honest—these are cookies, not health food. But knowing what’s in them can help you enjoy them mindfully. Here’s the approximate nutritional breakdown per cookie (based on 24 cookies):
- Calories: 115
- Total Fat: 5g
- Saturated Fat: 3g
- Cholesterol: 20mg
- Sodium: 55mg
- Total Carbohydrates: 17g
- Dietary Fiber: 0.5g
- Sugars: 11g
- Protein: 1.5g
Health Benefits of Key Ingredients: Cocoa powder is actually a good source of antioxidants called flavonoids, which can help reduce inflammation and support heart health. The butter provides vitamin A and healthy fats, while the egg adds a small amount of protein. The powdered sugar? Well, it makes you happy, and that counts for something.
Dietary Considerations: This recipe contains gluten, dairy, and eggs. For gluten-free and vegan alternatives, check the variations section above. These cookies are nut-free as written, making them a safe option for school bake sales or parties where nut allergies are a concern. They are not low-carb or keto-friendly due to the sugar content.
Potential Allergens: Wheat (gluten), dairy (butter, milk), eggs. Always check your specific ingredient labels if cooking for someone with allergies.
Personal Perspective: I believe in balance. These cookies are a treat, something to enjoy on special occasions or when you need a little pick-me-up. I don’t stress about the sugar content when I’m sharing them with loved ones. Food is about connection and joy, and sometimes that joy comes in the form of a perfectly crinkled red velvet cookie. And that’s okay.
Conclusion
These Perfect Red Velvet Crinkle Cookies have become a staple in my kitchen, and I hope they become one in yours too. They’re the kind of cookie that makes people stop mid-conversation to say, “Wait, what did you put in these?” They’re simple enough for a Tuesday afternoon baking session but special enough for holiday platters and cookie swaps.
What I love most about this recipe is how forgiving it is. Even if your first batch isn’t picture-perfect, they’ll still taste incredible. And honestly, that’s the beauty of baking at home—it doesn’t have to be perfect to be wonderful. So roll up your sleeves, get a little powdered sugar on your counter, and make these cookies. Your kitchen will smell amazing, your friends and family will thank you, and you’ll have a new go-to recipe in your collection.
I’d love to hear how these turn out for you! Drop a comment below and let me know if you tried any of the variations or came up with your own twist. Did you add white chocolate? Go the vegan route? Bake them for a holiday party? Share your stories—I read every single comment, and your feedback helps me create better recipes for all of us. Happy baking, friends!
Frequently Asked Questions
Why did my red velvet crinkle cookies not crack?
This usually happens when the dough isn’t chilled enough or when it’s too dry. Make sure you chill the dough for at least 30 minutes, and don’t overmix the flour—overmixing develops gluten and makes the dough tough, which prevents cracking. Also, check that your baking powder is fresh. Expired baking powder won’t give you the rise needed for those beautiful cracks.
Can I use liquid food coloring instead of gel?
I really don’t recommend it. Liquid food coloring adds extra moisture to the dough, which can throw off the texture and cause the cookies to spread too much. It also takes a lot more liquid coloring to achieve that deep red shade, which can make the dough sticky and hard to work with. Gel food coloring is concentrated, so you get vibrant color without altering the dough consistency.
How do I keep the powdered sugar from dissolving into the dough?
The key is to roll the dough balls in powdered sugar right before baking, not ahead of time. If the coated dough balls sit too long, the sugar will absorb moisture from the dough and disappear. Also, roll them generously—a thick coating ensures you’ll still have visible white sugar after baking. Rolling twice, as I mentioned in the tips section, really helps.
Can I make the dough ahead of time?
Absolutely! You can prepare the dough up to 3 days in advance and keep it covered in the refrigerator. When you’re ready to bake, let the dough sit at room temperature for about 10 minutes to soften slightly, then roll into balls and coat with powdered sugar. You can also freeze the shaped, unbaked dough balls for up to 3 months—just bake directly from frozen, adding a couple of minutes to the baking time.
Why are my cookies spreading too much?
This is almost always a chilling issue. If the dough is too warm when it goes into the oven, the butter melts too quickly and the cookies spread into flat discs. Pop the shaped dough balls back in the fridge for 15-20 minutes before baking. Also, make sure your butter was properly softened (not melted) and that you measured your flour correctly—too little flour can also cause excess spreading.
Pin This Recipe!

Perfect Red Velvet Crinkle Cookies: Easy Homemade Recipe
These Perfect Red Velvet Crinkle Cookies are soft, fudgy, and beautifully crackled with a snowy powdered sugar coating. An easy, crowd-pleasing recipe that’s perfect for holidays, gifting, or any occasion.
- Prep Time: 15 minutes
- Cook Time: 12 minutes
- Total Time: 45 minutes
- Yield: 24 servings 1x
- Category: Dessert
- Cuisine: American
Ingredients
- 1 ½ cups all-purpose flour (spooned and leveled)
- ¼ cup unsweetened cocoa powder (natural, not Dutch-processed)
- 1 teaspoon baking powder
- ¼ teaspoon fine sea salt or table salt
- ½ cup unsalted butter, softened to room temperature
- ¾ cup granulated sugar
- 1 large egg, room temperature
- 1 teaspoon pure vanilla extract
- 1 tablespoon milk (any kind)
- 1 tablespoon red gel food coloring (e.g., Americolor Super Red or Wilton Red-Red)
- ½ teaspoon white vinegar
- ½ cup powdered sugar (confectioners’ sugar), sifted if lumpy
Instructions
- Preheat your oven to 350°F (175°C). Line two baking sheets with parchment paper.
- In a medium bowl, whisk together 1 ½ cups all-purpose flour, ¼ cup unsweetened cocoa powder, 1 teaspoon baking powder, and ¼ teaspoon salt. Whisk for about 20 seconds to evenly distribute. Set aside.
- In a large bowl, beat ½ cup softened unsalted butter with ¾ cup granulated sugar until light and fluffy, about 2-3 minutes on medium speed. Scrape down the sides halfway through.
- Beat in 1 large egg, 1 teaspoon vanilla extract, and 1 tablespoon milk until well combined. The mixture may look slightly curdled—this is normal.
- Add 1 tablespoon red gel food coloring and ½ teaspoon white vinegar. Mix on low speed until the color is evenly distributed and vibrant red.
- Add the flour mixture to the wet ingredients in two additions, mixing on low speed just until combined. Use a rubber spatula to scrape the bottom of the bowl. The dough will be soft and slightly sticky.
- Cover the bowl with plastic wrap and refrigerate for at least 30 minutes. This is essential for the perfect crinkle texture.
- While the dough chills, place ½ cup powdered sugar in a small bowl. Sift if clumpy.
- Using a cookie scoop or spoon, portion out about 1.5 tablespoons of dough. Roll each portion into a smooth ball. Roll each ball generously in the powdered sugar, coating completely. For best results, roll twice.
- Place the coated dough balls on the prepared baking sheets, spacing them about 2 inches apart.
- Bake for 10-12 minutes. The cookies should look puffed and cracked on top, with edges set but not browned. Centers will look slightly underdone.
- Let the cookies cool on the baking sheet for 5 minutes, then transfer to a wire cooling rack to cool completely. The crinkles will become more pronounced as they cool.
Notes
Chill the dough for at least 30 minutes—this is non-negotiable for the perfect crinkle. Roll dough balls twice in powdered sugar for a snowy crust. Don’t overbake; cookies continue to set as they cool. Use gel food coloring, not liquid, for vibrant color without altering dough consistency. For best flavor, bake a day ahead and store in an airtight container.
Nutrition
- Serving Size: 1 cookie
- Calories: 115
- Sugar: 11
- Sodium: 55
- Fat: 5
- Saturated Fat: 3
- Carbohydrates: 17
- Fiber: 0.5
- Protein: 1.5
Keywords: red velvet crinkle cookies, red velvet cookies, crinkle cookies, Christmas cookies, easy cookie recipe, homemade cookies, soft cookies


