Love this? Save it for later!
Share the inspiration with your friends
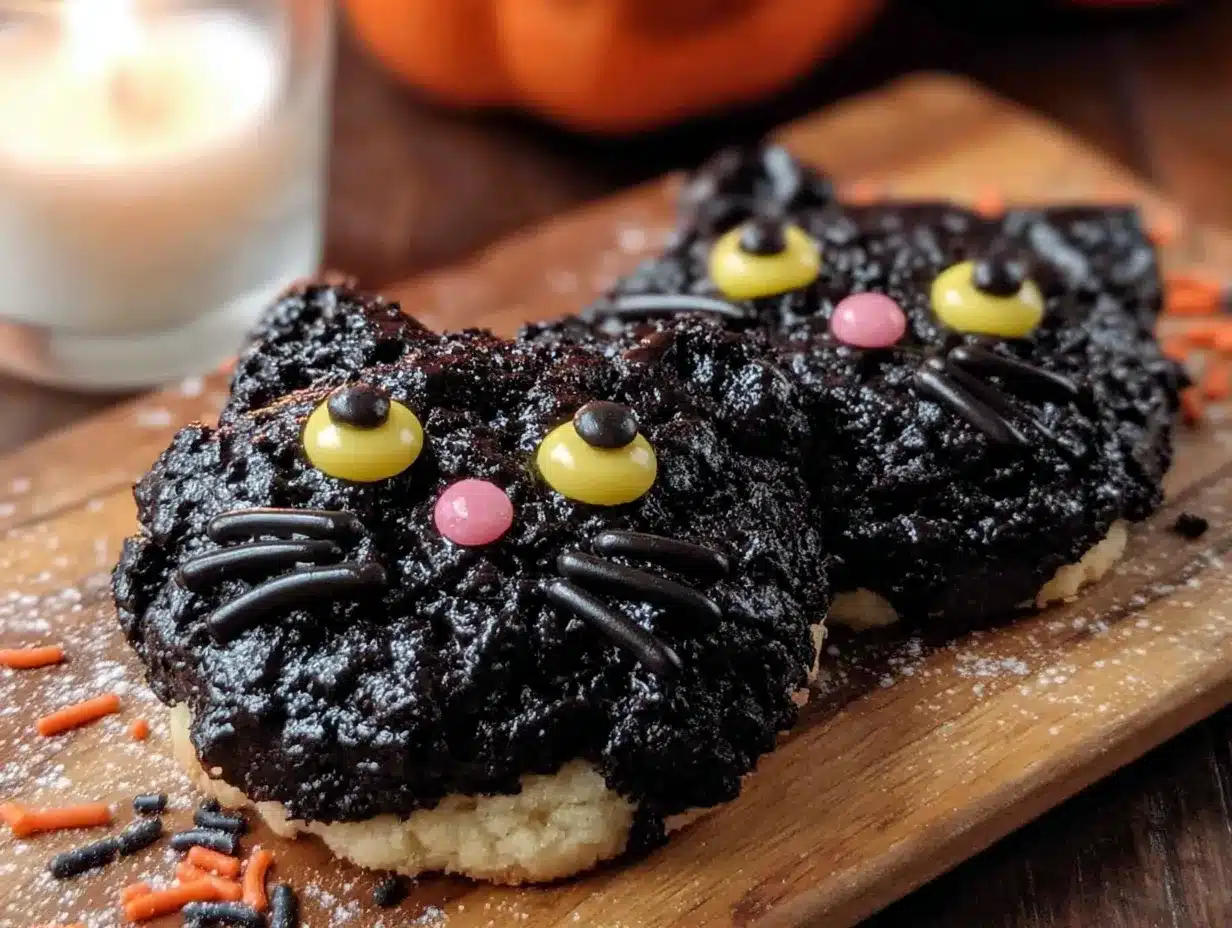
There used to be a tiny bakery tucked between a laundromat and a nail salon on the edge of town that made the most ridiculous black cat sugar cookies I’d ever seen. When they closed their doors three years ago—just a handwritten sign in the window saying “Thanks for the memories”—I honestly felt a little lost. Those cookies had become my unofficial Halloween tradition. I’d stop by every October 1st, grab a half dozen, and savor them all month long. After about twelve attempts—some that looked more like sad blobs than cats, let me tell you—I finally cracked the code.
The secret wasn’t in some fancy technique or expensive ingredient. It was simpler than that. It was about getting the dough just right so the cookies held their shape, and figuring out the perfect consistency for the black royal icing so it didn’t run off the edges like a melting shadow. The first time I pulled a tray out of the oven and saw those little cat faces staring back at me, perfectly intact, I actually squealed. My neighbor probably thought I’d lost my mind, but I didn’t care.
These adorable black cat sugar cookies are now my go-to Halloween treat, and I’m pretty sure they’ll become yours too. They’re crisp, buttery, and just sweet enough without being overwhelming. Plus, they’re surprisingly forgiving once you know a few tricks. Maybe you’ve been there—staring at a Pinterest-perfect cookie and wondering how on earth anyone gets those sharp edges and smooth icing. I’ve been there too. That’s exactly why I’m sharing every little detail I learned along the way.
Why You’ll Love This Recipe
Let me tell you why these cookies have earned a permanent spot in my Halloween rotation. Honestly, they check every box I look for in a holiday treat.
- Simple Ingredients: You probably have most of these in your pantry right now. No hunting down obscure extracts or special flours.
- Holds Its Shape: This dough doesn’t spread into a puddle in the oven. Your cats will actually look like cats.
- Kid-Friendly Fun: My niece helped me decorate a batch last weekend, and she had an absolute blast. The mess was worth every giggle.
- Make-Ahead Magic: The dough freezes beautifully, so you can prep weeks before Halloween and bake fresh when you’re ready.
- Completely Customizable: Once you nail the base, you can switch up the faces, add little details, or even change the color for other holidays.
What makes these different from every other sugar cookie recipe out there? It’s the texture, honestly. They’re sturdy enough to hold royal icing without crumbling, but they still have that melt-in-your-mouth quality that makes you reach for another one. I tested this dough six times to get the flour-to-butter ratio exactly right. The result? A cookie that’s crisp on the edges, tender in the middle, and absolutely perfect for decorating.
These aren’t just cookies—they’re the kind that make people stop and say, “Wait, you made these?” And that feeling never gets old.
What Ingredients You Will Need
This recipe uses straightforward ingredients, but a few specifics make a real difference in the final result. I’ve learned through trial and error that the quality of your butter and the type of flour you use can make or break a sugar cookie.
For the Sugar Cookie Dough
- Unsalted butter, softened (1 cup / 226g) — I always use unsalted so I can control the salt level. Let it sit out for about an hour until it’s soft but not greasy.
- Granulated sugar (1 cup / 200g) — Regular white sugar works perfectly here. No need for anything fancy.
- Large egg (1, room temperature) — Cold eggs can make the dough seize up. Just leave it on the counter while the butter softens.
- Vanilla extract (2 teaspoons) — Pure vanilla makes a difference, but imitation works fine if that’s what you have.
- All-purpose flour (2 ½ cups / 312g) — Spoon and level your flour. Scooping directly from the bag packs it down and gives you too much.
- Baking powder (1 teaspoon) — This gives the cookies just a tiny bit of lift without spreading.
- Salt (½ teaspoon) — Don’t skip this. It balances the sweetness.
- Black food coloring gel (1-2 teaspoons) — Gel coloring is crucial here. Liquid drops will mess up your dough consistency. I prefer the Americolor brand for a deep, true black.
For the Royal Icing
- Powdered sugar (2 cups / 240g) — Sift it first to avoid lumps. Trust me on this one.
- Meringue powder (2 tablespoons) — This gives the icing that smooth, hard finish. You can find it at most craft stores or online.
- Warm water (3-4 tablespoons) — Add slowly. You can always add more, but you can’t take it out.
- Black food coloring gel (1-2 teaspoons) — Same brand as above for consistency.
- White decorating icing (for eyes and whiskers) — A small tube works wonders for details.
One thing I want to mention about the black food coloring—it takes more than you think to get a true black. Don’t be shy with it. And yes, your dough will look a little alarming before it’s baked, but that’s exactly what you want.
If you’re looking for a gluten-free option, I’ve had good results swapping the all-purpose flour with a 1:1 gluten-free baking blend. The texture is slightly more delicate, but the flavor is still spot on.
Equipment Needed
You don’t need a professional bakery setup for these cookies, but a few specific tools will make your life much easier.
- Stand mixer or hand mixer — Creaming the butter and sugar by hand is possible, but your arm will hate you. I use my KitchenAid for this.
- Cat-shaped cookie cutter — I found mine on Amazon for about eight dollars. Look for one with a simple silhouette—too many details in the cutter can make the dough hard to release.
- Baking sheets — Light-colored metal sheets work best. Dark sheets can over-brown the bottoms.
- Parchment paper or silicone baking mat — Non-negotiable for preventing sticking and ensuring even baking.
- Rolling pin with thickness guides — Those little rings that slip onto the ends of your rolling pin? Game changer. They guarantee even thickness every time.
- Piping bags or squeeze bottles — For the royal icing. Squeeze bottles are actually easier for beginners, believe it or not.
- Small offset spatula — Great for transferring raw cookies to the baking sheet without distorting their shape.
- Cooling rack — Air circulation underneath prevents soggy bottoms.
If you don’t have a cat cutter, a simple round cutter works too—just pipe little ears on with the icing. I’ve done that in a pinch, and they still turned out adorable.
Preparation Method
Alright, let’s get into the actual process. I’ve broken this down into clear steps so nothing catches you off guard.
Step 1: Make the Dough
In your stand mixer fitted with the paddle attachment, beat the softened butter and granulated sugar together on medium speed until light and fluffy. This takes about 3 minutes. You’re looking for a pale yellow color and a texture that feels like soft sand. Scrape down the sides of the bowl halfway through.
Add the egg and vanilla extract, then beat on low until just combined. Don’t overmix here—you don’t want to incorporate too much air. In a separate bowl, whisk together the flour, baking powder, and salt. Gradually add the dry ingredients to the wet mixture, mixing on low speed. Stop as soon as the dough comes together. It should look crumbly at first, then form a cohesive ball.
Now for the color. Add your black food coloring gel and mix on low until the color is evenly distributed. You might need to stop and scrape the bowl a few times. The dough will look like grayish-black at first, but it deepens as you mix. If it’s not dark enough, add more gel a little at a time.
Step 2: Chill the Dough
Divide the dough into two discs, wrap each tightly in plastic wrap, and refrigerate for at least 2 hours. I know it’s tempting to skip this, but don’t. Chilling solidifies the butter, which prevents the cookies from spreading in the oven. Overnight is even better if you have the time.
Step 3: Roll and Cut
Preheat your oven to 350°F (175°C) and line your baking sheets with parchment paper. Take one disc of dough out of the fridge and let it sit for about 5 minutes—it’ll be too hard to roll right away. Lightly flour your work surface and rolling pin, then roll the dough to about ¼-inch thickness. Those thickness guide rings really come in handy here.
Dip your cat cookie cutter in flour before each cut to prevent sticking. Press straight down and lift straight up—no twisting. Twisting seals the edges and ruins the shape. Use your offset spatula to transfer the cut cookies to the prepared baking sheet, spacing them about 2 inches apart.
Step 4: Bake
Bake for 8-10 minutes, rotating the sheet halfway through. The cookies should look set around the edges but not browned—remember, they’re black, so you can’t rely on color to tell doneness. The bottoms should be just barely golden when you lift one with a spatula. Let them cool on the baking sheet for 5 minutes, then transfer to a cooling rack to cool completely. This is critical—if you try to ice them while they’re warm, the icing will melt right off.
Step 5: Make the Royal Icing
In a clean bowl, combine the powdered sugar and meringue powder. Add 3 tablespoons of warm water and beat on low speed until combined. Increase to medium-high and beat for about 5 minutes until the icing is glossy and holds stiff peaks. Add the black food coloring gel and mix until uniform. If the icing is too thick, add water a teaspoon at a time. If it’s too thin, add more powdered sugar. The consistency should be like thick glue—it should hold its shape for a few seconds before slowly settling.
Step 6: Decorate
Transfer the icing to a piping bag or squeeze bottle. Outline each cookie first, then fill in the center. Use a toothpick to spread the icing into corners and pop any air bubbles. Let the base icing dry for at least 2 hours before adding details. Once it’s set, use white decorating icing to pipe little eyes and whiskers. I like to make the eyes two tiny dots and the whiskers three thin lines on each side. A little pink or green dot in the center of each eye adds extra personality.
Cooking Tips & Techniques
I’ve made plenty of mistakes with these cookies, so let me save you some trouble.
Don’t overwork the dough. The more you handle it, the tougher the cookies get. Mix until just combined, and handle the scraps gently when you reroll them. Speaking of scraps—you can only reroll the dough once or twice before it gets tough. After that, bake the scraps as is and use them for cookie crumbs.
Chill, chill, chill. If your dough gets sticky while you’re cutting shapes, pop it back in the fridge for 15 minutes. I keep a second baking sheet in the freezer and slide my cut cookies onto it before baking. Cold cookies bake up cleaner.
Watch the baking time like a hawk. Since black cookies don’t show browning, it’s easy to overbake them. Set a timer for 8 minutes and check. If they’re not done, give them 2 more minutes max. They’ll continue to set on the hot baking sheet after you pull them out.
Royal icing patience. The first time I made royal icing, I got impatient and added details before the base layer dried. Everything ran together, and my cats looked like they’d been caught in a rainstorm. Give it a full 2 hours, or even overnight if you can wait.
Consistency is queen. Test your icing consistency before piping. Dip a toothpick in—the icing should slowly drizzle off in a continuous ribbon. If it breaks into drops, it’s too thick. If it runs off like water, it’s too thin.
Variations & Adaptations
Once you’ve mastered the basic black cat, the possibilities are endless.
Pumpkin Spice Version: Add 1 teaspoon of pumpkin pie spice to the flour mixture and swap the vanilla for maple extract. The warm spices pair beautifully with the black icing—it’s like fall in cookie form.
Gluten-Free Adaptation: Use a 1:1 gluten-free baking blend that contains xanthan gum. I’ve tested this with Bob’s Red Mill, and the cookies came out slightly more delicate but still delicious. Chill the dough for an extra 30 minutes since gluten-free dough tends to be softer.
Vegan Option: Substitute the butter with a high-quality vegan butter stick (not the spreadable kind) and use a flax egg (1 tablespoon ground flaxseed mixed with 3 tablespoons water, let sit for 5 minutes). For the royal icing, use aquafaba—the liquid from a can of chickpeas—instead of meringue powder. Whip it until frothy before adding the powdered sugar.
Mini Cat Bites: Use a smaller cutter to make bite-sized cookies. Reduce baking time to 6-7 minutes. These are perfect for Halloween party platters.
Color Swap: Skip the black coloring and make orange cats for fall, white ghosts for Halloween, or green monsters for a spooky twist. The base cookie works with any color.
I once made a batch with orange icing and little green eyes for a friend’s Halloween party. They were gone within 20 minutes. People couldn’t stop talking about them.
Serving & Storage Suggestions
These cookies are best served at room temperature, ideally within 24 hours of decorating. The royal icing needs that time to fully harden, but after that, they’re perfect for snacking.
For a Halloween party spread, arrange them on a platter with other spooky treats—think ghost meringues, pumpkin cupcakes, and candy corn. They also look incredible arranged in a clear jar tied with a black ribbon. I gave a jar to my mail carrier last year, and she said it made her whole week.
Storage: Keep the cookies in an airtight container at room temperature for up to 2 weeks. Layer them between sheets of parchment paper to prevent the icing from sticking. Don’t refrigerate them—the humidity can make the icing tacky.
Freezing: You can freeze the baked, undecorated cookies for up to 3 months. Just wrap them tightly in plastic wrap and then foil. Thaw at room temperature before icing. The dough itself freezes beautifully for up to 3 months too. Wrap it well, and when you’re ready, thaw overnight in the fridge before rolling and cutting.
One thing I love about these cookies is that the flavors actually meld together over a few days. The vanilla becomes more pronounced, and the cookie softens just slightly. Honestly, they’re even better on day three.
Nutritional Information & Benefits
Let’s be real—these are a treat, not a health food. But here’s the breakdown per cookie (based on a standard 3-inch cat shape):
- Calories: 185
- Fat: 8g
- Carbohydrates: 27g
- Sugar: 16g
- Protein: 2g
That said, there are a few bright spots. The butter provides a small amount of vitamin A, and if you use pure vanilla extract, you’re getting trace amounts of antioxidants. The meringue powder in the icing adds a tiny bit of protein. But honestly? These are about joy, not nutrition.
If you’re watching your sugar intake, you can reduce the sugar in the dough by a quarter cup without affecting the texture too much. Just know the cookies won’t be as sweet. For a lower-carb option, try a sugar substitute like Swerve in the dough, though I haven’t tested this with the royal icing.
These cookies are not suitable for anyone with egg or dairy allergies unless you use the vegan adaptations I mentioned earlier. The royal icing contains meringue powder, which is made from egg whites, so keep that in mind.
Conclusion
These adorable black cat sugar cookies have become more than just a Halloween treat in my house—they’re a tradition. Every year, I pull out that cat cutter, crank up some spooky music, and spend an afternoon making little faces come to life. There’s something deeply satisfying about seeing a tray of perfect cats come out of the oven, each one ready for its own personality.
I hope you give these a try, whether you’re a seasoned cookie decorator or a complete beginner. Don’t stress about perfection—my first batch had lopsided eyes and crooked whiskers, and they were still the hit of the party. That’s the beauty of handmade treats. They’ve got character.
If you make these, I’d love to hear about it. Drop a comment below and tell me how your cats turned out, or share a photo if you’re feeling proud. And if you come up with a fun variation I haven’t thought of, definitely let me know. Happy Halloween, and happy baking!
Frequently Asked Questions
Can I use liquid food coloring instead of gel?
I wouldn’t recommend it. Liquid food coloring adds too much moisture to the dough, which can throw off the texture and cause the cookies to spread. Gel coloring gives you a deep black without changing the consistency.
Why did my cookies spread in the oven?
This usually happens when the dough isn’t chilled enough or the butter was too soft when you mixed it. Make sure your dough chills for at least 2 hours, and if your kitchen is warm, pop the cut cookies in the fridge for 10 minutes before baking.
How do I get the royal icing perfectly smooth?
The key is consistency. Your icing should be thick enough to hold a peak but thin enough to settle into a smooth surface. Use a toothpick to spread the icing into corners and pop any bubbles. A light tap of the baking sheet on the counter also helps level things out.
Can I freeze the decorated cookies?
I don’t recommend it. The royal icing can become tacky or crack during thawing. It’s better to freeze the undecorated cookies and ice them fresh when you’re ready to serve.
How far in advance can I make these cookies?
You can make the dough up to a month ahead and freeze it. Bake the cookies up to a week ahead, store them in an airtight container, and decorate them a day or two before you plan to serve them. The royal icing needs about 24 hours to fully harden.
Pin This Recipe!

Adorable Black Cat Sugar Cookies – Easy Halloween Treat

These adorable black cat sugar cookies are crisp, buttery, and just sweet enough without being overwhelming. They hold their shape perfectly and are surprisingly forgiving once you know a few tricks, making them the perfect Halloween treat.
- Prep Time: 30 minutes
- Cook Time: 10 minutes
- Total Time: 2 hours 40 minutes (includes 2 hours chilling and 2 hours drying time)
- Yield: 24 servings 1x
- Category: Dessert
- Cuisine: American
Ingredients
- 1 cup (226g) unsalted butter, softened
- 1 cup (200g) granulated sugar
- 1 large egg, room temperature
- 2 teaspoons vanilla extract
- 2 ½ cups (312g) all-purpose flour
- 1 teaspoon baking powder
- ½ teaspoon salt
- 1–2 teaspoons black food coloring gel
- 2 cups (240g) powdered sugar, sifted
- 2 tablespoons meringue powder
- 3–4 tablespoons warm water
- 1–2 teaspoons black food coloring gel (for icing)
- White decorating icing (for eyes and whiskers)
Instructions
- Make the dough: In a stand mixer with paddle attachment, beat softened butter and granulated sugar on medium speed until light and fluffy, about 3 minutes. Scrape down sides halfway through.
- Add egg and vanilla extract, beat on low until just combined. In a separate bowl, whisk together flour, baking powder, and salt. Gradually add dry ingredients to wet mixture, mixing on low until dough comes together.
- Add black food coloring gel and mix on low until color is evenly distributed. Add more gel if needed for a deep black.
- Divide dough into two discs, wrap tightly in plastic wrap, and refrigerate for at least 2 hours (overnight is better).
- Preheat oven to 350°F (175°C). Line baking sheets with parchment paper. Let one dough disc sit at room temperature for 5 minutes.
- Lightly flour work surface and rolling pin. Roll dough to ¼-inch thickness. Dip cat cookie cutter in flour before each cut. Press straight down and lift straight up—no twisting.
- Transfer cut cookies to prepared baking sheet using an offset spatula, spacing 2 inches apart.
- Bake for 8-10 minutes, rotating sheet halfway through. Cookies should look set around edges but not browned. Let cool on baking sheet for 5 minutes, then transfer to cooling rack to cool completely.
- Make royal icing: In a clean bowl, combine powdered sugar and meringue powder. Add 3 tablespoons warm water and beat on low until combined. Increase to medium-high and beat for 5 minutes until glossy and holds stiff peaks. Add black food coloring and mix until uniform. Adjust consistency with water or powdered sugar as needed.
- Decorate: Transfer icing to piping bag or squeeze bottle. Outline each cookie, then fill in center. Use toothpick to spread icing and pop air bubbles. Let base icing dry for at least 2 hours.
- Once base is set, use white decorating icing to pipe eyes (two tiny dots) and whiskers (three thin lines on each side). Add pink or green dot in center of each eye for extra personality.
Notes
Don’t overwork the dough—mix until just combined. Chill dough thoroughly to prevent spreading. Watch baking time carefully since black cookies don’t show browning. Let royal icing base dry fully (2 hours minimum) before adding details. Dough can be frozen for up to 3 months. Baked undecorated cookies can be frozen for up to 3 months. Store decorated cookies in airtight container at room temperature for up to 2 weeks.
Nutrition
- Serving Size: 1 cookie (3-inch cat
- Calories: 185
- Sugar: 16
- Sodium: 95
- Fat: 8
- Saturated Fat: 5
- Carbohydrates: 27
- Protein: 2
Keywords: black cat sugar cookies, Halloween cookies, sugar cookies, royal icing cookies, cat cookies, Halloween treats, decorated cookies


