Love this? Save it for later!
Share the inspiration with your friends
I was standing in the baking aisle of our local grocery store last October, staring at a display of candy eyes like they held the secrets to the universe. My cart was already overflowing with bags of Oreos and blocks of cream cheese—I was committed to making something, but I had no idea what. An older woman, maybe in her seventies, noticed my cart and then looked at the candy eyes. She didn’t say anything at first. Then she reached past me, grabbed a bag of black gel icing, and placed it gently on top of my Oreos. “Black cat truffles,” she said with a wink. “My grandkids won’t eat anything that isn’t shaped like an animal.” And just like that, a recipe was born from a stranger in aisle seven.
Honestly, I stood there for a solid minute trying to picture it. Black cat truffles? I mean, I’ve made Oreo balls a hundred times—they’re the lazy baker’s secret weapon, the kind of thing you whip up when you want to look like you tried without actually trying. But shaping them into cats? That was a new twist. She must have seen the confusion on my face because she laughed and said, “Just dip ’em, stick on some eyes, and use the icing for whiskers. It’s not brain surgery, honey.” And you know what? She was right.
That conversation lasted maybe two minutes, but it stuck with me. I went home, made a batch, and promptly ate three before they even made it to the fridge. The kids next door came over for our annual Halloween cookie swap, and let me tell you—those little black cat truffles disappeared faster than anything else on the table. There’s something about food that looks like a creature, right? Maybe you’ve been there, watching a plate of themed treats vanish while the “normal” desserts sit untouched. It’s a special kind of kitchen magic.
So here we are. These Spooky Black Cat Oreo Truffles have become my go-to Halloween treat, and I keep making them because they’re just so forgiving. You don’t need perfect piping skills or a steady hand. You just need a little patience and maybe a sense of humor when one of your cats ends up looking more like a blob with googly eyes. Trust me, that’s part of the charm.
Why You’ll Love This Recipe
Let me tell you why these truffles have earned a permanent spot in my Halloween rotation. I’ve tested this recipe at least six times—yes, six—to get the texture and the look just right. The first batch was too soft, the second batch had eyes that kept sliding off, and the third batch? Let’s just say I learned that black gel icing can look a lot like a horror movie if you’re not careful. But that’s the thing about this recipe: it’s forgiving enough for beginners and fun enough for seasoned bakers who just want to make something cute without the stress.
- Quick & Easy: These come together in about 30 minutes of active time, plus some chill time in the fridge. Perfect for those last-minute Halloween parties or when the kids suddenly announce they need treats for school tomorrow.
- Simple Ingredients: You probably have most of this stuff in your kitchen right now. Oreos, cream cheese, chocolate chips—that’s the base. No trips to specialty stores required.
- Perfect for Halloween: These are the star of any spooky spread. They’re cute without being overly complicated, and they fit right in with pumpkins, ghosts, and all the other Halloween icons.
- Crowd-Pleaser: I’ve brought these to three different Halloween events now, and every single time, someone asks for the recipe. Kids love them because they look like cats. Adults love them because they taste like Oreo cheesecake.
- Unbelievably Delicious: The texture is this perfect mix of creamy and crunchy. The Oreo crumbs give it that familiar cookies-and-cream flavor, while the chocolate coating adds a satisfying snap when you bite in.
What makes these different from every other Oreo truffle recipe out there? It’s the shape, honestly. Most recipes just roll the mixture into plain balls and call it a day. But shaping them into little cats? That transforms them from “another dessert” into “the thing everyone talks about.” Plus, I’ve figured out a trick for getting the ears to stay put without crumbling—you’ll see that in the method section.
This isn’t just a recipe that tastes good. It’s the kind that makes you smile when you’re done. The kind that makes people say, “Wait, you made these?” with genuine surprise. And on a busy Halloween night, when you’re juggling costumes and candy and maybe a little chaos, having a treat this simple and this adorable feels like a win.
What Ingredients You Will Need
This recipe uses simple, everyday ingredients to create something that looks way more impressive than it actually is. Most of these are pantry staples, and the ones that aren’t are easy to find at any grocery store. Let me walk you through what you’ll need and why each ingredient matters.
- 1 package (14.3 oz) Oreo cookies: You want the regular ones, not Double Stuf. The filling-to-cookie ratio matters here—too much cream filling and your truffle mixture gets too soft to shape. I’ve tried this with generic chocolate sandwich cookies, and honestly, stick with Oreos. The texture is just better. If you want to get fancy, you can use the Halloween-themed Oreos with orange filling, but the color doesn’t really show once everything’s mixed together.
- 8 oz cream cheese, softened: Full-fat cream cheese is non-negotiable here. Low-fat or Neufchâtel will make your truffles too soft and they won’t hold their shape. Let it sit on the counter for about 30 minutes before you start—cold cream cheese creates lumps that are impossible to smooth out. I use Philadelphia because it’s consistent, but any full-fat brand works.
- 2 cups semi-sweet chocolate chips: This is for the coating. You can use dark chocolate if you prefer a less sweet truffle, or milk chocolate if you want it extra rich. I’ve found that Ghirardelli melts the smoothest, but Nestlé Toll House works fine too. Avoid chocolate melts or candy melts if you can—they have a waxy texture that doesn’t taste as good.
- 1 tablespoon coconut oil or vegetable shortening: This is the secret to a smooth, shiny chocolate coating. Without it, your chocolate might seize up or look dull. Coconut oil adds a subtle flavor that I actually love, but shortening is flavorless if that matters to you.
- Candy eyes: You can find these in the baking aisle at most grocery stores, usually near the sprinkles. I like the ones that come in a mix of sizes—the smaller ones look more cat-like. You’ll need about 24-30 eyes depending on how many truffles you make.
- Black gel icing: This is for the whiskers and noses. The tube kind works best because it gives you control over the lines. I use Wilton brand because the tip is narrow enough for detail work. Avoid the pouches—they’re too messy for this.
- Pink or white gel icing (optional): If you want to add little pink noses or white highlights, this is a nice touch. Not required, but it makes the cats look friendlier.
Ingredient Tips from My Kitchen:
- For the Oreos, I recommend crushing them in a food processor if you have one. A rolling pin and a Ziploc bag works too, but the texture is more consistent with a machine. You want fine crumbs, not chunks—chunks make the truffles fall apart.
- If you’re dairy-free, you can use a dairy-free cream cheese alternative, but be warned: the texture will be softer. You might need to freeze the truffles for an extra 30 minutes before dipping.
- For a gluten-free version, use gluten-free Oreos. They work exactly the same way. I’ve tested this with the gluten-free chocolate sandwich cookies from the brand Goodie Girl, and they’re almost indistinguishable from regular Oreos.
Equipment Needed
You don’t need a fancy kitchen to make these truffles. Here’s what you’ll need, along with some alternatives if you’re working with limited tools.
- Food processor: This makes quick work of crushing the Oreos into fine crumbs. If you don’t have one, put the cookies in a large Ziploc bag and crush them with a rolling pin or the bottom of a heavy pan. It takes a little longer, but it works.
- Mixing bowl: Any medium-sized bowl will do. I use a glass bowl because it’s easy to see when everything’s fully combined.
- Hand mixer or sturdy spatula: A hand mixer makes incorporating the cream cheese effortless, but you can absolutely do this by hand. Just make sure your cream cheese is really soft, or you’ll end up with arm fatigue.
- Baking sheet lined with parchment paper: This is where your shaped truffles will chill before dipping. Parchment paper is non-negotiable—wax paper will stick, and foil is a nightmare.
- Microwave-safe bowl or double boiler: For melting the chocolate. I use the microwave because it’s faster, but a double boiler gives you more control. If using the microwave, do 30-second bursts and stir between each one.
- Fork or dipping tool: A regular fork works perfectly for lifting truffles out of the chocolate. You can also buy special chocolate dipping tools, but I’ve never found them necessary.
- Toothpicks: These are surprisingly useful for fixing mistakes—like repositioning an eye that’s sliding off or cleaning up a messy whisker line.
- Small piping bag or sandwich bag: For the gel icing. If you’re using a tube with a fine tip, you don’t need this. But if you bought a larger tube, a small piping bag gives you more control.
Budget-Friendly Alternatives: Don’t have a food processor? No problem. The Ziploc bag method is free and works just as well. Don’t have a hand mixer? A wooden spoon and a little elbow grease will get the job done. The only tool I wouldn’t skip is the parchment paper—it makes cleanup so much easier.
Preparation Method
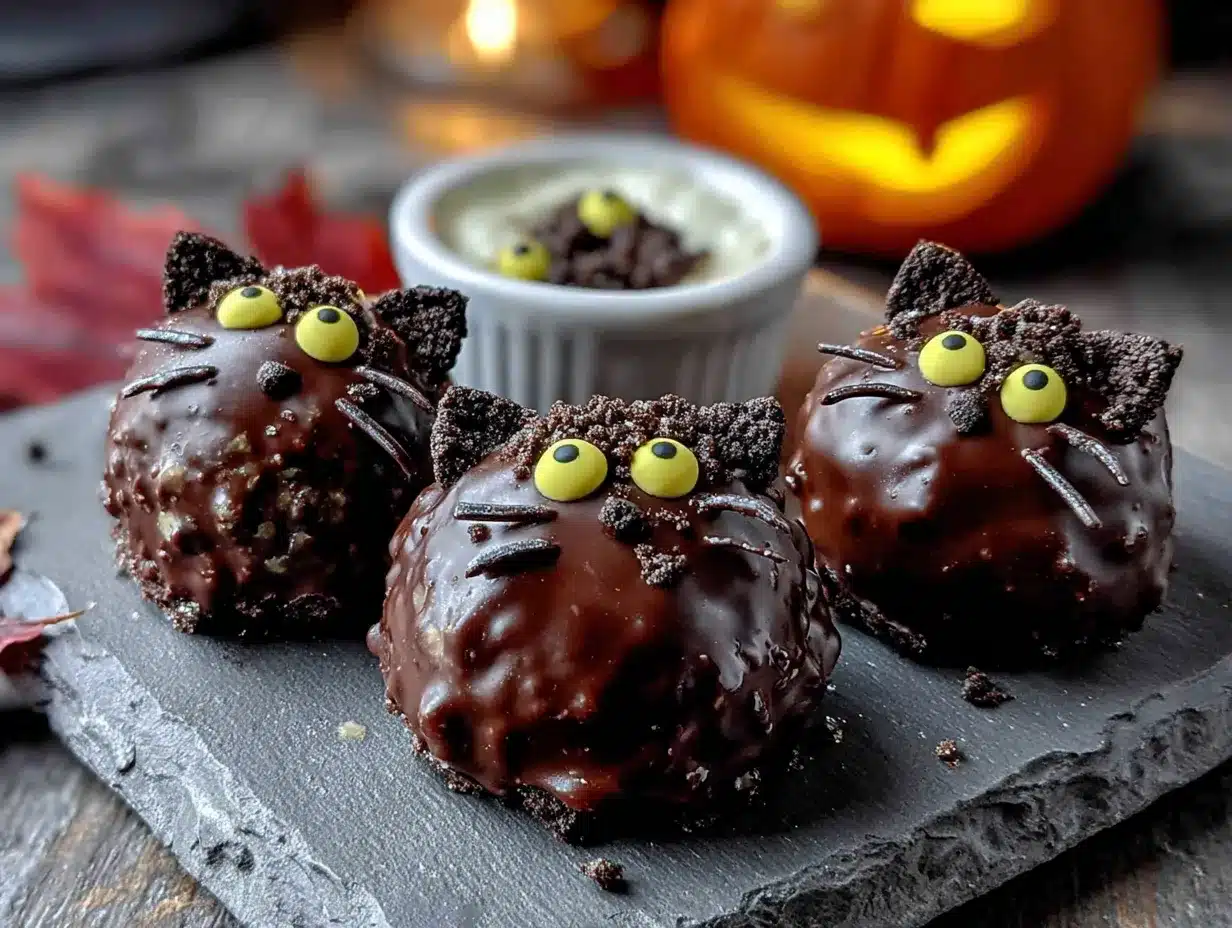
Alright, let’s get into the actual making of these little guys. I’ve broken this down into steps that are easy to follow, even if you’ve never made truffles before. Take your time with the shaping—it’s the most important part for getting that cat look.
Step 1: Crush the Oreos
Place the entire package of Oreos (filling and all) into your food processor. Pulse until you have fine, uniform crumbs. This should take about 30 seconds. If you’re using the Ziploc bag method, put the cookies in the bag, seal it tight, and go to town with your rolling pin. You want the crumbs to look like dark sand—no large chunks. I usually end up with about 2 ½ cups of crumbs.
Step 2: Mix with cream cheese
Transfer the Oreo crumbs to your mixing bowl. Add the softened cream cheese and mix until everything is fully combined. If using a hand mixer, start on low speed so the crumbs don’t fly everywhere. By hand, use a sturdy spatula and fold until you can’t see any white streaks. The mixture should look like a dark, uniform dough. It will be soft but should hold together when you press it.
Step 3: Shape into balls and then into cats
Scoop out about 1 tablespoon of the mixture and roll it into a ball. This is your starting point. Now, here’s the trick for the cat shape: gently pinch the top of the ball between your thumb and forefinger to create two small peaks—those are the ears. Don’t squeeze too hard or the ears will crumble. Just a gentle pinch, then use your fingers to smooth out the rest of the ball into an oval shape. The bottom should be flat so the truffle sits upright. Place each shaped truffle on your parchment-lined baking sheet. Repeat until all the mixture is used up. You should get about 24 truffles.
Step 4: Chill the truffles
Place the baking sheet in the refrigerator for at least 30 minutes. This is crucial—if the truffles aren’t cold, they’ll fall apart when you dip them in the warm chocolate. I usually let them chill for a full hour if I have the time. You want them firm to the touch.
Step 5: Melt the chocolate
While the truffles are chilling, melt your chocolate chips and coconut oil together. In a microwave-safe bowl, heat for 30 seconds, then stir. Repeat in 15-second bursts until the chocolate is smooth and glossy. Be careful not to overheat—chocolate seizes up if it gets too hot, and then you have to start over. If using a double boiler, bring a pot of water to a simmer, place the bowl on top, and stir until melted.
Step 6: Dip the truffles
Take your chilled truffles out of the fridge. Working with one at a time, drop a truffle into the melted chocolate. Use a fork to gently turn it until it’s fully coated. Lift it out with the fork, tap the fork on the edge of the bowl to let excess chocolate drip off, and then carefully slide it back onto the parchment paper. Don’t worry if the chocolate pools a little at the bottom—that’s normal. Repeat with all the truffles.
Step 7: Add the eyes
This is where the magic happens. While the chocolate is still wet, press two candy eyes onto each truffle. I place them slightly above the center, closer to the ears, to give the cat a face. If the chocolate starts to set before you get the eyes on, just dab a tiny bit of melted chocolate on the back of the eye to glue it in place.
Step 8: Let the chocolate set
Place the baking sheet back in the refrigerator for about 15 minutes, or until the chocolate is completely firm. You’ll know it’s ready when the coating looks shiny and doesn’t smudge when you touch it.
Step 9: Add whiskers and noses
Once the chocolate is set, it’s time for the faces. Using your black gel icing, draw three small whiskers on each side of the face. Then add a tiny dot for the nose—just a small triangle or a simple dot. If you have pink icing, you can use that for the nose instead. Be gentle with the icing; it’s easy to accidentally smudge if you press too hard.
Step 10: Final chill
Pop the truffles back in the fridge for another 10 minutes to set the icing. After that, they’re ready to serve!
Cooking Tips & Techniques
I’ve made these truffles more times than I care to count, and I’ve learned a few things the hard way. Let me save you some trouble.
Keep your hands cold. This is the number one tip for shaping these truffles. If your hands are warm, the cream cheese in the mixture will soften and the truffles will get sticky and hard to shape. Run your hands under cold water before you start, and dry them thoroughly. If the mixture starts to get too soft, pop the bowl in the fridge for 10 minutes.
Don’t skip the chill step. I know it’s tempting to rush, but cold truffles are the key to a smooth chocolate coating. If you dip a room-temperature truffle, it will fall apart in the warm chocolate, and you’ll end up with a chocolate-covered mess that looks nothing like a cat. Trust me on this—I learned the hard way during my second batch.
Work in batches. When dipping, take only a few truffles out of the fridge at a time. Keep the rest cold. If you leave them all out, they’ll warm up and the chocolate won’t set properly. I usually work with 4-5 truffles at a time.
Fix mistakes quickly. If an eye falls off or a whisker smudges, you have about 30 seconds to fix it before the chocolate sets. Keep a toothpick handy for repositioning. If the chocolate has already set, just dab a little melted chocolate on the back of the eye and press it back on.
Temperature matters. Your chocolate should be warm but not hot. If it’s too hot, it will melt the truffle. If it’s too cold, it will be thick and clumpy. The ideal temperature is around 90°F—warm to the touch but not burning. I test by dabbing a tiny bit on my wrist, like you would with baby formula.
Multitasking strategy: While the truffles are chilling for the first time, melt your chocolate and set up your dipping station. Have your parchment paper ready, your candy eyes open, and your toothpicks nearby. This makes the dipping process go much faster.
Variations & Adaptations
One of the best things about this recipe is how easy it is to change up. Here are some variations I’ve tried and loved.
Pumpkin Spice Truffles: Add 1 teaspoon of pumpkin pie spice to the Oreo mixture before shaping. The warm spices pair beautifully with the chocolate, and it gives the truffles a fall flavor that’s perfect for Halloween. I tried this last year and ended up making a second batch because the first one disappeared so fast.
White Chocolate Ghosts: Instead of semi-sweet chocolate, use white chocolate for the coating. Shape the truffles into ghost-like ovals instead of cats, and use black icing to draw little ghost faces. These are great if you want a mix of spooky characters on your dessert table.
Mint Chocolate Cats: Crush a few mint Oreos into the mix, or add ½ teaspoon of peppermint extract to the cream cheese. The minty freshness cuts through the richness of the chocolate, making these feel lighter. I made these for a Halloween party and someone asked if they were Thin Mints in disguise.
Vegan Version: Use dairy-free cream cheese (I like Kite Hill) and vegan chocolate chips. The texture will be slightly softer, so you’ll need to freeze the truffles for an extra 30 minutes before dipping. The taste is still amazing—I’ve served these to non-vegans who had no idea they were plant-based.
Nut-Free Option: This recipe is naturally nut-free as written, but double-check your chocolate chips if you’re serving someone with allergies. Some brands process chocolate on equipment that also processes nuts.
Spider Variation: Instead of making cats, shape the truffles into balls and add eight candy legs using black licorice strings or pretzel sticks. This is a fun alternative if you want to stick with the Halloween theme but change up the look.
Serving & Storage Suggestions
These truffles are best served cold, straight from the fridge. The chocolate coating has a satisfying snap, and the inside is creamy and firm. If you leave them out at room temperature for too long, they’ll get soft and lose their shape. I recommend serving them on a chilled platter if you’re hosting a party.
Presentation Ideas: Arrange the black cat truffles on a black or orange platter for maximum Halloween vibes. You can scatter some candy corn or Halloween sprinkles around them for color contrast. I like to place them on a bed of shredded coconut that’s been dyed green to look like grass—it makes the cats pop.
What to Serve With Them: These truffles pair beautifully with a warm cup of hot chocolate or a pumpkin spice latte. For a Halloween party spread, serve them alongside other no-bake treats like chocolate-covered pretzels or caramel apples. The sweetness of the truffles balances well with salty snacks like popcorn or pretzels.
Storage Instructions: Store the truffles in an airtight container in the refrigerator for up to 1 week. Place them in a single layer with parchment paper between layers to prevent sticking. If you’re stacking them, make sure the chocolate is fully set before you put them in the container.
Freezer Tips: These truffles freeze beautifully. Place them on a baking sheet in a single layer and freeze until solid (about 2 hours). Then transfer them to a freezer-safe bag or container. They’ll keep for up to 3 months. To serve, thaw them in the refrigerator overnight—don’t thaw at room temperature or they’ll get soggy.
Flavor Development: Honestly, these truffles taste even better the next day. The flavors meld together overnight, and the texture becomes perfectly creamy. I always try to make them a day ahead of time if I can.
Nutritional Information & Benefits
Let’s be real—these are a treat, not a health food. But here’s what you need to know if you’re keeping an eye on nutrition.
Per truffle (based on 24 servings):
- Calories: 185
- Fat: 12g
- Carbohydrates: 19g
- Protein: 2g
- Sugar: 14g
- Fiber: 1g
Ingredient Benefits: The Oreos provide a small amount of iron, and the dark chocolate (if you use semi-sweet) contains antioxidants called flavonoids. The cream cheese adds a bit of calcium and protein. It’s not much, but hey—every little bit counts, right?
Dietary Considerations: This recipe is vegetarian. For a gluten-free version, use gluten-free Oreos. For a dairy-free version, use dairy-free cream cheese and vegan chocolate. The recipe is naturally nut-free, but always check your ingredients if allergies are a concern.
Potential Allergens: This recipe contains wheat, dairy, and soy (from the chocolate). If you’re serving these at a party, it’s a good idea to label them so guests with allergies know what they’re eating.
My Personal Take: Look, I’m not going to pretend these are healthy. They’re a Halloween treat, meant to be enjoyed in moderation. But I love that they’re made from real ingredients—no preservatives, no artificial flavors. You know exactly what’s going into them, and that counts for something.
Conclusion
These Spooky Black Cat Oreo Truffles are everything I want in a Halloween recipe: fun to make, adorable to look at, and absolutely delicious to eat. They’re the kind of treat that brings a smile to everyone’s face, whether you’re five years old or fifty-five. And honestly, the fact that they come together with just a few simple ingredients and no oven time? That’s the icing on the cake—or in this case, the chocolate on the truffle.
I hope you give these a try. Don’t worry if your first few cats look a little lopsided or if the ears crumble off—that’s part of the learning process. My first batch looked more like blob monsters than cats, and you know what? They still tasted amazing. The beauty of this recipe is that it’s forgiving. It doesn’t demand perfection. It just asks you to have a little fun.
If you make these, I’d love to hear about it. Leave a comment below and tell me how your cats turned out—did they have perfect whiskers or did they look like they’d seen a ghost? Share your photos on Pinterest and tag me so I can see your creations. And if you come up with your own variation, please share that too. This recipe is meant to be played with.
Happy Halloween, my friend. Go make some spooky treats and enjoy every single bite. You’ve got this.
Frequently Asked Questions
Can I make these truffles ahead of time?
Absolutely! These truffles actually taste better the next day. You can make them up to 3 days in advance and store them in the refrigerator. Just keep them in an airtight container with parchment paper between layers.
Why did my truffles fall apart when I dipped them?
This usually happens when the truffles aren’t cold enough. Make sure they’ve chilled for at least 30 minutes before dipping, and work with only a few at a time. If the chocolate is too hot, that can also cause the truffles to soften and fall apart.
Can I use white chocolate instead of semi-sweet?
Yes, white chocolate works great! If you’re making the ghost variation, white chocolate is perfect. Just be careful when melting it—white chocolate burns more easily than dark chocolate. Use low heat and stir frequently.
How do I get the ears to stay pointy?
The key is gentle pinching. Don’t squeeze too hard, or the mixture will crumble. If the ears are still looking flat, try pinching them while the truffle is still in the fridge—the cold helps them hold their shape. You can also use a toothpick to gently define the ears after shaping.
Can I freeze these truffles?
Yes, they freeze beautifully. Freeze them on a baking sheet until solid, then transfer to a freezer-safe bag. They’ll keep for up to 3 months. Thaw in the refrigerator overnight before serving.
Pin This Recipe!

Spooky Black Cat Oreo Truffles: Easy Halloween Treat Recipe

These adorable black cat Oreo truffles are a fun and easy Halloween treat made with just a few simple ingredients. Perfect for parties, they combine a creamy Oreo cheesecake center with a smooth chocolate coating and cute candy eyes.
- Prep Time: 30 minutes
- Cook Time: 0 minutes
- Total Time: 1 hour 15 minutes (includes chilling)
- Yield: 24 servings 1x
- Category: Dessert
- Cuisine: American
Ingredients
- 1 package (14.3 oz) Oreo cookies
- 8 oz cream cheese, softened
- 2 cups semi-sweet chocolate chips
- 1 tablespoon coconut oil or vegetable shortening
- Candy eyes
- Black gel icing
- Pink or white gel icing (optional)
Instructions
- Crush the Oreos: Place the entire package of Oreos (filling and all) into a food processor. Pulse until you have fine, uniform crumbs. Alternatively, place cookies in a Ziploc bag and crush with a rolling pin.
- Mix with cream cheese: Transfer the Oreo crumbs to a mixing bowl. Add the softened cream cheese and mix until fully combined. The mixture should look like a dark, uniform dough.
- Shape into balls and then into cats: Scoop about 1 tablespoon of the mixture and roll into a ball. Gently pinch the top to create two small peaks for ears. Smooth into an oval shape with a flat bottom. Place on a parchment-lined baking sheet. Repeat to make about 24 truffles.
- Chill the truffles: Refrigerate the baking sheet for at least 30 minutes, or until firm.
- Melt the chocolate: In a microwave-safe bowl, combine chocolate chips and coconut oil. Heat in 30-second bursts, stirring between each, until smooth and glossy. Alternatively, use a double boiler.
- Dip the truffles: Working with one at a time, drop a chilled truffle into the melted chocolate. Use a fork to turn until fully coated. Lift out, tap off excess chocolate, and slide back onto the parchment paper.
- Add the eyes: While the chocolate is still wet, press two candy eyes onto each truffle, slightly above center near the ears.
- Let the chocolate set: Return the baking sheet to the refrigerator for about 15 minutes, or until the chocolate is firm.
- Add whiskers and noses: Using black gel icing, draw three small whiskers on each side of the face. Add a tiny dot or triangle for the nose. Optionally, use pink icing for the nose.
- Final chill: Refrigerate for another 10 minutes to set the icing. Serve cold.
Notes
Keep your hands cold when shaping truffles to prevent the mixture from getting sticky. Don’t skip the chill step before dipping—cold truffles ensure a smooth chocolate coating. Work in batches when dipping to keep truffles cold. Fix mistakes quickly with a toothpick before the chocolate sets. These truffles taste even better the next day.
Nutrition
- Serving Size: 1 truffle
- Calories: 185
- Sugar: 14
- Sodium: 95
- Fat: 12
- Saturated Fat: 7
- Carbohydrates: 19
- Fiber: 1
- Protein: 2
Keywords: Halloween treats, Oreo truffles, black cat truffles, no-bake dessert, easy Halloween recipe


