Love this? Save it for later!
Share the inspiration with your friends
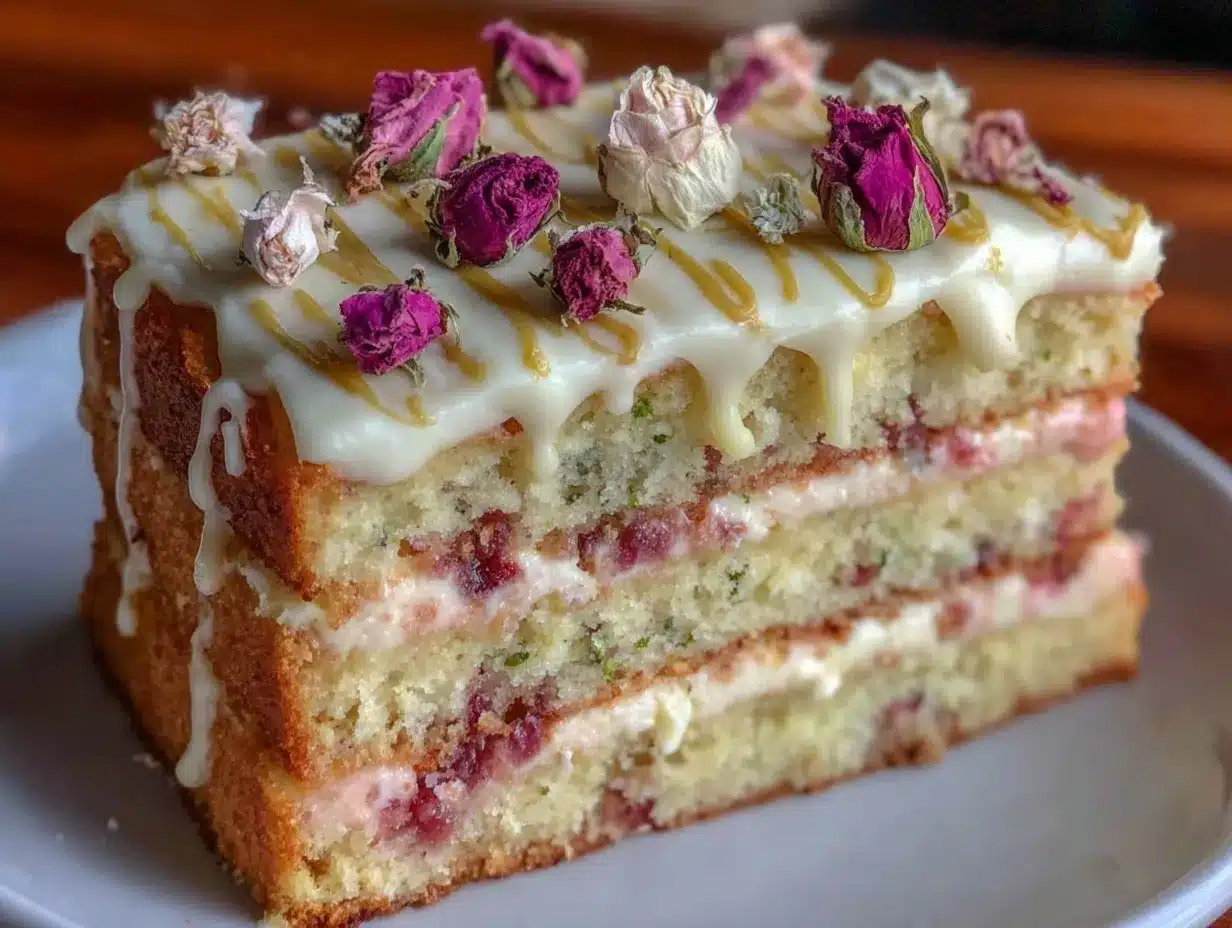
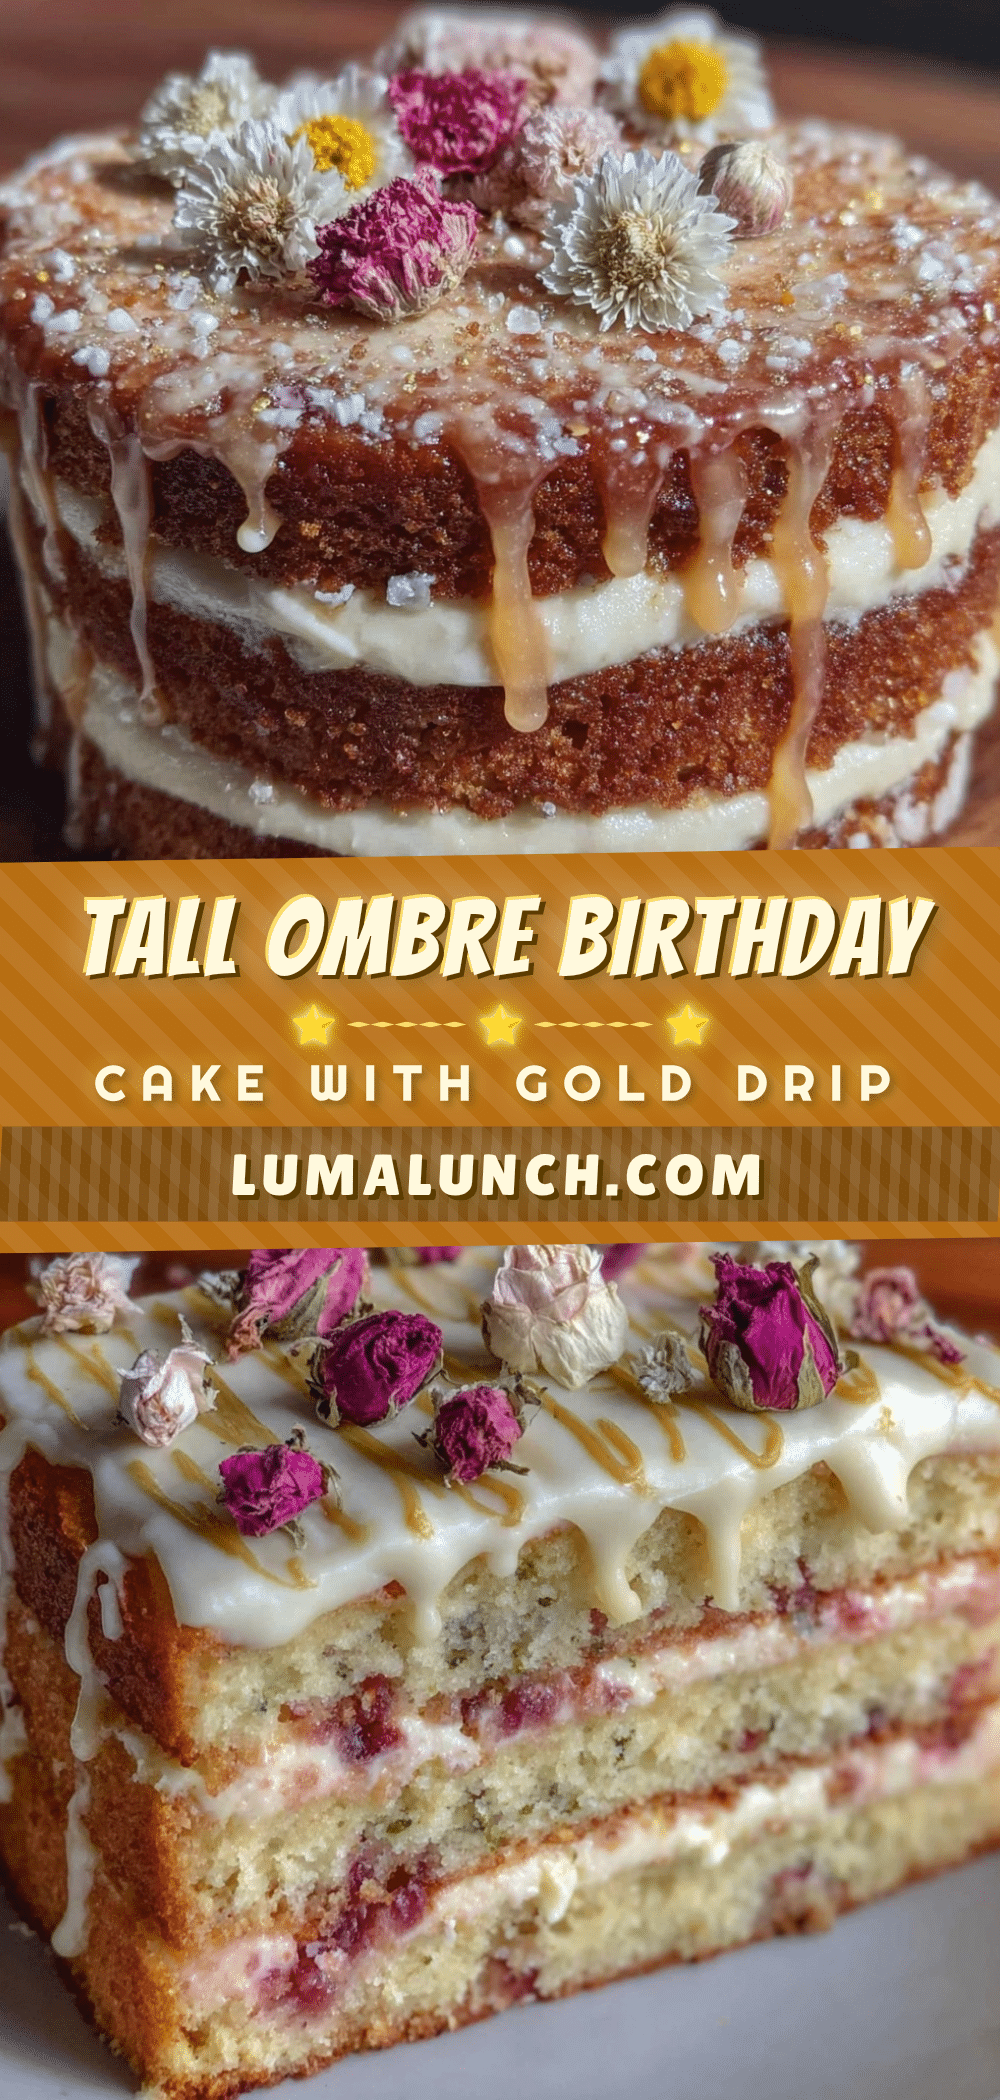
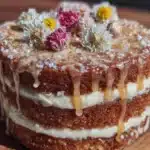
“You know that moment when a simple birthday cake turns into a total showstopper?” That’s exactly how this perfect tall stack ombre birthday cake with edible gold drip came to be. It was last summer, on a humid Saturday afternoon, when my neighbor Lucy—who’s usually the queen of casual backyard barbecues—decided to bake a cake for her daughter’s party. She wasn’t aiming for anything fancy, just something pretty and fun. But then, halfway through decorating, her mixer broke down (classic Murphy’s law), and I ended up helping her with the layers.
What started as a bit of a mess with batter flying everywhere, ended as the most stunning cake I’d seen in a long time. The ombre effect, with its smooth gradient of pastel pinks and peaches, paired with a shiny edible gold drip that looked like liquid treasure, was honestly mesmerizing. I remember thinking, “I have to figure out how to make this at home.”
Maybe you’ve been there—wanting to bake something special but feeling overwhelmed by complicated recipes or fancy tools. This recipe is the answer for anyone who wants to wow a crowd without losing their mind. It’s approachable, forgiving, and the results are as elegant as they are delicious. Plus, it’s tall and proud, the kind of cake that commands attention (and second helpings) at any celebration.
So, let me tell you the story of how this perfect tall stack ombre birthday cake with edible gold drip became a staple in my kitchen, and why I keep making it whenever a party calls for something unforgettable but not impossible.
Why You’ll Love This Recipe
After testing this ombre birthday cake recipe more times than I can count (and trust me, there were a few crumb disasters along the way), I’ve come to truly trust it for special occasions. It’s not just beautiful but genuinely delicious and surprisingly simple once you get the hang of it.
- Quick & Easy: The batter comes together in about 20 minutes, and the layered bake time is just under an hour—perfect for last-minute party prep.
- Simple Ingredients: No exotic or hard-to-find items here. You probably have everything in your pantry already.
- Perfect for Celebrations: Whether it’s a birthday, baby shower, or just a treat-yourself moment, this cake steals the show.
- Crowd-Pleaser: The light vanilla sponge with just the right amount of sweetness has won over kids and adults alike.
- Unbelievably Delicious: The ombre effect isn’t just for looks—the gradual color change matches a subtle shift in frosting flavor that keeps every bite interesting.
- Standout Technique: The edible gold drip adds that luxe, professional touch without needing a pastry chef’s skills.
This recipe isn’t just another birthday cake. It feels like a small celebration every time you slice into it, and honestly, that shiny gold drip makes you feel like you’re indulging in something truly special. If you’re aiming to impress without stress, this is your go-to.
What Ingredients You Will Need
This perfect tall stack ombre birthday cake recipe uses simple, wholesome ingredients that come together to create a moist, flavorful cake with a stunning visual effect. Most are pantry staples, and substitutions are easy if needed.
- For the Cake Batter:
- All-purpose flour – 3 cups (360g), sifted (I like King Arthur for consistent results)
- Baking powder – 1 tablespoon
- Salt – 1/2 teaspoon
- Unsalted butter – 1 cup (227g), softened (use European-style for richer flavor)
- Granulated sugar – 2 cups (400g)
- Large eggs – 5, room temperature (helps with better volume)
- Whole milk – 1 cup (240ml), room temperature (can swap for almond milk if dairy-free)
- Pure vanilla extract – 2 teaspoons
- Gel food coloring – in your choice of ombre shades (I recommend AmeriColor gels for vibrant color without thinning batter)
- For the Buttercream Frosting:
- Unsalted butter – 2 cups (454g), softened
- Powdered sugar – 6 cups (720g), sifted
- Heavy cream – 2-4 tablespoons (30-60ml) for desired consistency
- Pure vanilla extract – 1 tablespoon
- Gel food coloring – matching your cake layers for the ombre effect
- For the Edible Gold Drip:
- White chocolate – 4 ounces (115g), chopped
- Heavy cream – 1/4 cup (60ml)
- Edible gold luster dust – 1 teaspoon (mixed with a few drops of clear vanilla extract to create a paintable drip)
For best results, pick fresh eggs and unsalted butter that’s not too soft or melted. If you’re baking in summer, keep everything cool to prevent batter from curdling. And if you want a gluten-free option, try swapping regular flour for a 1:1 gluten-free baking flour blend. I’ve done this many times with great success!
Equipment Needed
- Three 6-inch round cake pans (or four if you want thinner layers)
- Electric stand mixer or hand mixer (I swear by my KitchenAid for smooth, fluffy batter)
- Mixing bowls (medium and large sizes)
- Offset spatula for frosting and smoothing
- Bench scraper for sharp edges on the cake
- Cooling racks to let cakes cool completely
- Measuring cups and spoons (digital scale recommended for accuracy)
- Small saucepan for making the gold drip
- Pastry brush or small paintbrush for applying the edible gold luster dust
If you don’t have cake pans in this exact size, 8-inch pans work too—just adjust baking time accordingly. I’ve found that using a bench scraper really helps achieve that perfect tall stack look. Also, a digital scale can save you from many measuring mishaps I’ve had over the years!
Preparation Method
- Preheat and Prep: Preheat your oven to 350°F (175°C). Grease and flour your cake pans or line them with parchment paper for easy removal. This usually takes about 10 minutes.
- Mix Dry Ingredients: In a medium bowl, sift together 3 cups (360g) of flour, 1 tablespoon baking powder, and 1/2 teaspoon salt. Set aside.
- Cream Butter and Sugar: In your mixer bowl, beat 1 cup (227g) softened butter and 2 cups (400g) granulated sugar on medium speed until light and fluffy—about 4-5 minutes. This step is crucial for a tender crumb.
- Add Eggs: Add 5 large eggs one at a time, beating well after each addition. If the mixture looks curdled, don’t panic—this is normal. Just keep mixing until smooth.
- Combine Wet and Dry: Alternately add the dry ingredients and 1 cup (240ml) milk to the butter mixture in three parts, beginning and ending with dry ingredients. Mix on low speed to keep batter light.
- Add Vanilla and Color: Stir in 2 teaspoons vanilla extract. Then, divide the batter evenly into separate bowls depending on how many ombre layers you want (typically 4-5). Add gel food coloring a little at a time to create a gradient from light to dark.
- Bake Layers: Pour each colored batter into prepared pans and bake for 18-22 minutes or until a toothpick inserted comes out clean. Rotate pans halfway through baking for even cooking.
- Cool Completely: Let cakes cool in pans for 10 minutes, then turn out onto cooling racks. This step can’t be rushed or your frosting will melt!
- Prepare Buttercream: Beat 2 cups (454g) butter until creamy. Gradually add 6 cups (720g) powdered sugar, alternating with 2-4 tablespoons heavy cream until desired consistency. Stir in 1 tablespoon vanilla. Divide and tint to match your cakes.
- Assemble Cake: Level the tops of each cake layer with a serrated knife if needed. Place darkest layer on cake board or plate, spread frosting evenly on top, then stack next lighter layer. Repeat until all layers are stacked.
- Crumb Coat: Apply a thin layer of frosting all over the cake and chill for 20 minutes. This traps crumbs and makes final frosting smooth.
- Final Frosting: Add a final, thicker layer of frosting, smoothing with an offset spatula and bench scraper for clean edges.
- Make Gold Drip: Heat 1/4 cup (60ml) heavy cream until simmering. Pour over 4 ounces (115g) chopped white chocolate, stirring until smooth. Mix in edible gold luster dust with a few drops of clear vanilla to create a paintable drip. Let cool slightly.
- Apply Gold Drip: Using a spoon or small brush, gently drip gold ganache over cake edges and top for a luxe finish. Chill cake briefly to set drip.
Pro tip: If your batter feels too thick when coloring, add a splash more milk to keep it smooth. Also, don’t rush cooling—warm layers can ruin your frosting game. Trust me, I learned that the hard way during a birthday party once!
Cooking Tips & Techniques
Baking a tall stack cake can seem intimidating, but a few tricks make it manageable and fun. First, always use room temperature ingredients for even mixing and fluffier cake. I’ve found that beating butter and sugar long enough is key to avoid dense layers.
When coloring your batter, add gel color bit by bit; it’s easier to darken than to fix a too-bright color. Also, leveling your layers after baking helps your tall stack stay steady and look professional.
One mistake I made early on was skipping the crumb coat—crumbs everywhere! A thin initial frosting layer traps crumbs, so your final coat is smooth and clean.
Timing-wise, bake all your layers first and cool completely before frosting. Multitasking is essential here: while cakes bake, prep your frosting and clean up to keep the kitchen manageable.
Finally, for the edible gold drip, don’t pour it too hot or your frosting will melt. Let it cool just enough to drip slowly but set quickly. Patience pays off with that gorgeous shimmer!
Variations & Adaptations
This ombre birthday cake is versatile and easy to tweak based on preferences or dietary needs. Here are some ideas I’ve tried or recommend:
- Chocolate Ombre: Swap half the flour for cocoa powder and adjust sugar slightly for a rich chocolate version.
- Fruit-Infused Layers: Add fresh pureed berries or citrus zest to your batter for a fruity twist. I love adding a hint of lemon zest for brightness.
- Dairy-Free Option: Use coconut oil instead of butter, and almond or oat milk for the liquid. The cake still stays moist and flavorful.
- Gluten-Free: Substitute with a 1:1 gluten-free baking flour blend. Add a teaspoon of xanthan gum if your blend doesn’t include it.
- Alternative Gold Drip: If you’re short on edible gold dust, white chocolate ganache with a splash of caramel sauce makes a beautiful amber drip.
Personally, I once made a pastel blue ombre with raspberry buttercream layers for a friend’s baby shower—it was a hit! Don’t be afraid to play with colors and flavors to match your party theme.
Serving & Storage Suggestions
This tall stack cake looks stunning served chilled or at room temperature. I usually slice it about 30 minutes before serving to let the buttercream soften slightly—makes for a melt-in-your-mouth experience.
Pair it with a light cup of tea or sparkling lemonade to balance the sweetness. For a fuller dessert spread, a simple fruit salad or crispy garlic chicken appetizer works surprisingly well for party balance.
To store, keep the cake covered in the fridge for up to 4 days. The layers actually taste better after a day as the flavors meld. For longer storage, wrap slices tightly in plastic wrap and freeze up to 2 months.
Reheat frozen slices gently at room temperature or briefly in the microwave (10-15 seconds) to bring back softness without melting frosting.
Nutritional Information & Benefits
An average slice (1/12th of the cake) contains approximately 350 calories, 15g fat, 45g carbohydrates, and 3g protein. The recipe is rich in calcium and provides some vitamin A from butter.
Using real butter and whole eggs means you get natural fats and nutrients, but it’s a treat best enjoyed in moderation. For a lighter feel, swap heavy cream buttercream with whipped cream frosting, though it won’t hold as well for tall stacks.
This cake offers comfort and celebration in every bite, perfect for sharing joy and creating memories. Just keep in mind any allergies, especially to dairy and gluten, and adapt as needed.
Conclusion
This perfect tall stack ombre birthday cake with edible gold drip is more than just a dessert—it’s a centerpiece that brings people together. Whether you’re an experienced baker or a weekend enthusiast, this recipe guides you through making a cake that’s both beautiful and delicious without overwhelming steps.
Feel free to tweak the colors, flavors, or frosting to make it truly yours. I love how every time I bake it, it sparks smiles and conversations—plus that golden drip makes it feel like a celebration before the first slice.
If you try it, please share your thoughts or your own creative twists. I’d love to hear how this cake shows up in your celebrations. Remember, it’s not about perfection but the joy of sharing something special.
FAQs
How do I achieve the perfect ombre color gradient?
Start with a small amount of gel food coloring and gradually add more to each batter portion, making each layer slightly darker than the last. Mixing well after each addition helps create smooth transitions.
Can I make this cake ahead of time?
Absolutely! Bake the layers up to 2 days in advance and store wrapped tightly at room temperature. Assemble and frost on the day of the event for best freshness.
What if I don’t have edible gold luster dust?
You can use white chocolate ganache as a drip instead, or try edible gold leaf sheets for a different but equally elegant look.
How do I keep my cake layers from drying out?
Don’t overbake the layers and cool them properly. You can also brush each layer lightly with simple syrup before frosting to add moisture.
Is this recipe suitable for beginners?
Yes! The steps are straightforward, and with a bit of patience and practice, even novice bakers can create this stunning cake. Just take your time with frosting and layering for the best results.
Pin This Recipe!
Perfect Tall Stack Ombre Birthday Cake Recipe with Edible Gold Drip
A stunning tall stack ombre birthday cake featuring a smooth gradient of pastel colors and a luxurious edible gold drip. This recipe is approachable, forgiving, and perfect for celebrations.
- Prep Time: 20 minutes
- Cook Time: 40-55 minutes
- Total Time: 1 hour 15 minutes
- Yield: 12 servings
- Category: Dessert
- Cuisine: American
Ingredients
- All-purpose flour – 3 cups (360g), sifted
- Baking powder – 1 tablespoon
- Salt – 1/2 teaspoon
- Unsalted butter – 1 cup (227g), softened
- Granulated sugar – 2 cups (400g)
- Large eggs – 5, room temperature
- Whole milk – 1 cup (240ml), room temperature
- Pure vanilla extract – 2 teaspoons
- Gel food coloring – in your choice of ombre shades
- Unsalted butter – 2 cups (454g), softened (for buttercream)
- Powdered sugar – 6 cups (720g), sifted
- Heavy cream – 2-4 tablespoons (30-60ml) for desired consistency
- Pure vanilla extract – 1 tablespoon (for buttercream)
- Gel food coloring – matching your cake layers for the ombre effect (for buttercream)
- White chocolate – 4 ounces (115g), chopped (for gold drip)
- Heavy cream – 1/4 cup (60ml) (for gold drip)
- Edible gold luster dust – 1 teaspoon (mixed with a few drops of clear vanilla extract)
Instructions
- Preheat your oven to 350°F (175°C). Grease and flour your cake pans or line them with parchment paper for easy removal.
- In a medium bowl, sift together 3 cups (360g) of flour, 1 tablespoon baking powder, and 1/2 teaspoon salt. Set aside.
- In your mixer bowl, beat 1 cup (227g) softened butter and 2 cups (400g) granulated sugar on medium speed until light and fluffy—about 4-5 minutes.
- Add 5 large eggs one at a time, beating well after each addition.
- Alternately add the dry ingredients and 1 cup (240ml) milk to the butter mixture in three parts, beginning and ending with dry ingredients. Mix on low speed to keep batter light.
- Stir in 2 teaspoons vanilla extract. Divide the batter evenly into separate bowls depending on how many ombre layers you want (typically 4-5). Add gel food coloring a little at a time to create a gradient from light to dark.
- Pour each colored batter into prepared pans and bake for 18-22 minutes or until a toothpick inserted comes out clean. Rotate pans halfway through baking for even cooking.
- Let cakes cool in pans for 10 minutes, then turn out onto cooling racks to cool completely.
- Beat 2 cups (454g) butter until creamy. Gradually add 6 cups (720g) powdered sugar, alternating with 2-4 tablespoons heavy cream until desired consistency. Stir in 1 tablespoon vanilla. Divide and tint to match your cakes.
- Level the tops of each cake layer with a serrated knife if needed. Place darkest layer on cake board or plate, spread frosting evenly on top, then stack next lighter layer. Repeat until all layers are stacked.
- Apply a thin layer of frosting all over the cake and chill for 20 minutes to trap crumbs.
- Add a final, thicker layer of frosting, smoothing with an offset spatula and bench scraper for clean edges.
- Heat 1/4 cup (60ml) heavy cream until simmering. Pour over 4 ounces (115g) chopped white chocolate, stirring until smooth.
- Mix in edible gold luster dust with a few drops of clear vanilla extract to create a paintable drip. Let cool slightly.
- Using a spoon or small brush, gently drip gold ganache over cake edges and top for a luxe finish. Chill cake briefly to set drip.
Notes
Use room temperature ingredients for even mixing and fluffier cake. Add gel food coloring gradually to achieve a smooth ombre gradient. Cool cake layers completely before frosting to prevent melting. For gluten-free option, substitute flour with a 1:1 gluten-free baking flour blend and add xanthan gum if needed. Let gold drip cool slightly before applying to avoid melting frosting.
Nutrition
- Serving Size: 1 slice (1/12th of c
- Calories: 350
- Fat: 15
- Carbohydrates: 45
- Protein: 3
Keywords: birthday cake, ombre cake, edible gold drip, tall stack cake, vanilla sponge, buttercream frosting, celebration cake