Love this? Save it for later!
Share the inspiration with your friends
I was standing in the frozen foods aisle last October, staring at a box of something that claimed to be “spooky-shaped chicken nuggets,” when a kid zoomed past me in a too-big astronaut costume. His mom was juggling a cart, a baby, and what looked like the world’s most defeated grocery list. And just like that, I was seven years old again, sitting cross-legged on my Aunt Carla’s linoleum kitchen floor while she pulled something ridiculous out of the oven. It was a hot dog wrapped in a crescent roll, with little olive eyes staring up at me. She called them mummies. I thought they were the greatest thing I’d ever seen. Honestly, I still kind of do.
Aunt Carla wasn’t exactly a gourmet cook — she burned toast more often than not — but she understood something about feeding kids on Halloween night. It couldn’t be fussy. It couldn’t take forever. And it absolutely had to make you laugh. These easy mummy hot dogs checked every box. She’d hand me a plastic knife to “help” slice the dough strips, which I did with all the precision of a toddler learning to color. There was flour on my nose, a smear of mustard on my sleeve, and I was having the time of my life.
That’s the thing, isn’t it? You don’t remember the perfect meals from childhood. You remember the ones that felt like a party. These mummy hot dogs are that — a spooky Halloween dinner that takes ten minutes of prep and delivers a hundred times the fun. Maybe you’re looking for something to make with your own kids, or maybe you just want a ridiculous, satisfying dinner on October 31st without ordering pizza. I get it. I’ve been there, standing in that frozen aisle, trying to decide if spooky nuggets are worth the price tag. They’re not. These are.
Why You’ll Love This Recipe
Let me tell you why this recipe has survived in my rotation for more years than I care to count. It’s not fancy, but it’s honest — and honestly, it’s perfect.
- Quick & Easy: From fridge to table in under 20 minutes. That’s less time than it takes to argue about what to order for delivery.
- Simple Ingredients: You need hot dogs, crescent roll dough, and a squirt of mustard or ketchup for eyes. That’s it. No specialty store runs required.
- Perfect for Halloween Dinner: Whether you’re hosting a costume party or just trying to get the kids fed before trick-or-treating, these fit the bill without the stress.
- Crowd-Pleaser: I’ve watched picky eaters, teenagers, and grown adults all reach for seconds. There’s something about the wrapped-up look that makes everyone smile.
- Unbelievably Delicious: The crescent dough gets golden and flaky while the hot dog stays juicy. Dip it in ketchup or mustard and it’s pure comfort food magic.
What makes this version different from the other mummy hot dog recipes floating around? It’s the little things I’ve learned from making these about forty times. Like how to cut the dough strips so they don’t tear. How to space the eyes so the mummy looks cute, not creepy. And the exact baking time that gives you golden dough without dried-out hot dogs. This isn’t just another version — it’s the one I keep coming back to, and the one my family requests every single October.
This recipe is the kind that makes you feel like a kitchen hero without breaking a sweat. It’s Halloween dinner, reimagined — faster, easier, and way more fun than anything in a box. Perfect for impressing the little monsters in your life, or just turning a regular Tuesday into something worth remembering.
What Ingredients You Will Need
This recipe uses the simplest lineup of ingredients you can imagine. Most of these are probably in your kitchen right now, which is exactly the point. Here’s what you need and why each one matters.
For the Mummies
- 8 hot dogs (I prefer all-beef for better flavor, but any kind works — even turkey or plant-based options)
- 1 can (8 oz) refrigerated crescent roll dough (I use Pillsbury, but store brands work fine — just make sure it’s the sheet-style if you want fewer seams)
- Mustard or ketchup, for the eyes (yellow mustard gives the best “mummy” look, but ketchup works if that’s what your kids prefer)
Optional Add-Ons
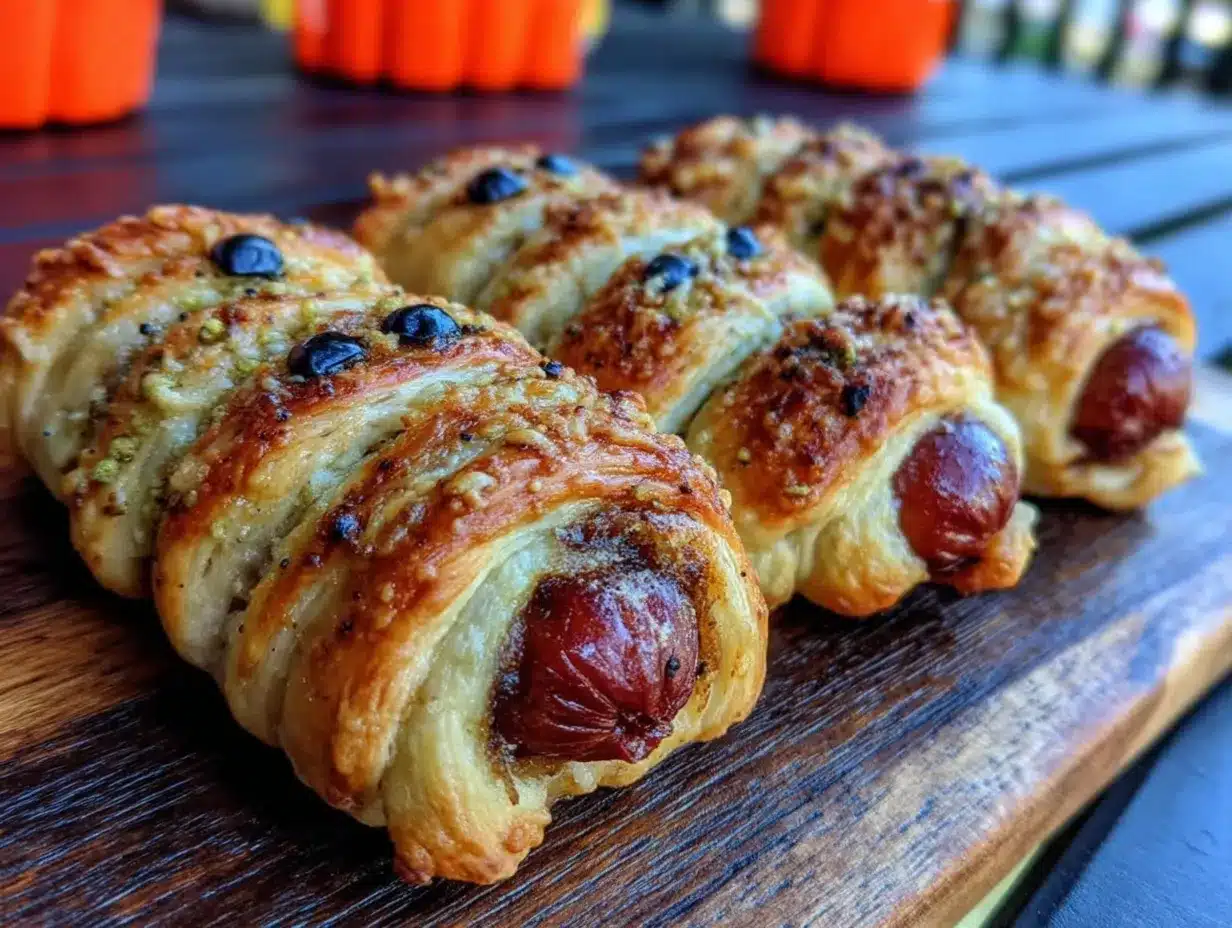
- Olive slices, for more traditional mummy eyes (pimento-stuffed green olives add a nice salty pop)
- Pretzel sticks, for mummy arms (break them in half and tuck them under the dough before baking)
- Shredded cheese, to sprinkle on top in the last 2 minutes of baking (adds a gooey, delicious layer)
A few ingredient tips I’ve picked up along the way. For the hot dogs, look for ones that are evenly sized so they bake at the same rate. I’ve had good luck with Nathan’s and Hebrew National, but honestly, the store brand works just fine for this. If you’re using crescent roll dough, let it sit at room temperature for about 5 minutes before unrolling — cold dough cracks and tears more easily. I learned that one the hard way, let me tell you.
For the eyes, I’ve tried everything. Mustard dots are the easiest and most kid-friendly. Olive slices look more authentic but can be a pain to keep in place. My personal favorite? A tiny dab of mustard with a speck of black sesame seed in the center. It sounds ridiculous, but it gives the mummies actual pupils and my kids lose their minds over it.
If you’re making these for a crowd, double the recipe without any issues. Just use two baking sheets and rotate them halfway through baking. You can also prep the mummies a few hours ahead — just arrange them on the baking sheet, cover with plastic wrap, and refrigerate until you’re ready to bake. Add a minute or two to the baking time if they’re going in cold.
Equipment Needed
You don’t need a fancy kitchen for these. Here’s what I use every time:
- Baking sheet (any size works — I use a standard half-sheet pan lined with parchment paper for easy cleanup)
- Parchment paper or silicone baking mat (prevents sticking and makes cleanup a breeze)
- Sharp knife or pizza cutter (for cutting the dough strips — a pizza cutter gives you cleaner edges)
- Small bowl (for the mustard or ketchup if you’re dipping eyes)
- Toothpicks (for positioning olive eyes if you go that route)
- Pastry brush (optional, for brushing the dough with egg wash for extra golden color)
If you don’t have a pizza cutter, a sharp knife works perfectly. I’ve also used kitchen shears in a pinch — just cut the dough while it’s still rolled up, then unroll it. That’s a trick I picked up from a friend who makes these for her son’s Halloween class party every year. Budget-friendly tip: skip the silicone mat and just use parchment paper. A roll costs about two dollars and lasts for months.
Preparation Method
Alright, let’s make some mummies. I’ve broken this down so clearly that even a first-timer will feel like a pro. Trust me — if I can do this without burning anything, you can too.
- Preheat your oven to 375°F (190°C). Line a baking sheet with parchment paper or a silicone mat. This step matters — the dough will stick to an unlined pan, and nobody wants to scrape mummy parts off a baking sheet.
- Unroll the crescent dough and separate it into 8 triangles. If you bought the sheet-style dough, just unroll it into one large rectangle. Using a pizza cutter or sharp knife, cut each triangle lengthwise into 3 thin strips. For sheet dough, cut the rectangle into 24 thin strips — about 1/2 inch wide each. You want them thin enough to wrap around the hot dog but thick enough not to tear.
- Pat the hot dogs dry with a paper towel. This helps the dough stick better. I skipped this step once and the dough slid right off during baking. Lesson learned.
- Wrap each hot dog with dough strips. Start at one end and wrap the strips around the hot dog at a slight angle, overlapping them slightly. Leave a small gap about 1 inch wide near the top of the hot dog for the mummy’s face. Don’t wrap too tightly — the dough will expand as it bakes, and you want it to look slightly loose, like actual bandages. Press the ends of the strips gently against the hot dog to seal them.
- Place the wrapped hot dogs on the prepared baking sheet, leaving about 1 inch of space between each one. They don’t spread much, so you can fit all 8 on a standard sheet pan.
- Bake for 10-12 minutes, or until the dough is golden brown and puffed. The hot dogs should be heated through. If you want extra golden mummies, brush the dough with a beaten egg or a little milk before baking. I usually skip this step because I’m lazy, but it does make them prettier.
- Let them cool for 2 minutes on the baking sheet. This gives the dough a chance to set so it doesn’t fall apart when you move them.
- Add the eyes. Using a toothpick or the tip of a knife, dab a tiny amount of mustard or ketchup onto the exposed hot dog area. For olive eyes, press an olive slice into a small dab of mustard to help it stick. For the pupil effect I mentioned earlier, press a black sesame seed into the center of the mustard dot.
- Serve immediately. These are best warm, when the dough is still flaky and the hot dog is juicy. Set out bowls of ketchup, mustard, and any other dipping sauces you like.
A quick note on timing: the whole process takes about 15 minutes of active work and 12 minutes of baking. If you’re making these on Halloween night, you can wrap the hot dogs earlier in the day and keep them in the fridge. Then just pop them in the oven when the kids start getting restless. It’s a lifesaver on busy nights.
One thing I always tell first-timers: don’t stress about making the wraps look perfect. Mummies are supposed to look a little messy. If some dough strips overlap more than others, that’s fine. If a strip breaks, just press it back together — it’ll bake up just fine. The only real rule is leaving that face gap. Without it, they just look like weird dough logs, and nobody wants that.
Cooking Tips & Techniques
After making these more times than I can count, I’ve picked up a few tricks that make the process smoother and the results better. Here’s what I wish someone had told me the first time.
Don’t overwork the dough. Crescent roll dough is delicate. If you handle it too much, it gets tough and doesn’t puff up as nicely in the oven. Cut your strips quickly, wrap them gently, and get them in the oven. The less you fuss, the better they turn out.
Watch the baking time like a hawk. I’ve burned these exactly once, and it was because I got distracted by a phone call. The difference between perfect golden mummies and sad brown logs is about 90 seconds. Start checking at the 10-minute mark. You’re looking for a deep golden color on the dough, not brown.
Use room-temperature dough. This is the tip that changed everything for me. Cold dough cracks when you try to cut it into thin strips. Let the can sit on the counter for 5-10 minutes before opening. If you’re in a hurry, run the sealed can under warm water for 30 seconds. Just don’t microwave it — I tried that once and ended up with partially cooked dough and a mess.
Space the eyes properly. I learned this from a particularly derpy-looking mummy that my daughter named “Winky.” Place the eyes about 1/2 inch apart. Too close together and they look cross-eyed. Too far apart and the mummy looks surprised. Right in the middle gives you that cute, slightly clueless expression that makes everyone smile.
Multitask like a pro. While the mummies are baking, set up your dipping sauce station and get the plates ready. These are best served immediately, so having everything ready to go makes the meal feel effortless. I also like to have a veggie tray or some apple slices on hand to balance out the indulgence.
Variations & Adaptations
One of the best things about this recipe is how easily it adapts. Here are some variations I’ve tried and loved.
Cheesy Mummies: Before wrapping the hot dogs, cut a slit lengthwise down the center and stuff it with a strip of cheddar or mozzarella cheese. Wrap and bake as directed. The cheese oozes out a little during baking, which looks delightfully creepy. My kids call these “zombie mummies.”
Spicy Mummies: Use spicy Italian sausages instead of hot dogs, and add a thin smear of sriracha or chipotle paste to the dough before wrapping. These are my personal favorite for adult Halloween parties. Serve with a cooling ranch or blue cheese dip.
Vegetarian Mummies: Swap the hot dogs for vegetarian sausages or even pre-cooked carrot dogs. For carrot dogs, peel whole carrots, boil them in vegetable broth with a splash of soy sauce for 10 minutes, then pat dry and proceed with the wrapping. They’re surprisingly good and look just as cute.
Breakfast Mummies: Use breakfast sausages instead of hot dogs and serve with maple syrup for dipping. I made these for a Halloween morning breakfast and they were a huge hit. The sweet-and-savory combo works beautifully.
Air Fryer Mummies: If you don’t want to heat up the whole oven, these work great in an air fryer. Cook at 350°F (175°C) for 6-8 minutes, checking at the 6-minute mark. The dough gets even crispier this way. Just don’t overcrowd the basket — work in batches if needed.
I once made a batch with gluten-free crescent dough for a friend’s kid who has celiac disease. It worked fine, though the dough was a bit more fragile and tore more easily. Just handle it gently and don’t stress if the wraps look a little raggedy — mummies are supposed to look disheveled anyway.
Serving & Storage Suggestions
These mummy hot dogs are best served warm, straight from the oven. The contrast between the hot, juicy hot dog and the flaky, golden dough is what makes them special. Let them cool for just 2-3 minutes before serving — any longer and the dough starts to soften.
For presentation, I like to arrange them on a platter with a small bowl of ketchup for “blood” dipping. Add some pretzel sticks for “bones” and maybe a few cheese cubes cut into tiny pumpkin shapes with a cookie cutter. It takes five extra minutes and makes the whole meal feel like an event.
As for drinks, these pair well with apple cider (hot or cold), root beer floats, or just plain milk for the kids. For grown-up gatherings, a dark beer or a smoky bourbon cocktail complements the savory flavors nicely.
Storage: If you have leftovers (unlikely, but possible), let them cool completely, then store in an airtight container in the refrigerator for up to 3 days. The dough will soften, but they’re still tasty.
Reheating: The best way to reheat these is in the oven or air fryer. Pop them in a 350°F (175°C) oven for 5-7 minutes, or in the air fryer at 350°F for 3-4 minutes. The microwave works in a pinch, but the dough will be soft and chewy rather than crisp. I don’t recommend it unless you’re in a serious hurry.
Freezing: You can freeze the unbaked, wrapped mummies on a baking sheet until solid, then transfer to a freezer bag. They’ll keep for up to 2 months. Bake from frozen at 375°F (190°C) for 14-16 minutes, adding the eyes after baking. This is a great make-ahead option for busy Halloween nights.
One thing I’ve noticed: the flavors actually don’t change much over time, but the texture does. These are really at their peak within the first hour after baking. So make what you’ll eat, and don’t try to stretch them into lunch the next day — they’re just not the same.
Nutritional Information & Benefits
Let’s be real — these are not health food. They’re a fun Halloween treat, and that’s okay. But here’s the breakdown if you’re curious.
Per serving (2 mummies): approximately 380-420 calories, 22g fat, 32g carbohydrates, 14g protein. Exact numbers depend on the brand of hot dogs and dough you use. The crescent dough contributes most of the carbs and fat, while the hot dog provides the protein.
If you’re looking to lighten these up, a few easy swaps help. Use turkey or chicken hot dogs to cut the fat and calories by about 30%. Low-fat crescent dough is available at most grocery stores. And skipping the dipping sauces saves a surprising amount of sugar and sodium.
The hot dogs themselves are a decent source of protein and B vitamins. Crescent dough provides quick energy, which is honestly perfect for fueling up before a night of trick-or-treating. I like to serve these with a side of carrot sticks or apple slices to add some fiber and vitamins to the meal. It makes me feel better about the whole thing, and the kids eat the veggies without complaint when there’s a mummy staring at them from the plate.
For anyone with dietary restrictions: these contain wheat and dairy (the dough has both). Gluten-free crescent dough is available at many stores now. For dairy-free, check the dough label — some brands use butter, others use oil. Plant-based hot dogs work beautifully for a vegan version, just make sure your dough is also vegan.
Conclusion
These easy mummy hot dogs are proof that Halloween dinner doesn’t have to be complicated to be memorable. They’re quick, they’re fun, and they bring a little bit of that childhood magic to the table — the kind that makes you feel like you’re getting away with something, even though you’re just eating a hot dog wrapped in dough.
I’ve made these for costume parties, for classroom celebrations, and for quiet Halloween nights at home with just my family. Every single time, they disappear in minutes. There’s something about the mummy shape that makes people smile, and that’s worth more than any fancy recipe I’ve ever attempted.
So go ahead and make them your own. Add cheese, swap the hot dogs, experiment with different dipping sauces. The beauty of this recipe is that it’s a starting point, not a rulebook. And if you come up with a variation I haven’t tried, I’d love to hear about it. Drop a comment below or tag me in your photos — nothing makes my day like seeing your kitchen creations.
Now go make some mummies. Your Halloween night just got a whole lot more fun.
Frequently Asked Questions
Can I make these mummy hot dogs ahead of time?
Absolutely. Wrap the hot dogs up to 4 hours in advance and keep them on the baking sheet in the fridge. Add a minute or two to the baking time if they’re going in cold. I wouldn’t recommend baking them fully ahead of time, though — the dough is best fresh from the oven.
What if I don’t have crescent roll dough?
No problem. You can use puff pastry (cut into thin strips), refrigerated pizza dough, or even homemade pie crust. Each gives a slightly different texture. Puff pastry is the flakiest, pizza dough is the chewiest, and pie crust is the most buttery. All work great.
Can I use the air fryer instead of the oven?
Yes! Air fry at 350°F (175°C) for 6-8 minutes. Check at the 6-minute mark — air fryers run hot and you don’t want to burn the dough. The mummies come out extra crispy this way. Just work in batches so you don’t overcrowd the basket.
How do I keep the olive eyes from falling off?
This used to drive me crazy. The trick is to dab a tiny bit of mustard or cream cheese on the hot dog first, then press the olive slice into it. The mustard acts like glue. You can also use a toothpick to secure the olive in place, just remember to remove it before serving.
My dough keeps tearing when I wrap it. What am I doing wrong?
Two things: your dough might be too cold, or you’re cutting the strips too thin. Let the dough sit at room temperature for 5-10 minutes before working with it. And aim for strips that are about 1/2 inch wide — anything thinner will tear. If a strip does break, just press it back together on the hot dog. The heat of baking will seal it.
Pin This Recipe!

Easy Mummy Hot Dogs: Spooky Halloween Dinner Idea
These easy mummy hot dogs are a quick and fun Halloween dinner that takes ten minutes of prep and delivers a hundred times the fun. Made with hot dogs wrapped in crescent roll dough and topped with mustard or ketchup eyes, they’re a crowd-pleaser for kids and adults alike.
- Prep Time: 10 minutes
- Cook Time: 12 minutes
- Total Time: 22 minutes
- Yield: 4 servings (2 mummies per serving) 1x
- Category: Main Course
- Cuisine: American
Ingredients
- 8 hot dogs (all-beef recommended, but any kind works)
- 1 can (8 oz) refrigerated crescent roll dough
- Mustard or ketchup, for the eyes
- Olive slices (optional, for traditional mummy eyes)
- Pretzel sticks (optional, for mummy arms)
- Shredded cheese (optional, for topping)
Instructions
- Preheat your oven to 375°F (190°C). Line a baking sheet with parchment paper or a silicone mat.
- Unroll the crescent dough and separate it into 8 triangles. Using a pizza cutter or sharp knife, cut each triangle lengthwise into 3 thin strips.
- Pat the hot dogs dry with a paper towel to help the dough stick.
- Wrap each hot dog with dough strips, starting at one end and wrapping at a slight angle, overlapping slightly. Leave a 1-inch gap near the top for the mummy’s face. Press the ends gently to seal.
- Place the wrapped hot dogs on the prepared baking sheet, leaving about 1 inch of space between each.
- Bake for 10-12 minutes, or until the dough is golden brown and puffed.
- Let them cool for 2 minutes on the baking sheet.
- Add the eyes: Using a toothpick or knife tip, dab a tiny amount of mustard or ketchup onto the exposed hot dog area. For olive eyes, press an olive slice into a small dab of mustard to help it stick.
- Serve immediately with ketchup, mustard, or other dipping sauces.
Notes
For best results, let crescent dough sit at room temperature for 5-10 minutes before unrolling to prevent tearing. Don’t overwork the dough. Watch baking time closely—difference between perfect and burnt is about 90 seconds. For air fryer, cook at 350°F for 6-8 minutes. Can be prepped up to 4 hours ahead and refrigerated. Freeze unbaked mummies for up to 2 months.
Nutrition
- Serving Size: 2 mummies
- Calories: 400
- Sugar: 6
- Sodium: 900
- Fat: 22
- Saturated Fat: 8
- Carbohydrates: 32
- Fiber: 1
- Protein: 14
Keywords: mummy hot dogs, Halloween dinner, easy Halloween recipe, hot dog recipe, crescent roll recipe, spooky dinner, kid-friendly Halloween


