Love this? Save it for later!
Share the inspiration with your friends
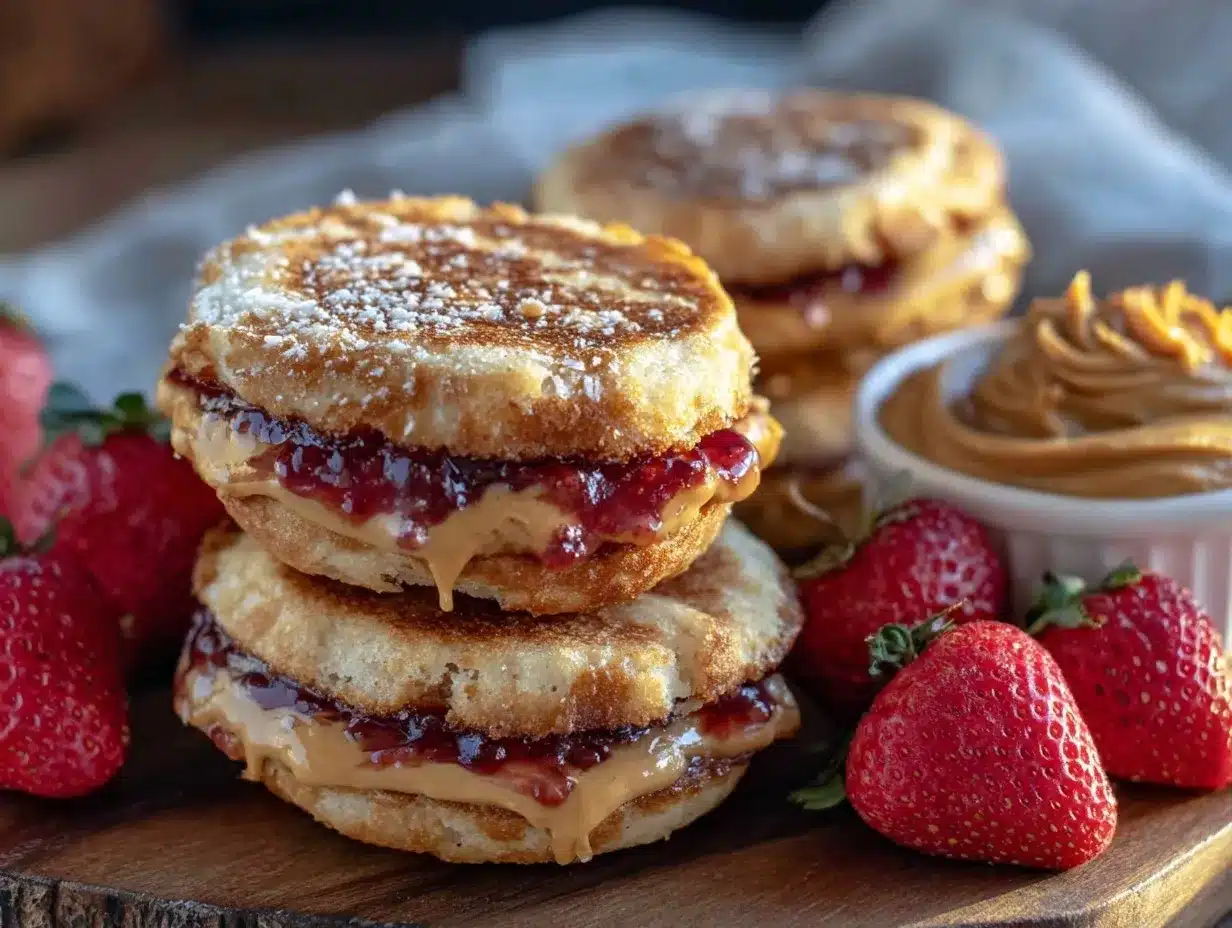
Honestly, I thought making homemade freezer-friendly Uncrustables sounded like a mistake until I accidentally ran out of store-bought ones mid-week. My usual go-to was grabbing those pre-packaged little pockets at the grocery store, but one evening, faced with a hungry kiddo and an empty pantry, I had to wing it. The idea of fussing over crustless peanut butter and jelly sandwiches felt like a hassle, but I gave it a shot anyway. What surprised me wasn’t just how easy it was but how much better they tasted—fresh, soft bread hugging just the right amount of filling.
There was something oddly satisfying about crafting these little sandwiches myself, freezing them, and knowing I could pull them out whenever snack time hit hard. The texture stayed spot-on after thawing, and the convenience? Unmatched. This recipe stuck with me because it turned a skeptical “why bother?” into a quiet little win in my kitchen routine. It’s the kind of homemade that doesn’t scream “effort” but delivers comfort and convenience in spades, perfect for busy days or last-minute snacks.
So yeah, while I wasn’t sold on ditching the store brands at first, now I’m quietly proud to say these homemade freezer-friendly Uncrustables are my secret snack weapon. They feel like something made with care but don’t take a ton of time—just what I needed.
Why You’ll Love This Recipe
After testing this easy homemade freezer-friendly Uncrustables recipe a handful of times, I can honestly say it’s a keeper for anyone juggling hectic schedules and hungry bellies. Here’s why it’s stood the test of my busy weeks and picky eaters:
- Quick & Easy: You can have a batch ready to freeze in under 30 minutes, saving you from those frantic sandwich-making moments.
- Simple Ingredients: No need for fancy stuff—just basic pantry staples that you probably already have, like soft sandwich bread, peanut butter, and jelly.
- Perfect for On-the-Go: Whether it’s lunchboxes, road trips, or unexpected snack attacks, these sandwiches thaw perfectly and stay mess-free.
- Crowd-Pleaser: Kids, adults, even the picky eaters give these a thumbs-up—probably because they taste fresher and less processed than store-bought.
- Customizable: You can swap out fillings easily—try almond butter or sunflower seed spread for allergies, or different jams for seasonal flavor twists.
What really sets this recipe apart is the method I use to seal the edges perfectly, so you don’t get that annoying leakage or frozen mess. Plus, choosing the right bread (I love using a soft white sandwich loaf for the fluffiest texture) makes all the difference. This isn’t just a copycat—it’s a homemade snack that feels like a treat but is totally practical.
It’s a recipe that’s stuck around because it quietly solves a real problem without fuss, which, honestly, is the kind of kitchen magic I’m all about.
What Ingredients You Will Need
This recipe uses simple, wholesome ingredients to deliver soft, flavorful freezer-friendly Uncrustables without any fuss. Most of what you need are pantry staples, and you can easily swap or adjust depending on what you have on hand.
- Soft Sandwich Bread: White or whole wheat, crusts removed (I recommend a fresh, square loaf for best sealing edges)
- Peanut Butter: Creamy or chunky, depending on your preference (natural peanut butter works well, but a smooth commercial brand helps with spreading evenly)
- Grape Jelly or Jam: Classic grape is a favorite, but strawberry or raspberry jam works beautifully too (choose a thicker jam to prevent sogginess)
- Powdered Sugar: For dusting the sandwiches before freezing to keep them from sticking together
- Optional Fillings: Almond butter, sunflower seed butter, or honey for variation or allergy-friendly options
If you want to get fancy, a little cinnamon or vanilla mixed into the peanut butter can add a subtle flavor boost. During summer, swapping in a fresh jam like peach or blueberry can keep things seasonal and delightful.
When I first tried this recipe, I used whatever bread was on hand, but the difference in texture when using a fresh soft loaf versus day-old or dense bread was night and day. Also, for those who need gluten-free options, using a soft gluten-free sandwich bread is a great alternative—just watch the sealing step closely.
Equipment Needed
To make these freezer-friendly Uncrustables, you don’t need much beyond basic kitchen tools. Here’s what I use:
- Round Sandwich or Cookie Cutter: About 3 to 4 inches in diameter, perfect for cutting and sealing the sandwiches. I personally prefer a fluted edge cutter for a cute touch, but a plain round one works fine.
- Rolling Pin: To flatten and seal the bread edges nicely. If you don’t have one, a clean wine bottle or smooth cup will do.
- Baking Sheet or Tray: For laying out the sandwiches before freezing.
- Parchment Paper or Silicone Mat: Prevents sticking during freezing.
- Plastic Wrap or Freezer Bags: For storing the sandwiches once frozen.
If you want to keep things budget-friendly, you can skip the fancy cutters and just use a butter knife to trim crusts and shape sandwiches, but the cutter really speeds things up and keeps the edges sealed tight. Also, I keep my rolling pin clean and lightly dust it with flour to avoid any sticky situations.
Preparation Method
- Prepare Your Workspace: Line a baking sheet with parchment paper or a silicone mat to place your sandwiches on. Remove crusts from the bread slices carefully using a sharp knife or crust cutter.
- Flatten the Bread: Place a slice of bread on a clean surface and gently press it with a rolling pin just enough to make it a bit thinner and easier to seal later. Repeat for a matching slice.
- Apply the Peanut Butter: Spread about 1 tablespoon (15 ml) of peanut butter evenly over the first slice, leaving a small border around the edges (about 1/4 inch or 6 mm). This helps prevent leakage when sealing.
- Add the Jelly: Spread about 1 tablespoon (15 ml) of jelly or jam over the peanut butter layer, again keeping a bit clear of the edges to avoid messy spills.
- Top with Second Slice: Place the second slice of bread on top, pressing gently to sandwich the filling.
- Cut and Seal: Use your round sandwich cutter to press down firmly, cutting through the sandwich and sealing the edges together. If you don’t have a cutter, trim the sandwich edges and press firmly with a rolling pin to seal.
- Dust with Powdered Sugar: Lightly sprinkle powdered sugar on both sides of each sandwich to help prevent them from sticking together once frozen.
- Freeze: Arrange the sandwiches on the prepared baking sheet in a single layer. Freeze uncovered for about 30 minutes until firm.
- Store: Once firm, transfer the sandwiches to a zip-top freezer bag or airtight container, separating layers with parchment paper if stacking.
Note: When you want to eat one, just thaw at room temperature for 30-40 minutes or pop it in the lunchbox the night before. They stay soft and fresh, unlike many store-bought versions that get tough or soggy.
Cooking Tips & Techniques
Making homemade freezer-friendly Uncrustables is easier than you might think, but a few pointers can make all the difference.
- Pick the Right Bread: Soft, fresh sandwich bread seals better and stays tender after freezing. Stale or dense bread can crack or get chewy.
- Don’t Overfill: Too much peanut butter or jelly can cause leaks during freezing or thawing. About a tablespoon each is just right.
- Seal Edges Firmly: Press the cutter or rolling pin firmly to create a tight seal—this keeps fillings inside and prevents freezer burn.
- Use Powdered Sugar: This little trick keeps sandwiches from sticking together in the freezer, saving you from a sticky mess.
- Freeze Individually First: Freezing the sandwiches on a tray before bagging helps them keep their shape and prevents sticking.
One personal lesson learned the hard way: skipping the edge sealing step meant jelly oozed out and froze into a solid mess. Also, letting the sandwiches thaw completely before eating helps recover that fresh-baked softness, which is why I often pack them in lunchboxes the night before.
Variations & Adaptations
This recipe is super adaptable depending on your taste, dietary needs, or what you have on hand.
- Allergy-Friendly: Swap peanut butter for sunflower seed butter or soy nut butter to avoid nuts.
- Flavor Swaps: Try fillings like Nutella, cream cheese with jam, or even honey and banana slices for a twist on the classic.
- Gluten-Free: Use gluten-free sandwich bread and gluten-free powdered sugar to keep it safe and tasty.
- Different Shapes: Use cookie cutters in fun shapes like stars or hearts to make snack time more exciting for kids.
One variation I love is mixing a little cinnamon into the peanut butter before spreading—it adds a cozy warmth that’s perfect for cooler days. For a fruity change, I once swapped grape jelly for fresh peach preserves during summer, which made the sandwiches taste like a fresh peach cobbler in a portable form.
Serving & Storage Suggestions
These homemade freezer-friendly Uncrustables are best served at room temperature after thawing, which usually takes about 30-45 minutes. They make perfect grab-and-go snacks for lunchboxes, picnics, or quick afternoon bites.
Pair them with fresh fruit, crunchy veggies, or a small glass of milk for a balanced snack. They also work great alongside simple salads or light pasta dishes like a grilled chicken Caesar pasta salad for a no-fuss lunch.
For storage, keep the sandwiches in an airtight freezer bag or container for up to 3 months. When stacking, separate layers with parchment paper to avoid sticking. To reheat slightly, you can place them in a warm spot or microwave for about 15 seconds, but honestly, I prefer them thawed naturally for the best texture.
Over time, the flavors meld nicely in the freezer, and the bread stays soft but stable, making these sandwiches a convenient staple to have on hand.
Nutritional Information & Benefits
Each homemade freezer-friendly Uncrustable sandwich contains approximately:
| Calories | Protein | Fat | Carbohydrates | Fiber |
|---|---|---|---|---|
| 250-280 kcal | 7-8 g | 12-14 g | 30-32 g | 2-3 g |
Key ingredients like peanut butter provide good sources of protein and healthy fats, while the bread offers energy-boosting carbohydrates. Using whole wheat bread can bump up fiber content, which is a nice bonus.
This recipe can be modified for dietary needs: swapping in gluten-free bread or nut-free spreads makes it accessible for different diets. Just be mindful of peanut allergies, which are common, and substitute accordingly.
From a wellness standpoint, these sandwiches make for a balanced snack that offers sustained energy, making them a great option for kids’ lunchboxes or quick adult snacks during busy days.
Conclusion
Making easy homemade freezer-friendly Uncrustables has quietly become one of my favorite kitchen hacks. They’re simple, reliable, and genuinely delicious without the fuss of store-bought versions. Plus, the flexibility to customize fillings or bread means you can make them truly your own.
I love having a stash ready for those chaotic mornings or sudden snack emergencies—it’s a little peace of mind in sandwich form. If you give this recipe a try, I’d love to hear what variations you come up with and how it fits into your routine.
Whether you’re packing lunchboxes or just need a quick, satisfying bite, these Uncrustables make snack time easier and tastier. Share your thoughts or tweaks in the comments—I’m always curious about what works for other busy kitchens!
Frequently Asked Questions
How long can homemade Uncrustables be frozen?
They keep best for up to 3 months in the freezer when stored properly in an airtight container or freezer bag.
Can I use gluten-free bread for this recipe?
Absolutely! Just use a soft gluten-free sandwich bread, but be extra careful sealing the edges since gluten-free breads can be more fragile.
Will the sandwiches get soggy when thawed?
If you keep the fillings balanced and seal the edges well, they stay soft and not soggy. Using thicker jams helps prevent excess moisture too.
Can I use other fillings besides peanut butter and jelly?
Yes! Try almond butter, sunflower seed butter, Nutella, or even cream cheese with fruit preserves for different flavors.
What’s the best way to thaw these sandwiches?
Thaw at room temperature for 30-45 minutes or place the frozen sandwich in a lunchbox overnight. Avoid microwaving too long to keep the bread soft.
Pin This Recipe!
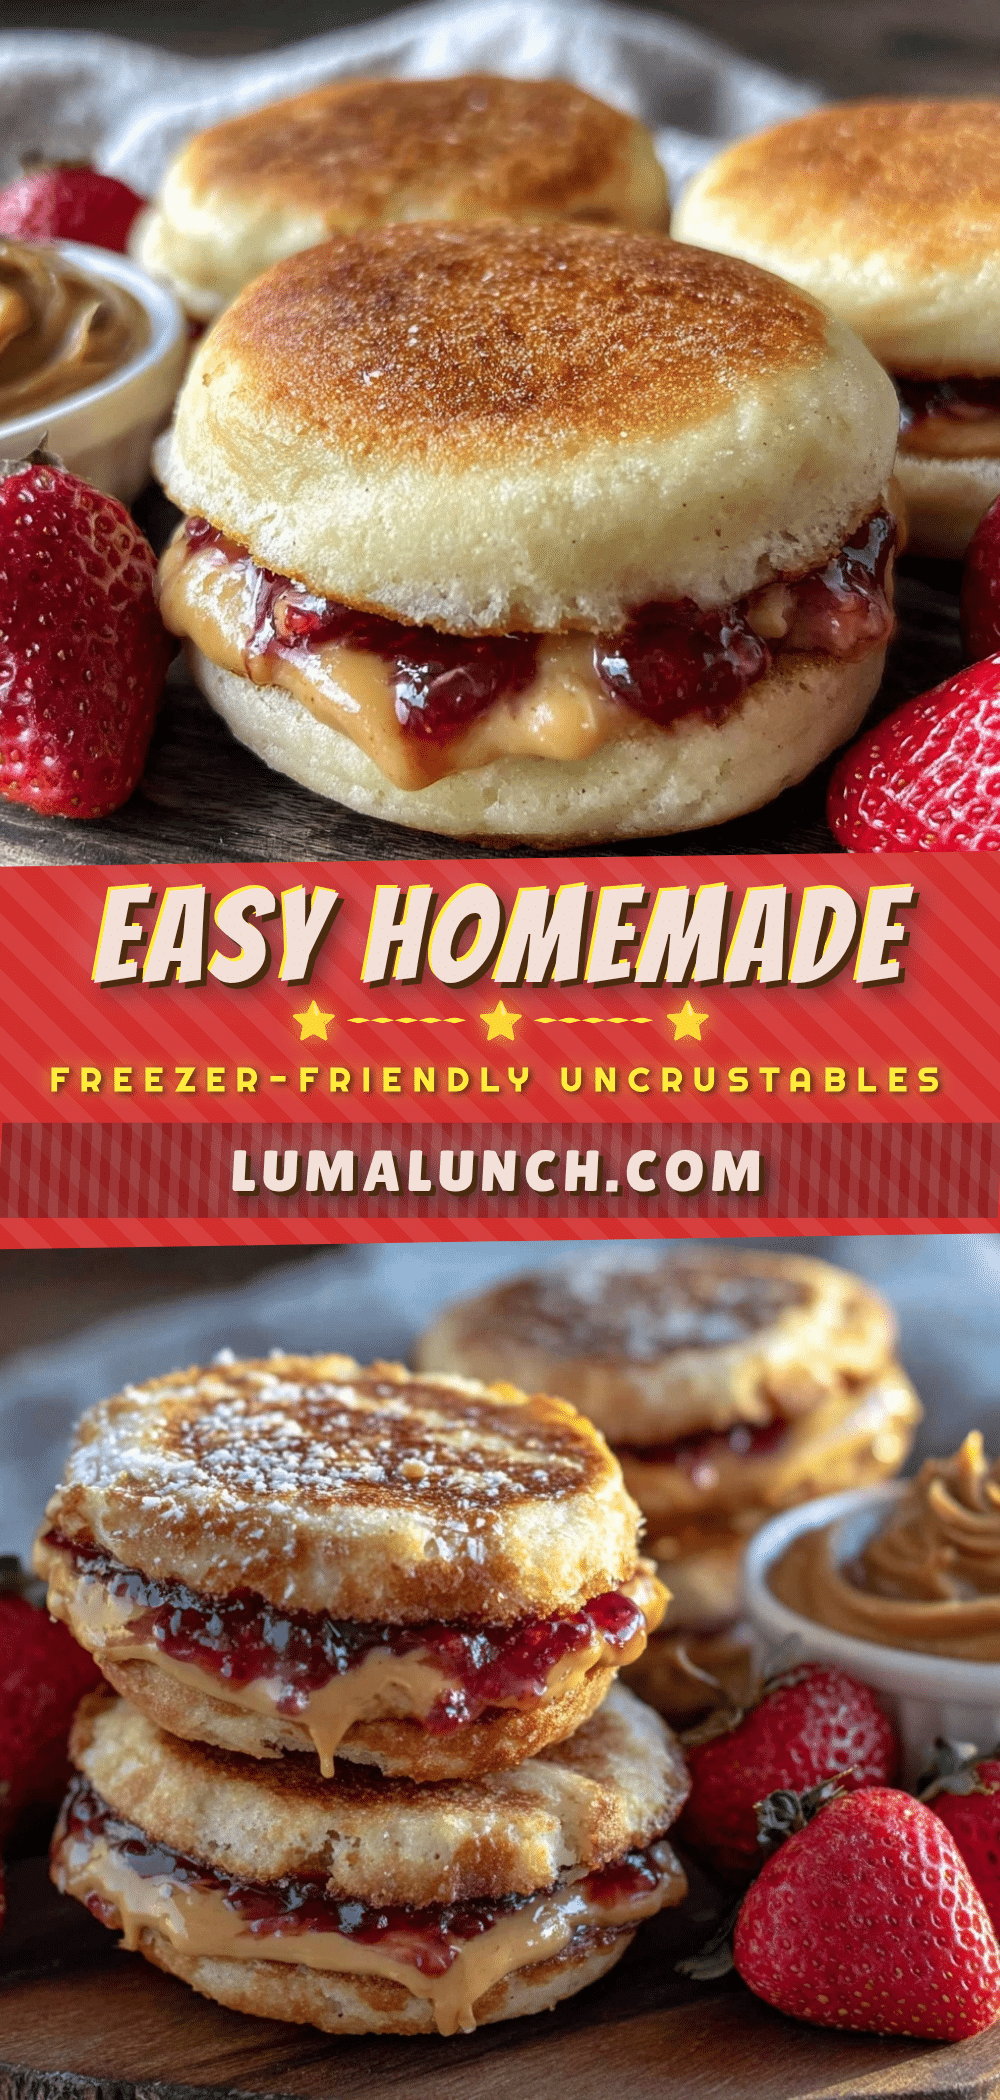
Easy Homemade Freezer-Friendly Uncrustables Recipe for Quick Snacks

This easy homemade freezer-friendly Uncrustables recipe delivers soft, flavorful crustless peanut butter and jelly sandwiches that freeze well and thaw perfectly for quick, mess-free snacks.
- Prep Time: 15 minutes
- Cook Time: 30 minutes (freezing time)
- Total Time: 45 minutes
- Yield: 6 sandwiches
- Category: Snack
- Cuisine: American
Ingredients
- Soft sandwich bread (white or whole wheat), crusts removed
- Peanut butter (creamy or chunky)
- Grape jelly or jam (thicker jams preferred)
- Powdered sugar (for dusting)
- Optional fillings: almond butter, sunflower seed butter, honey
- Optional: cinnamon or vanilla mixed into peanut butter
Instructions
- Line a baking sheet with parchment paper or a silicone mat.
- Remove crusts from bread slices using a sharp knife or crust cutter.
- Flatten each slice of bread gently with a rolling pin to make sealing easier.
- Spread about 1 tablespoon (15 ml) of peanut butter evenly over one slice, leaving a 1/4 inch (6 mm) border.
- Spread about 1 tablespoon (15 ml) of jelly or jam over the peanut butter, keeping edges clear.
- Place the second slice of bread on top and press gently to sandwich the filling.
- Use a round sandwich or cookie cutter (3-4 inches diameter) to cut and seal the edges firmly. If no cutter, trim edges and press with rolling pin to seal.
- Lightly dust both sides of each sandwich with powdered sugar to prevent sticking.
- Arrange sandwiches on the prepared baking sheet in a single layer and freeze uncovered for about 30 minutes until firm.
- Transfer frozen sandwiches to a zip-top freezer bag or airtight container, separating layers with parchment paper if stacking.
Notes
Use soft, fresh sandwich bread for best sealing and texture. Do not overfill with peanut butter or jelly to avoid leaks. Dust sandwiches with powdered sugar before freezing to prevent sticking. Freeze sandwiches individually on a tray before storing in bags. Thaw at room temperature for 30-45 minutes or overnight in lunchbox for best texture.
Nutrition
- Serving Size: 1 sandwich
- Calories: 265
- Sugar: 10
- Sodium: 250
- Fat: 13
- Saturated Fat: 2
- Carbohydrates: 31
- Fiber: 2.5
- Protein: 7.5
Keywords: Uncrustables, freezer-friendly snacks, peanut butter and jelly, homemade sandwiches, quick snacks, lunchbox ideas, easy recipes