Love this? Save it for later!
Share the inspiration with your friends
This was supposed to be a batch of perfectly round, elegantly iced sugar cookies for a Halloween party. I had the royal icing recipe memorized, the gel food coloring ready, and a vision of neat little ghosts and pumpkins. Then, I realized I was out of vanilla extract—grabbed almond extract by mistake—and my butter was way too soft. The dough was a sticky, fragrant mess that refused to hold a circle. I was already running late, the kitchen looked like a flour bomb went off, and I was this close to ordering a sad sheet cake from the grocery store.
But you know that feeling when you’re just too stubborn to give up? I looked at the sticky dough, smelled that strong almond scent, and thought, “Fine. If I can’t make cute cookies, I’ll make creepy ones.” I rolled the dough into long, knobby fingers, pressed an almond on each one for a nail, and baked them. When they came out, they looked genuinely grotesque—pale, wrinkled, with those almond fingernails staring back at me. Honestly, I laughed out loud. They were perfect.
That accidental swap of extracts and a moment of pure kitchen frustration gave birth to my now most-requested Halloween treat. These Spooky Witch Finger Cookies are the kind of thing that makes people do a double-take, then grin. Maybe you’ve been there—a recipe gone sideways that turned into something better than the plan. These cookies are that happy accident, and I’ve been making them every October since.
Why You’ll Love This Recipe
Let me tell you, after making these for five Halloweens straight, I’ve learned a thing or two. These aren’t just another sugar cookie. They are a conversation starter, a crowd-pleaser, and secretly one of the easiest cookies you’ll ever make.
- Quick & Easy: From start to finish, you’re looking at about 45 minutes. The dough comes together in one bowl, and there is no chilling time required. Perfect for a last-minute Halloween craving.
- Simple Ingredients: You probably have everything in your pantry right now. Flour, sugar, butter, eggs, and a jar of almonds. No fancy extracts or specialty decorations needed.
- Perfect for Halloween Parties: These are the star of any spooky spread. Kids love the gross factor, and adults appreciate the cleverness. They disappear faster than candy corn at a dentist’s office.
- Crowd-Pleaser: I brought these to a potluck last year, and a woman told me she “couldn’t eat something that looked like a finger.” She ate four before the night was over. They are buttery, slightly crisp on the edges, and soft in the center.
- Unbelievably Delicious: The almond extract gives them a subtle, almost marzipan-like flavor that pairs perfectly with the buttery cookie base. That almond “nail” on top? It gets slightly toasted and adds the most wonderful crunch.
What makes this recipe different from the rest is the texture. I’ve tested this dough a dozen times to make sure it holds its shape without cracking, but still stays tender. It’s not just a gimmick cookie—it’s a genuinely good shortbread-style cookie dressed up in a terrifying disguise. This is the kind of recipe that makes you close your eyes after the first bite, then open them wide to see if anyone else is eating a finger.
What Ingredients You Will Need
This recipe uses simple, wholesome ingredients to create a cookie that looks disturbing but tastes divine. Most of these are pantry staples you likely have on hand, which makes this an easy last-minute Halloween project.
For the Cookie Dough:
- 1 cup (226g) unsalted butter, softened to room temperature. I use Land O’Lakes for its consistent fat content. Don’t use margarine—the cookies will spread too much and lose their finger shape.
- 1 cup (200g) granulated sugar. Regular white sugar gives the cookies a nice sandy texture. You could use organic cane sugar if you prefer.
- 1 large egg, at room temperature. A cold egg will seize the butter and make the dough hard to mix.
- 1 teaspoon almond extract. This is the secret weapon. It gives the cookies that distinct, almost cherry-like flavor. I prefer Nielsen-Massey for its pure, strong flavor—a little goes a long way.
- ½ teaspoon salt. Balances the sweetness and enhances the almond flavor.
- 2 ½ cups (312g) all-purpose flour. Spoon and level your flour—scooping directly from the bag packs it down and makes dry cookies.
For the Decoration:
- 48 whole almonds (about ½ cup), unroasted and unsalted. You want them raw so they toast slightly in the oven. Slivered almonds are too thin—use whole ones for a convincing fingernail look.
- Red food coloring (gel or liquid). Gel gives a deeper, more realistic “blood” color without thinning the dye. I use a tiny dab of Wilton Red-Red.
- Seedless raspberry jam (optional, for “blood”). A small jar is plenty. The jam gives a glossy, congealed blood effect that looks way more realistic than plain food coloring.
Substitution Guidance: If you are allergic to almonds, you can use a different nut for the nail—pecan halves or macadamia nuts work well. For the extract, swap in 1 teaspoon of vanilla extract and ¼ teaspoon of butter extract to maintain a rich flavor. For a dairy-free version, use a high-quality vegan butter stick (like Miyoko’s) that has a high fat content.
Equipment Needed
You don’t need a lot of fancy gear for these cookies, which is part of their charm. Here is what you will need:
- Electric hand mixer or stand mixer: A stand mixer with the paddle attachment makes creaming the butter and sugar effortless, but a hand mixer works just as well. I’ve made these with a whisk and a strong arm before—doable, but your arm will hate you.
- Large mixing bowl: Any bowl will do, but a wide, shallow one makes it easier to mix in the flour without sending clouds of it everywhere.
- Baking sheets: Two standard half-sheet pans. I like the Nordic Ware aluminum ones—they heat evenly and don’t warp.
- Parchment paper or silicone baking mat: Absolutely necessary. The cookies will stick to a bare pan. Parchment is cheap and makes cleanup a breeze.
- Small paring knife: For scoring knuckle lines into the dough. A butter knife works in a pinch, but a sharp paring knife gives cleaner lines.
- Small paintbrush or toothpick: For applying the red food coloring or jam into the knuckle creases. A cheap craft paintbrush reserved for baking is perfect.
- Cooling rack: Lets air circulate around the cookies so they don’t get soggy on the bottom.
If you don’t have a paring knife, a bench scraper or even a clean credit card can be used to press the knuckle lines. The cookies are forgiving—imperfect lines just make them look more like real fingers!
Preparation Method
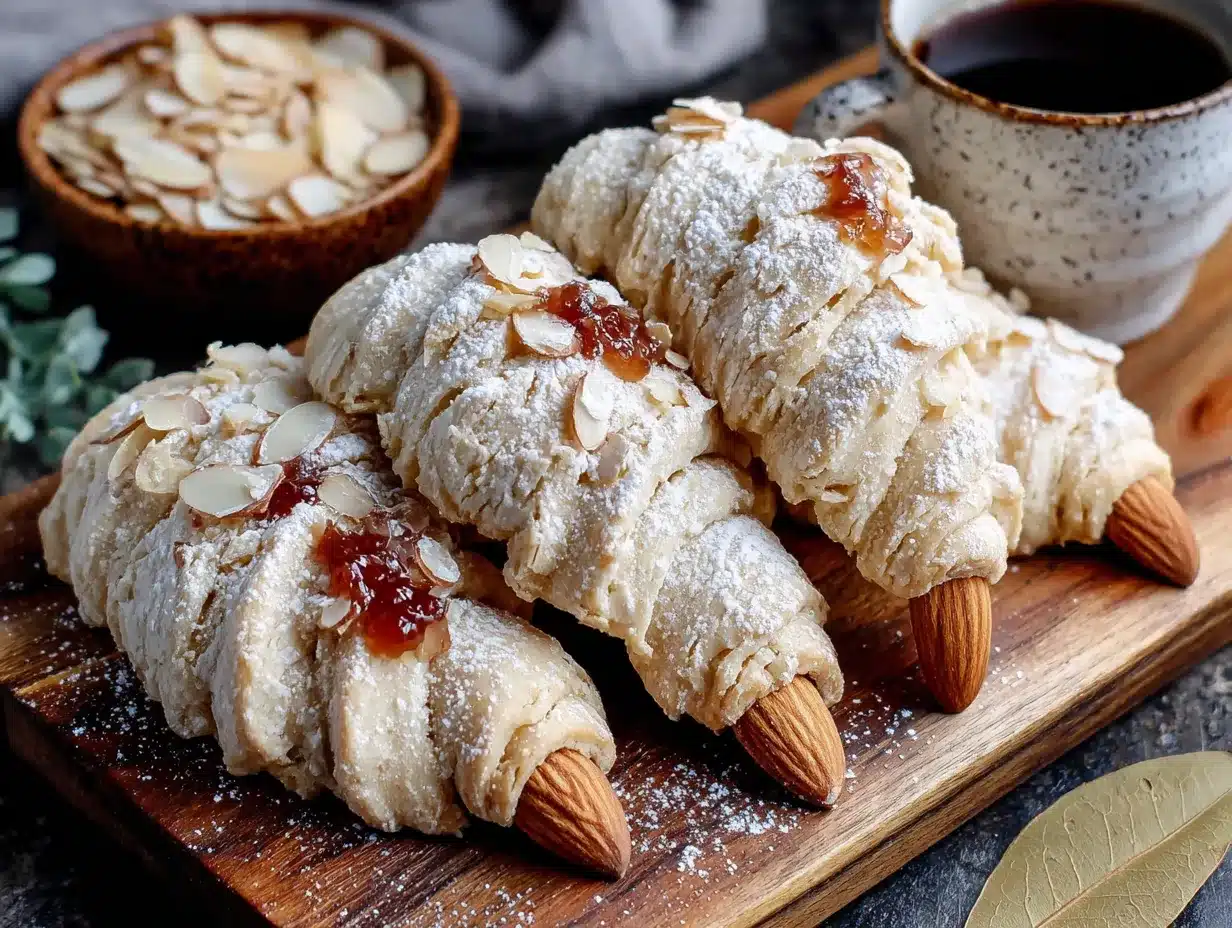
Preheat your oven to 350°F (175°C). Line two baking sheets with parchment paper. Take your butter and egg out of the fridge about 30 minutes before you start—they need to be at room temperature for the dough to come together properly.
- Cream the butter and sugar: In your large mixing bowl, beat the softened butter and granulated sugar together on medium speed for about 2-3 minutes, until the mixture is light, fluffy, and pale yellow. Scrape down the sides of the bowl once during mixing. You are looking for a texture that reminds you of thick, creamy frosting.
- Add the wet ingredients: Crack the room-temperature egg into the butter mixture. Add the teaspoon of almond extract. Beat on medium speed until fully combined—about 30 seconds. The mixture might look slightly curdled at this point, which is totally normal. Don’t panic.
- Mix in the dry ingredients: In a separate small bowl, whisk together the flour and salt. With the mixer on low speed, gradually add the flour mixture to the wet ingredients. Mix just until the dough comes together and no streaks of flour remain. Overmixing at this stage will develop too much gluten and make your cookies tough. The dough should be soft but not sticky—if it sticks to your fingers, add one more tablespoon of flour.
- Shape the fingers: This is the fun part. Scoop out about 1 tablespoon of dough (roughly 20-25 grams). Roll it between your palms into a log shape about 3 inches long and ½ inch thick. Place it on the prepared baking sheet. Now, shape the log into a finger—make one end slightly thicker (the “knuckle” area) and taper the other end slightly (the “fingertip”). The cookies will spread just a tiny bit, so leave about 1½ inches between each finger on the sheet. You should get about 24 fingers per batch, so two sheets will hold them all.
- Create the details: Using your small paring knife, gently press 2-3 shallow lines across each finger to create knuckle creases. Don’t cut all the way through—you just want an indentation. Then, use the tip of the knife to make a few tiny, shallow cuts near the fingertip to look like cuticles or wrinkles. Squeeze the sides of the finger slightly to make them look less perfectly round—real fingers aren’t uniform.
- Add the almond nail: Take a whole almond and press it firmly onto the tapered tip of each finger. Push it down so about ½ of the almond is embedded in the dough. It should look like a fingernail growing out of the fingertip. If the almond is too loose, dab a tiny bit of water on the dough before pressing it on.
- Bake the cookies: Place the baking sheets in the preheated oven, one on the top rack and one on the bottom. Bake for 12-15 minutes, rotating the pans halfway through. The cookies are done when the bottoms are just barely golden and the edges look set. The tops should still be pale—that’s what makes them look like creepy witch fingers. If they turn golden all over, they will still taste good, but they won’t look as spooky.
- Cool completely: Let the cookies cool on the baking sheets for 5 minutes. They will be very soft right out of the oven and will firm up as they cool. After 5 minutes, transfer them to a wire cooling rack to cool completely before decorating. Do not skip this step—moving them too early will break the almond nails off.
Cooking Tips & Techniques
I have made these cookies every single Halloween for five years, and I have definitely learned some lessons the hard way. Let me save you from my mistakes.
The biggest mistake I made my first year was using melted butter. I was in a hurry and thought, “Butter is butter, right?” Wrong. Melted butter makes the cookies spread into flat, shapeless blobs. Your fingers will look more like alien pancakes than witch digits. Always use softened butter—it should give slightly when you press it, but not be greasy or melted.
Another lesson learned: Don’t skip the egg. I tried making these vegan with a flax egg once, and the dough was crumbly and impossible to shape. The egg provides the structure that holds the finger shape together. If you need an egg substitute, use a commercial egg replacer like Bob’s Red Mill, which is designed to bind like real eggs.
Here is a pro tip for realistic knuckles: After you press the lines with your knife, gently pinch the dough on either side of the line. This creates a slight bulge that looks exactly like a real knuckle. It sounds weird, but it makes a huge difference in the “gross factor.”
Timing is everything: Bake these cookies one sheet at a time if your oven has hot spots. I once baked both sheets together and the top sheet came out perfect while the bottom sheet was overdone. If you must bake two sheets, swap their positions halfway through and rotate each sheet 180 degrees.
For the most realistic “blood” effect, wait until the cookies are completely cool. Then, using a toothpick, dab a tiny amount of red gel food coloring or seedless raspberry jam into the knuckle creases and around the cuticle area. The jam gives a thicker, more congealed look that is honestly a little disturbing—in the best way.
Variations & Adaptations
Over the years, I have played around with this recipe more times than I can count. Here are some of my favorite twists:
Gluten-Free Witch Fingers: Substitute the all-purpose flour with a 1:1 gluten-free baking flour blend that contains xanthan gum. I have used Bob’s Red Mill Gluten-Free 1-to-1 Baking Flour with great success. The dough will be slightly more crumbly, so be gentle when shaping. Bake for the same time, but check at 12 minutes.
Chocolate Witch Fingers: Replace ¼ cup of the all-purpose flour with ¼ cup of unsweetened cocoa powder. Reduce the almond extract to ½ teaspoon. The chocolate version looks even more ghoulish—like dirt-caked, decaying fingers. My nephew refuses to eat the chocolate ones because they “look too real.” I consider that a win.
Vegan Version: Use 1 cup of vegan butter (I like Miyoko’s), 1 cup of organic sugar (to ensure it’s vegan), and a commercial egg replacer equivalent to one egg. Add 2 tablespoons of cold water if the dough seems dry. The flavor is slightly different—less buttery—but the texture holds up surprisingly well.
Spooky Color Variations: Add a few drops of green or purple gel food coloring to the dough before adding the flour for a truly monstrous look. Green fingers with almond nails look like something out of a zombie movie. I did this for a themed party once and people were genuinely hesitant to eat them.
Seasonal Twist: For Christmas, shape the dough into tiny logs, skip the almond, and press a red and green candied cherry into the top. Call them “Elf Fingers.” It sounds silly, but kids absolutely love them.
Serving & Storage Suggestions
These cookies are best served at room temperature, arranged on a platter in a way that maximizes the creep factor. I like to scatter them on a black or dark purple plate, with a few “severed” fingers broken off and placed nearby. It sounds morbid, but it gets the biggest laughs at parties.
Presentation tip: Place the cookies with the almond nails pointing outward, as if the fingers are reaching for something. For an extra scare, arrange them around a small bowl of red jam (for “dipping in blood”). I once served them on a wooden cutting board with a few fake spiders scattered around—people were taking photos for ten minutes before anyone ate one.
Complementary treats: These pair wonderfully with a warm mug of spiced apple cider or a cup of hot chocolate. For a full Halloween spread, serve them alongside ghost-shaped meringues or pumpkin-shaped Rice Krispie treats. The contrast between the cute ghosts and the creepy fingers is delightful.
Storage instructions: Store the undecorated cookies in an airtight container at room temperature for up to 5 days. If you have added jam or gel coloring, store them in a single layer with parchment paper between layers to prevent smudging. Do not refrigerate them—the fridge will make the cookies dry and the almonds will lose their crunch.
Freezer instructions: You can freeze the shaped, unbaked cookie fingers (without the almond nails) for up to 3 months. Place them on a baking sheet in the freezer until solid, then transfer to a freezer bag. When ready to bake, press the almond nails onto the frozen dough and add 2-3 minutes to the baking time. The flavor actually improves after freezing—the almond extract has time to meld with the dough.
Reheating tip: If your cookies have gone a little stale, pop them in a 300°F (150°C) oven for 3-4 minutes. They will crisp up nicely. Let them cool before serving—warm cookies are delicious, but warm “fingers” are a little too realistic for some people.
Nutritional Information & Benefits
Let’s be honest: these are Halloween cookies, not health food. But here is the breakdown per cookie (based on 24 cookies):
| Nutrient | Amount per Cookie |
|---|---|
| Calories | 168 kcal |
| Total Fat | 9g |
| Saturated Fat | 5g |
| Carbohydrates | 20g |
| Sugar | 9g |
| Protein | 2g |
| Fiber | 1g |
Health highlights: The almonds on top are actually a good source of vitamin E and healthy monounsaturated fats. Almonds have been linked to better heart health and can help with blood sugar control. The butter provides a small amount of vitamin A. The cookie itself is a treat, but the almond nail gives you a tiny nutritional boost.
Dietary considerations: This recipe contains dairy (butter), eggs, and tree nuts (almonds). It is not suitable for vegans without substitutions, though I have included a vegan variation above. The recipe can be made gluten-free with a flour blend swap.
My perspective: I believe in balance. Halloween comes once a year, and these cookies are part of the fun. One or two of these with a cup of tea is a perfectly reasonable indulgence. They are made with real ingredients—no preservatives, no artificial flavors (unless you add the red gel). That counts for something in my book.
Conclusion
These Spooky Witch Finger Cookies are proof that some of the best recipes come from happy accidents. What started as a failed batch of sugar cookies turned into a Halloween tradition that my friends and family look forward to every year. They are fun to make, hilarious to serve, and genuinely delicious to eat.
I encourage you to make these your own. Add more knuckle lines. Use green food coloring. Dip the tips in red jam until they look truly gruesome. The beauty of this recipe is that it invites creativity—there is no “wrong” way to make a witch finger. The uglier, the better.
I would love to hear how your witch fingers turn out! Did you add any creepy details I haven’t thought of? Did your kids freak out when they saw them? Drop a comment below and share your spooky creations. And if you make these for a party, take a photo—tag me so I can see your terrifying handiwork. Happy Halloween, and happy baking!
Frequently Asked Questions
Can I make the dough ahead of time?
Absolutely. You can prepare the dough up to 2 days in advance and keep it wrapped tightly in plastic wrap in the refrigerator. Let it sit at room temperature for about 15 minutes before shaping—cold dough is harder to roll into finger shapes.
Why did my cookies spread too much?
This usually happens if your butter was too soft or melted, or if your baking sheet was too warm. Make sure your butter is softened but still cool to the touch, and always use a cool baking sheet. If you are reusing a sheet, let it cool completely between batches.
Can I use a different nut for the fingernails?
Yes! Pecan halves, macadamia nuts, or even whole cashews work well. Pistachios give a greenish nail that looks especially creepy. Just make sure the nut is large enough to look like a fingernail and press it firmly into the dough.
How do I get the red coloring to look like real blood?
Use seedless raspberry jam for the most realistic effect. Warm a spoonful of jam in the microwave for 10 seconds, then dab it into the knuckle creases with a toothpick. The jam dries with a glossy, slightly congealed look that is far more convincing than plain food coloring.
Can I freeze the baked cookies?
You can, but I don’t recommend it. The almonds can become soft and lose their crunch after thawing. If you must freeze them, do so before adding any jam or gel decorations. Thaw at room temperature for about 30 minutes, then add the “blood” just before serving.
Pin This Recipe!

Easy Spooky Witch Finger Cookies Recipe
These Spooky Witch Finger Cookies are a happy accident turned Halloween tradition. Buttery, slightly crisp shortbread-style cookies shaped like creepy fingers with almond fingernails, perfect for parties and guaranteed to get a reaction.
- Prep Time: 20 minutes
- Cook Time: 15 minutes
- Total Time: 35 minutes
- Yield: 24 cookies 1x
- Category: Dessert
- Cuisine: American
Ingredients
- 1 cup (226g) unsalted butter, softened to room temperature
- 1 cup (200g) granulated sugar
- 1 large egg, at room temperature
- 1 teaspoon almond extract
- ½ teaspoon salt
- 2 ½ cups (312g) all-purpose flour
- 48 whole almonds (about ½ cup), unroasted and unsalted
- Red food coloring (gel or liquid)
- Seedless raspberry jam (optional, for ‘blood’)
Instructions
- Preheat your oven to 350°F (175°C). Line two baking sheets with parchment paper.
- In a large mixing bowl, beat the softened butter and granulated sugar together on medium speed for about 2-3 minutes, until light, fluffy, and pale yellow.
- Add the room-temperature egg and almond extract. Beat on medium speed until fully combined, about 30 seconds.
- In a separate small bowl, whisk together the flour and salt. With the mixer on low speed, gradually add the flour mixture to the wet ingredients. Mix just until the dough comes together and no streaks of flour remain.
- Scoop out about 1 tablespoon of dough (roughly 20-25 grams). Roll it between your palms into a log shape about 3 inches long and ½ inch thick. Place on the prepared baking sheet. Shape one end slightly thicker (knuckle area) and taper the other end slightly (fingertip). Leave about 1½ inches between each finger.
- Using a small paring knife, gently press 2-3 shallow lines across each finger to create knuckle creases. Make a few tiny, shallow cuts near the fingertip for wrinkles. Squeeze the sides slightly to make them look less uniform.
- Take a whole almond and press it firmly onto the tapered tip of each finger, embedding about ½ of the almond in the dough.
- Bake for 12-15 minutes, rotating the pans halfway through. Cookies are done when bottoms are just barely golden and edges look set; tops should still be pale.
- Let cookies cool on the baking sheets for 5 minutes, then transfer to a wire cooling rack to cool completely before decorating.
- For the ‘blood’ effect, use a toothpick to dab a tiny amount of red gel food coloring or seedless raspberry jam into the knuckle creases and around the cuticle area.
Notes
Use softened butter, not melted, to prevent spreading. Don’t skip the egg—it provides structure. For realistic knuckles, gently pinch the dough on either side of the knife line. Bake one sheet at a time if your oven has hot spots. For best ‘blood’ effect, use seedless raspberry jam. Store undecorated cookies in an airtight container at room temperature for up to 5 days.
Nutrition
- Serving Size: 1 cookie
- Calories: 168
- Sugar: 9
- Sodium: 50
- Fat: 9
- Saturated Fat: 5
- Carbohydrates: 20
- Fiber: 1
- Protein: 2
Keywords: Halloween cookies, witch finger cookies, spooky cookies, sugar cookies, almond cookies, easy Halloween recipe


