Love this? Save it for later!
Share the inspiration with your friends
The office potluck was in six hours and I’d completely forgotten. I mean, completely. I was standing in my kitchen at 7 AM in my work clothes, staring into the fridge like it might magically produce something impressive. Everyone else would be bringing their grandmother’s famous layered desserts or those perfectly decorated things from the fancy bakery downtown. I had a block of cream cheese, a can of pumpkin that was somehow still in my pantry from last Thanksgiving, and a box of gingersnap cookies that I’d bought on a whim because they were on sale. Not exactly a winning combination, right?
Let me tell you, I was panicking. I’d even texted my friend Maria at work, asking if she could pick up a store-bought cake on her way in. She said no — she’s brutally honest like that — and told me to just bring coffee. But I couldn’t show up empty-handed. Not when Susan from accounting brings those insane chocolate croissants every single time. So I grabbed the cream cheese, softened it in the microwave (don’t judge, we’ve all been there), crushed the gingersnaps with the bottom of a measuring cup, and threw it all together in a mad rush. I honestly thought it would be a disaster.
But here’s the thing — those Quick Pumpkin Cheesecake Bars with Gingersnap Crust ended up being the first thing to disappear. People were actually asking me for the recipe. Susan from accounting asked for seconds. I was standing there, holding an empty baking dish, feeling equal parts shocked and amused. Maybe you’ve been in that spot — where the thing you threw together under pressure somehow works better than anything you planned. That’s this recipe. It’s not fancy, it’s not fussy, and it definitely wasn’t planned. But it’s the one I keep coming back to, year after year, because sometimes the best things come from a little bit of chaos.
Why You’ll Love This Recipe
These aren’t just any pumpkin bars. They’re the kind of recipe that makes you look like you spent hours in the kitchen when you really didn’t. I’ve tested this version at least a dozen times — tweaking the crust ratio, adjusting the sweetness, figuring out the perfect baking time — and I can tell you with confidence that this is the one.
- Quick & Easy: From start to finish, these bars are ready in about an hour. Most of that time is hands-off baking, so you can get other things done.
- Simple Ingredients: No obscure baking supplies here. Cream cheese, pumpkin puree, eggs, sugar, and gingersnaps. That’s it.
- Perfect for Fall Gatherings: Whether it’s a potluck, a Thanksgiving dessert table, or just a Tuesday night craving, these bars fit right in.
- Crowd-Pleaser: I’ve served these to kids, adults, picky eaters, and dessert snobs. They all go back for seconds.
- Unbelievably Delicious: The combination of spiced pumpkin filling and crunchy, buttery gingersnap crust is honestly next-level. It’s like fall in bar form.
What makes these different from every other pumpkin cheesecake bar out there? It’s the crust. Most recipes use a graham cracker base, but the gingersnaps add this warm, molasses-y kick that pairs perfectly with the creamy pumpkin filling. Plus, there’s no water bath, no complicated steps, and no fancy equipment. Just a 9×9 pan and about 15 minutes of active work. This isn’t just another version — it’s the version that’ll make you close your eyes after the first bite.
What Ingredients You Will Need
This recipe keeps things simple. Every ingredient plays a specific role, and none of them are hard to find. Here’s what you’ll need:
For the Gingersnap Crust
- Gingersnap cookies — 2 cups (about 200g), finely crushed. I prefer Nabisco or Anna’s brand for consistent texture. You can use a food processor or a zip-top bag and a rolling pin.
- Unsalted butter — 6 tablespoons (85g), melted. Adds richness and helps the crust hold together.
- Granulated sugar — 2 tablespoons (25g). Just a touch to balance the spice.
- Salt — A pinch. Don’t skip this — it makes the crust taste more buttery.
For the Pumpkin Cheesecake Filling
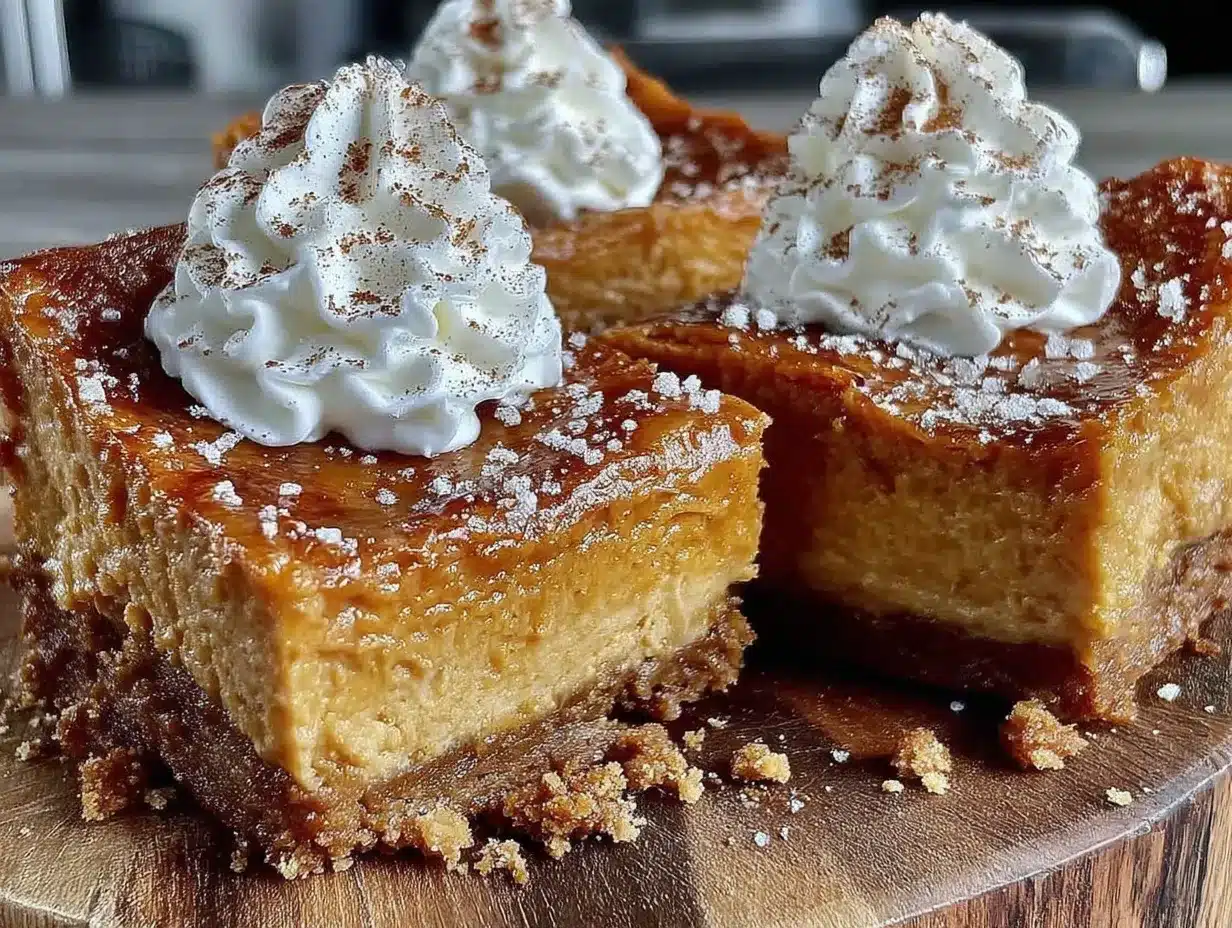
- Cream cheese — 16 ounces (450g), softened to room temperature. Full-fat works best for a creamy texture, but Neufchâtel (reduced-fat) also works.
- Granulated sugar — ¾ cup (150g). Just enough sweetness without being cloying.
- Pumpkin puree — 1 cup (240g). Make sure it’s 100% pumpkin, not pumpkin pie filling. Libby’s is my go-to.
- Large eggs — 2, room temperature. Helps the filling set properly.
- Vanilla extract — 1 teaspoon. Adds warmth and depth.
- Pumpkin pie spice — 1½ teaspoons. You can use store-bought or make your own with cinnamon, nutmeg, ginger, and cloves.
- Cinnamon — ½ teaspoon. Extra warmth for the filling.
- Salt — ¼ teaspoon. Balances the sweetness.
Optional Toppings
- Whipped cream — For serving. Homemade or store-bought, both work.
- Caramel sauce — A drizzle on top looks gorgeous and adds another layer of flavor.
- Extra crushed gingersnaps — For garnish and crunch.
Equipment Needed
You won’t need a professional bakery setup for these. Here’s what I use:
- 9×9-inch baking pan — Glass or metal both work. If using metal, line it with parchment paper for easy removal.
- Parchment paper — Makes lifting the bars out so much easier. Trust me on this one.
- Food processor or zip-top bag — For crushing the gingersnaps. A rolling pin or even a heavy skillet works too.
- Electric hand mixer or stand mixer — For beating the cream cheese until smooth. A whisk and some elbow grease will also do the job.
- Mixing bowls — One large, one medium.
- Spatula — For spreading the filling evenly.
- Measuring cups and spoons — Standard set works fine.
I’ve made these bars in a tiny apartment kitchen with a broken hand mixer and a butter knife for a spatula. They still turned out great. Don’t overthink the equipment.
Preparation Method
Alright, let’s get to it. This is straightforward, but I’ll walk you through each step so there’s no guesswork.
- Preheat your oven to 350°F (175°C). Line your 9×9 pan with parchment paper, leaving a little overhang on two sides. This will be your handle later.
- Make the crust. Crush the gingersnap cookies until you have fine crumbs. I use a food processor — about 30 seconds of pulsing — but a zip-top bag and a rolling pin work just as well. You want crumbs, not chunks. In a medium bowl, mix the crumbs with the melted butter, sugar, and salt. Stir until it looks like wet sand and holds together when you squeeze it.
- Press the crust into the pan. Dump the crumb mixture into your lined pan and press it down firmly. I use the bottom of a measuring cup to get it even. Make sure you press it into the corners. Bake for 10 minutes, then set it aside to cool slightly while you make the filling. The crust will firm up more as it cools.
- Beat the cream cheese. In a large bowl, beat the softened cream cheese with an electric mixer until it’s smooth and creamy — about 2 minutes. Scrape down the sides of the bowl halfway through. Don’t rush this step; lumps in the cream cheese mean lumps in the final bars.
- Add the sugar. Add the granulated sugar and beat until combined, about 1 minute. Again, scrape the bowl.
- Mix in the pumpkin and eggs. Add the pumpkin puree, eggs, vanilla extract, pumpkin pie spice, cinnamon, and salt. Beat on low speed until everything is smooth and evenly combined. The mixture will be thick and a beautiful orange color. Don’t overmix once the eggs are in — you don’t want to incorporate too much air.
- Pour the filling over the crust. Pour the pumpkin cheesecake mixture over the pre-baked crust. Use a spatula to spread it evenly to the edges. Tap the pan gently on the counter a few times to release any air bubbles.
- Bake. Bake for 35-40 minutes, or until the edges are set and the center is just slightly jiggly — like a firm Jell-O. A toothpick inserted 1 inch from the edge should come out clean, but the center will still wobble a bit. That’s perfect. Overbaking will make the bars dry and crack.
- Cool completely. Let the bars cool in the pan on a wire rack for about 1 hour. Then transfer the pan to the refrigerator and chill for at least 3 hours, or overnight. This step is non-negotiable — the bars need to set fully before you cut them.
- Slice and serve. Once chilled, use the parchment paper overhang to lift the entire block out of the pan. Place it on a cutting board and slice into 16 squares (4 rows by 4 rows). A sharp knife works best; wipe it clean between cuts for neat edges.
Cooking Tips & Techniques
I’ve made these bars more times than I can count, and I’ve definitely made some mistakes along the way. Here’s what I’ve learned:
- Room temperature ingredients matter. Cold cream cheese will leave you with a lumpy filling. Leave it on the counter for at least 30 minutes before you start. Same goes for the eggs. It makes a real difference in texture.
- Don’t overbake. I know it’s tempting to leave them in until the center is completely firm, but they’ll end up dry and cracked. The center should still have a slight wobble when you pull them out. They’ll continue to set as they cool.
- Chill thoroughly. I once tried to cut these after only an hour in the fridge. It was a mess. Give them the full 3 hours, or better yet, make them the night before. The flavor actually improves overnight as the spices meld together.
- Use a sharp knife. For clean cuts, use a long, sharp knife and wipe it clean between each slice. If the knife is sticking, dip it in hot water and dry it off before cutting.
- Crush the cookies evenly. If you have big chunks of cookie in your crust, it won’t hold together well. Aim for fine, even crumbs. A food processor is the easiest way to get there.
One time, I forgot to add the sugar to the crust. The bars were still good, but the crust was a little bland. That’s a mistake you’ll only make once!
Variations & Adaptations
This recipe is pretty forgiving, so feel free to play around. Here are some variations I’ve tried:
- Gluten-Free Version: Use gluten-free gingersnap cookies. Most major brands now offer a gluten-free option, and the recipe works exactly the same.
- Dairy-Free Adaptation: Substitute the cream cheese with a dairy-free alternative like Kite Hill or Tofutti. Use vegan butter in the crust. The texture will be slightly different, but still delicious.
- Spice It Up: Add a pinch of cayenne pepper or black pepper to the filling for a subtle heat that complements the pumpkin. It sounds weird, but it works.
- Chocolate Drizzle: Melt some dark chocolate and drizzle it over the cooled bars. The bitterness of the chocolate pairs beautifully with the sweet, spiced filling.
- Mini Version: Press the crust into a lined muffin tin and fill each cup with the cheesecake mixture. Bake for about 18-20 minutes. Perfect for portion control or parties.
- No Gingersnaps? Use graham crackers or vanilla wafers instead. Add ½ teaspoon of ground ginger and ¼ teaspoon of cloves to the crust to mimic the gingersnap flavor.
My personal favorite variation is adding a swirl of salted caramel on top before baking. Just drizzle it over the filling and use a knife to create a swirl pattern. It looks fancy with almost no extra effort.
Serving & Storage Suggestions
These bars are best served cold, straight from the fridge. The texture is firm and creamy, and the flavors are more pronounced. If you want to take the edge off, let them sit at room temperature for about 10 minutes before serving.
For presentation, I like to top each bar with a dollop of whipped cream and a light dusting of cinnamon. A drizzle of caramel sauce makes them look extra special for holidays or dinner parties. They pair beautifully with a hot cup of coffee, spiced chai, or even a glass of cold milk.
Storage: Keep the bars in an airtight container in the refrigerator for up to 5 days. They actually taste better on day two, as the flavors have more time to meld. I usually place a layer of parchment paper between stacked bars to prevent sticking.
Freezing: These freeze beautifully. Wrap individual bars tightly in plastic wrap, then place them in a freezer-safe bag or container. They’ll keep for up to 3 months. To thaw, transfer them to the refrigerator overnight. Don’t thaw at room temperature — they’ll get too soft and lose their structure.
Reheating: Honestly, I don’t recommend reheating these. They’re meant to be served cold. But if you absolutely must, a few seconds in the microwave will soften them. Just don’t overdo it.
Nutritional Information & Benefits
Here’s the approximate nutritional breakdown for one bar (based on 16 servings):
| Nutrient | Amount |
|---|---|
| Calories | 245 |
| Total Fat | 15g |
| Saturated Fat | 9g |
| Cholesterol | 65mg |
| Sodium | 190mg |
| Total Carbohydrates | 25g |
| Dietary Fiber | 1g |
| Sugars | 18g |
| Protein | 4g |
Pumpkin is a nutritional powerhouse — it’s packed with vitamin A, fiber, and antioxidants. Cream cheese provides calcium and a good amount of protein. While these bars are definitely a treat, they’re not completely devoid of redeeming qualities. If you’re looking for a lower-sugar option, you can reduce the sugar to ½ cup, but the texture will be slightly less creamy.
These bars are vegetarian and can be made gluten-free and dairy-free with the substitutions mentioned above. They contain dairy, eggs, and gluten (unless modified).
Conclusion
Look, I’m not going to tell you these are health food. They’re dessert. But they’re the kind of dessert that makes people happy — the kind that disappears from the table and gets texted around the office the next day. These Quick Pumpkin Cheesecake Bars with Gingersnap Crust have saved me more times than I can count, from last-minute potlucks to lazy Sunday afternoons when I just want something cozy.
The best part? You can make them your own. Add more spice, swap the crust, drizzle on some chocolate — whatever feels right. That’s the beauty of a simple recipe. It’s a starting point, not a rulebook.
If you try these, I’d love to hear about it. Leave a comment below and let me know how they turned out, or tag me in your photos if you share them online. Did you add a twist? Did they save you from a potluck panic too? Tell me your story. And if you’re looking for more easy fall desserts, check out my quick pumpkin bread recipe — it’s another one of those “I have no time” winners.
Happy baking, friend. Go make something delicious.
Frequently Asked Questions
Can I use fresh pumpkin instead of canned?
Yes, but you’ll need to cook and puree it first, then drain off any excess liquid. Canned pumpkin is more consistent in texture and moisture content, which is why I recommend it for this recipe. If you use fresh, make sure it’s well-drained or your bars might be too watery.
Why did my cheesecake bars crack on top?
Cracks usually happen from overbaking or sudden temperature changes. Make sure you pull the bars out when the center is still slightly jiggly. Also, let them cool gradually — don’t put them straight from the oven into the fridge. Let them cool on the counter for an hour first.
Can I make these bars ahead of time?
Absolutely. In fact, I recommend it. These bars need at least 3 hours to set in the fridge, and they taste even better after a full day. You can make them up to 2 days in advance and keep them covered in the refrigerator.
Can I use a different type of cookie for the crust?
Yes. Graham crackers, vanilla wafers, or even shortbread cookies all work. If you use a milder cookie, consider adding a teaspoon of ground ginger and a pinch of cloves to the crust to keep that warm, spiced flavor.
How do I know when the bars are done baking?
The edges should look set and slightly puffed, but the center should still wobble when you gently shake the pan. A toothpick inserted about 1 inch from the edge should come out clean. The center will firm up as the bars cool.
Pin This Recipe!
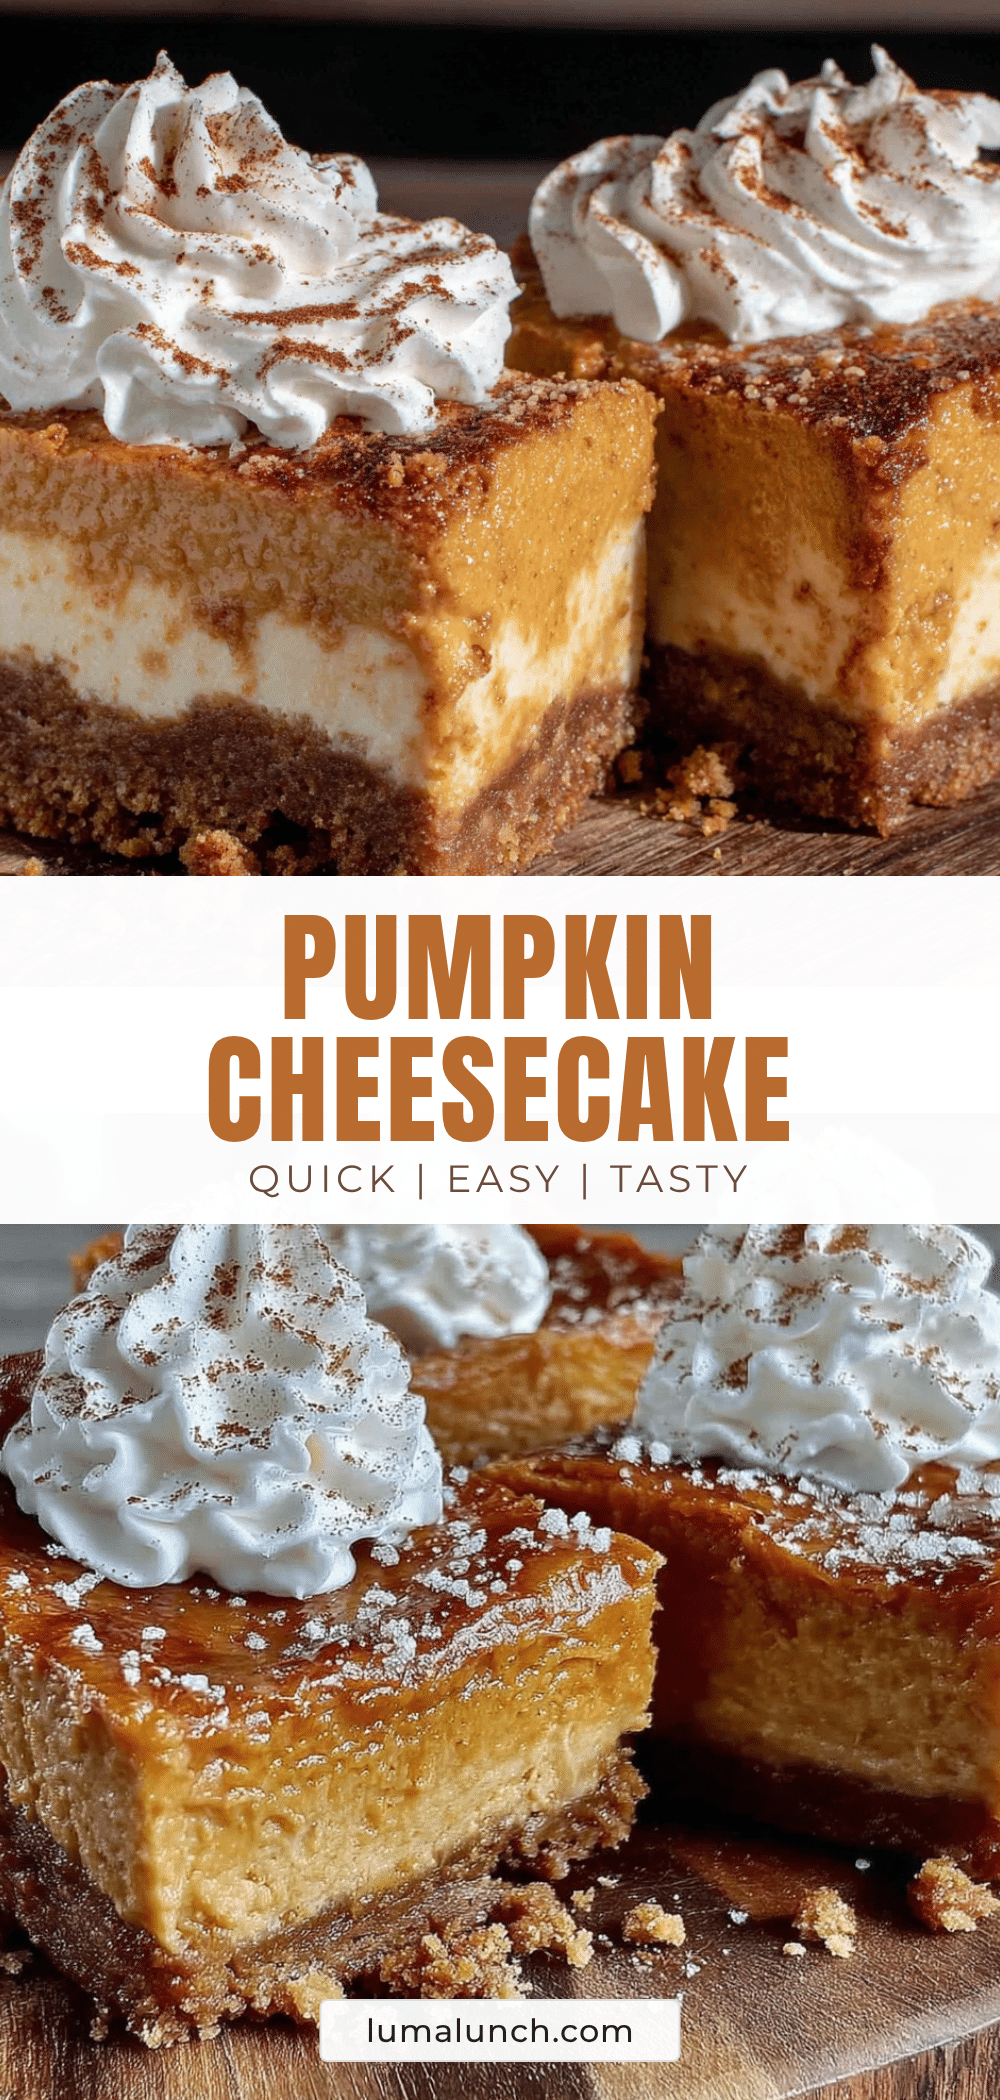
Easy Pumpkin Cheesecake Bars with Gingersnap Crust
These Quick Pumpkin Cheesecake Bars with Gingersnap Crust are a last-minute potluck hero. With a crunchy, buttery gingersnap crust and a creamy spiced pumpkin filling, they’re easy to make and always a crowd-pleaser.
- Prep Time: 15 minutes
- Cook Time: 35-40 minutes
- Total Time: About 1 hour (plus 3 hours chilling)
- Yield: 16 servings 1x
- Category: Dessert
- Cuisine: American
Ingredients
- 2 cups (about 200g) finely crushed gingersnap cookies
- 6 tablespoons (85g) unsalted butter, melted
- 2 tablespoons (25g) granulated sugar
- Pinch of salt
- 16 ounces (450g) cream cheese, softened to room temperature
- 3/4 cup (150g) granulated sugar
- 1 cup (240g) pumpkin puree (100% pumpkin, not pie filling)
- 2 large eggs, room temperature
- 1 teaspoon vanilla extract
- 1 1/2 teaspoons pumpkin pie spice
- 1/2 teaspoon cinnamon
- 1/4 teaspoon salt
- Whipped cream (optional, for serving)
- Caramel sauce (optional, for drizzling)
- Extra crushed gingersnaps (optional, for garnish)
Instructions
- Preheat your oven to 350°F (175°C). Line a 9×9-inch baking pan with parchment paper, leaving overhang on two sides.
- Make the crust: Crush the gingersnap cookies into fine crumbs. In a medium bowl, mix the crumbs with melted butter, 2 tablespoons sugar, and a pinch of salt until it resembles wet sand.
- Press the crust mixture firmly into the bottom of the prepared pan. Bake for 10 minutes, then set aside to cool slightly.
- Beat the cream cheese in a large bowl with an electric mixer until smooth and creamy, about 2 minutes. Scrape down the sides.
- Add 3/4 cup sugar and beat until combined, about 1 minute. Scrape the bowl again.
- Add pumpkin puree, eggs, vanilla extract, pumpkin pie spice, cinnamon, and 1/4 teaspoon salt. Beat on low speed until smooth and evenly combined. Do not overmix.
- Pour the filling over the pre-baked crust and spread evenly. Tap the pan gently on the counter to release air bubbles.
- Bake for 35-40 minutes, until the edges are set and the center is slightly jiggly (like firm Jell-O). A toothpick inserted 1 inch from the edge should come out clean.
- Cool the bars in the pan on a wire rack for 1 hour, then refrigerate for at least 3 hours or overnight until fully set.
- Use the parchment overhang to lift the bars out of the pan. Slice into 16 squares (4×4). Serve cold, optionally topped with whipped cream, caramel sauce, or extra crushed gingersnaps.
Notes
Room temperature ingredients are key for a smooth filling. Do not overbake; the center should still jiggle slightly. Chill thoroughly before slicing for clean cuts. Bars can be made up to 2 days ahead and stored in the refrigerator. Freeze individual bars wrapped in plastic wrap for up to 3 months.
Nutrition
- Serving Size: 1 bar
- Calories: 245
- Sugar: 18
- Sodium: 190
- Fat: 15
- Saturated Fat: 9
- Carbohydrates: 25
- Fiber: 1
- Protein: 4
Keywords: pumpkin cheesecake bars, gingersnap crust, easy pumpkin dessert, fall dessert, potluck dessert, quick pumpkin bars