Love this? Save it for later!
Share the inspiration with your friends
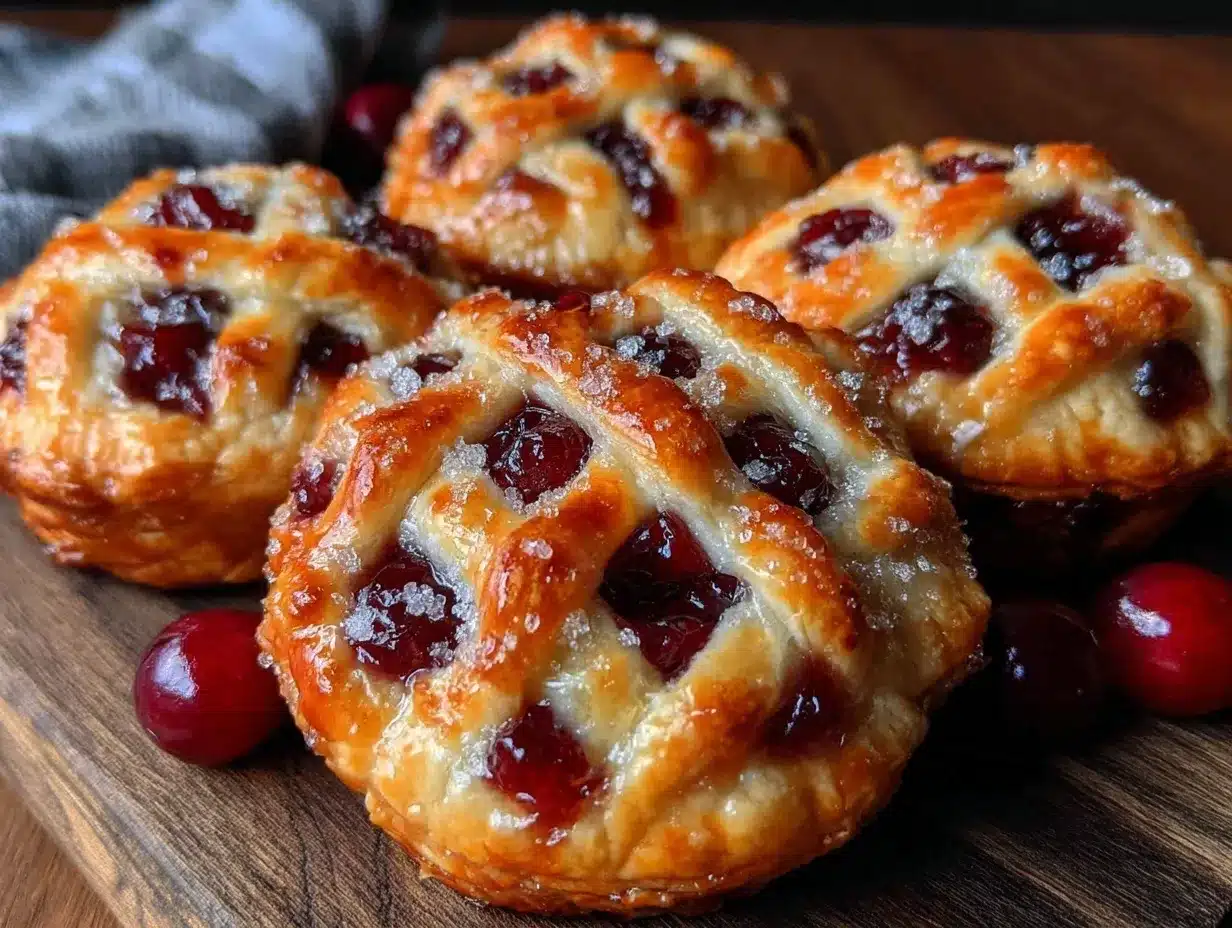
There used to be a tiny bakery tucked away on a cobblestone street in Charleston, South Carolina, that made these crispy fresh cherry hand pies with a delicate lattice crust. When the bakery closed down unexpectedly one hot July afternoon, I honestly felt like a piece of my summer was gone. I mean, those hand pies weren’t just any dessert—they were little pockets of joy, bursting with fresh cherries and that perfect flaky crust that cracked just right under your teeth. After more than a dozen attempts—some with dough that was too tough, others with filling that ran everywhere—I finally got it. The exact balance of tart and sweet cherries, the buttery crispness of the lattice top, and the way they still managed to be light enough to eat three in one sitting.
Let me tell you, recreating those crispy fresh cherry hand pies with lattice crust wasn’t just about following a recipe; it was about chasing a memory. I still remember the way the dough felt as I wove the lattice strips, slightly sticky but forgiving, and the sweet cherry juice bubbling up and caramelizing around the edges. Maybe you’ve been there—trying to capture a bite of your favorite treat that’s vanished from your life. Well, if that sounds like you, these hand pies might just be your sweet little victory too.
Honestly, these pies have stuck with me not only because of that nostalgic pull but because they’re genuinely delicious. I keep making them for weekend brunches, potlucks, and even late-night snacks. And every time, I’m reminded why that little bakery’s hand pies were so unforgettable—and why this recipe is now my go-to for fresh cherry desserts.
Why You’ll Love This Recipe
After countless experiments in the kitchen, this crispy fresh cherry hand pies recipe stands out for a bunch of reasons. I’ve tested it with friends and family, and it always wins hearts and requests for repeats. Here’s what makes it so special:
- Quick & Easy: The whole process—from mixing the dough to baking—takes about an hour, making it perfect for those spontaneous dessert cravings or weekend baking sessions.
- Simple Ingredients: You won’t need anything exotic. Just fresh cherries, pantry staples like flour and butter, and a few basic spices. No fancy trips to specialty stores required.
- Perfect for Any Occasion: Whether you’re serving brunch, packing a picnic, or need a charming dessert for a dinner party, these hand pies fit right in.
- Crowd-Pleaser: Kids love the sweet, fruity filling, and adults appreciate the flaky, buttery crust with its subtle hint of cinnamon and almond extract.
- Unbelievably Delicious: The lattice crust isn’t just pretty—it crisps up beautifully, giving a satisfying crunch that pairs perfectly with the juicy cherry filling.
This recipe isn’t just another cherry pie. The lattice crust technique adds a delicate texture contrast, and by blending fresh cherries with a touch of lemon juice and cornstarch, the filling stays thick without being overly sweet. Honestly, it’s the kind of dessert that makes you pause and savor, closing your eyes with the first bite. I’m pretty sure you’ll feel the same way.
What Ingredients You Will Need
This recipe uses simple, wholesome ingredients to deliver bold flavor and satisfying texture without the fuss. Most are pantry staples or easy to find at your local grocery store during cherry season.
- For the Dough:
- 2 ½ cups (320g) all-purpose flour
- 1 tsp salt
- 1 tbsp granulated sugar (adds a touch of sweetness)
- 1 cup (226g) unsalted butter, cold and cubed (I recommend Kerrygold for best flavor)
- ½ cup (120ml) ice-cold water
- For the Cherry Filling:
- 4 cups fresh cherries, pitted and halved (you can use frozen if fresh aren’t available, just thaw and drain)
- ¾ cup (150g) granulated sugar
- 2 tbsp cornstarch (helps thicken the filling)
- 1 tbsp fresh lemon juice (balances the sweetness)
- ½ tsp almond extract (optional, but adds a lovely depth)
- ½ tsp ground cinnamon (just a hint for warmth)
- For the Topping:
- 1 egg, beaten (for egg wash)
- 1 tbsp coarse sugar (for sprinkling on top)
If you want a gluten-free version, almond or oat flour can be experimented with, but keep in mind the texture will change. Also, swapping almond extract for vanilla extract works fine if you prefer. In summer, you might try mixing in a few raspberries with the cherries for a fresh twist.
Equipment Needed
Here’s the gear you’ll need to make these crispy fresh cherry hand pies:
- Mixing Bowls: A large bowl for dough and another for the filling. Glass or stainless steel works best to keep ingredients cool.
- Rolling Pin: Essential for rolling out the dough evenly. If you don’t have one, a clean wine bottle can do the trick (been there!).
- Baking Sheet: A sturdy, rimmed sheet for baking the pies. Lining it with parchment paper helps prevent sticking and makes cleanup easier.
- Pastry Cutter or Food Processor: For cutting the butter into the flour. If you don’t have either, your fingers work fine—just try not to warm the butter too much.
- Sharp Knife or Pizza Cutter: To cut the dough strips for the lattice crust.
- Pastry Brush: For applying the egg wash evenly over the pies.
Personally, I find a bench scraper helpful for lifting the dough without tearing it, but it’s not necessary. If you’re on a budget, investing in a good rolling pin and a baking sheet will serve you well beyond this recipe.
Preparation Method
- Make the Dough (15-20 minutes): In a large bowl, whisk together the flour, salt, and sugar. Add the cold, cubed butter. Using a pastry cutter or your fingers, quickly work the butter into the flour until the mixture resembles coarse crumbs with pea-sized pieces of butter. Slowly add the ice-cold water, one tablespoon at a time, mixing gently just until the dough starts to come together. Avoid overworking it—this keeps the crust flaky.
- Chill the Dough (at least 1 hour): Form the dough into two disks, wrap in plastic, and refrigerate. This resting time is crucial for texture and easier handling later. I usually do this step while prepping the filling.
- Prepare the Cherry Filling (10 minutes): In a medium bowl, combine the pitted cherries, sugar, cornstarch, lemon juice, almond extract, and cinnamon. Toss gently to coat all cherries evenly. Set aside to macerate while the dough chills.
- Roll Out the Dough (10 minutes): Remove one dough disk from the fridge. On a lightly floured surface, roll it out to about 1/8 inch (3mm) thickness. Using a 4-inch (10cm) round cutter or a glass, cut out circles for the pie bases. Re-roll scraps as needed.
- Assemble the Pies (15-20 minutes): Place a heaping tablespoon of cherry filling onto the center of each dough circle. Be careful not to overfill to prevent leaking. Roll out the second dough disk and slice into thin strips (about ¼ inch/6mm wide). Lay strips over the filling in a lattice pattern—you can get fancy or keep it simple. Press edges gently to seal, then crimp with a fork.
- Apply Egg Wash and Sugar (5 minutes): Brush the tops with beaten egg and sprinkle with coarse sugar for a shimmering, crispy finish.
- Bake (20-25 minutes): Preheat your oven to 375°F (190°C). Bake the pies on a parchment-lined baking sheet until golden brown and bubbly, about 20-25 minutes. Keep an eye on them; ovens vary, and you want that perfect golden crust without burning.
- Cool and Enjoy: Let the hand pies cool on a wire rack for at least 10 minutes before serving. The filling will be hot and thickened, so patience pays off here.
Pro tip: If you notice the edges browning too fast, cover them with foil halfway through baking. Also, don’t skip chilling the dough—warm dough is a nightmare to work with and won’t yield that flaky texture.
Cooking Tips & Techniques
Making perfect hand pies with crispy lattice crusts is all about timing and technique. Here are some tips I’ve learned the hard way:
- Keep Everything Cold: Butter and water should be ice cold to prevent the dough from becoming greasy or tough. I even chill my mixing bowl on hot days.
- Don’t Overwork the Dough: Mixing until just combined is key. Over-kneading develops gluten and makes the crust chewy, not flaky.
- Use Fresh Cherries When Possible: Frozen cherries can work but tend to release more water. If using frozen, thaw and drain well to avoid soggy pies.
- Lattice Crust Tips: Chill the dough strips slightly before weaving to reduce tearing. If the dough warms up while you work, pop it back in the fridge for a few minutes.
- Egg Wash Matters: It’s what gives you that gorgeous golden shine and helps the sugar stick for a delightful crunch.
- Watch Your Oven: Every oven bakes differently. I’ve burnt pies by a few minutes before, so I usually check at 18 minutes and adjust accordingly.
Honestly, the first time I forgot the egg wash, the pies looked pale and sad. Lesson learned—don’t skip it! Also, multitasking by prepping the filling while the dough chills saves so much time.
Variations & Adaptations
You can make these hand pies your own with a few simple tweaks:
- Dietary Adjustments: For gluten-free, try a blend of gluten-free flours, but expect a different texture. Coconut oil can replace butter for a dairy-free option, though the crust won’t be quite as flaky.
- Seasonal Twists: Swap cherries for peaches, blueberries, or apples with cinnamon in fall. Each fruit brings a new flavor profile but keep cornstarch to thicken the juices.
- Flavor Boosts: Add a splash of bourbon or vanilla extract to the filling for an adult-friendly twist. Or mix in toasted almonds for crunch.
- Cooking Method: These hand pies can be fried for a different texture—deep fry in hot oil until golden and crispy, but watch for filling leaks.
- Personal Favorite: I once tried adding a thin layer of cream cheese beneath the cherry filling. It gave a lovely tang that balanced the sweetness beautifully.
Serving & Storage Suggestions
These crispy fresh cherry hand pies are best served warm or at room temperature, letting the filling mellow and the crust stay crisp. They make a charming dessert or a sweet snack alongside a cup of coffee or tea.
For storage, keep leftover pies in an airtight container in the refrigerator for up to 3 days. To reheat, pop them in a 350°F (175°C) oven for about 8–10 minutes to refresh the crispness. Avoid microwaving, as it can make the crust soggy.
If you want to freeze them, assemble the pies but don’t bake. Freeze on a tray until solid, then transfer to a freezer-safe bag. Bake from frozen, adding a few extra minutes to the baking time. Over time, the flavors deepen, making leftovers taste even better.
Nutritional Information & Benefits
Each hand pie (makes about 12) contains roughly 250-300 calories depending on size. They provide a good source of antioxidants thanks to the fresh cherries, which are rich in vitamin C and anti-inflammatory compounds.
The butter and sugar content means these are definitely a treat, but the fresh fruit adds fiber and natural sweetness, making them a more wholesome dessert option than many store-bought pastries.
For those watching gluten or dairy, the recipe can be adapted as mentioned earlier. Just note that texture and flavor will vary a bit with substitutions.
From my wellness perspective, these hand pies are a joyful way to enjoy seasonal fruit without over-processing, and baking at home means you control the ingredients and quality.
Conclusion
If you’ve ever craved a perfectly crispy, sweet, and tangy cherry hand pie you can hold in your hand, this recipe is your new best friend. It’s not only about the taste but the whole experience—the lattice crust weaving, the bubbling cherry filling, and that satisfying crunch with every bite.
Feel free to tweak the recipe to your liking, whether that’s swapping fruits, adding a personal touch, or adjusting sweetness. I love making these pies because they remind me of chasing a lost bakery’s magic and finally capturing it at home with my own hands.
Give these crispy fresh cherry hand pies a try, and I’d love to hear how your version turns out! Drop a comment below or share your favorite twists. Let’s keep this sweet tradition alive together.
FAQs
Can I use frozen cherries for these hand pies?
Yes, you can use frozen cherries, but be sure to thaw and drain them well to avoid excess moisture which can make the pies soggy.
How do I prevent the filling from leaking during baking?
Don’t overfill the pies and make sure to seal the edges well by pressing firmly with a fork. Chilling the dough before baking also helps maintain structure.
Can I make the dough ahead of time?
Absolutely! The dough can be made and refrigerated for up to 2 days or frozen for longer storage. Just bring it to a cool room temperature before rolling out.
What’s the best way to store leftover hand pies?
Store them in an airtight container in the fridge for up to 3 days. Reheat in the oven to keep the crust crispy.
Can I use a different fruit for the filling?
Yes! Peaches, blueberries, apples, or mixed berries work well. Adjust sugar and cornstarch amounts depending on the fruit’s juiciness and sweetness.
Pin This Recipe!

Crispy Fresh Cherry Hand Pies

These crispy fresh cherry hand pies feature a delicate lattice crust and a perfectly balanced tart and sweet cherry filling. They are quick and easy to make, perfect for any occasion, and deliver a satisfying crunch with every bite.
- Prep Time: 30 minutes
- Cook Time: 20-25 minutes
- Total Time: 1 hour 15 minutes
- Yield: 12 hand pies 1x
- Category: Dessert
- Cuisine: American
Ingredients
- 2 ½ cups (320g) all-purpose flour
- 1 tsp salt
- 1 tbsp granulated sugar
- 1 cup (226g) unsalted butter, cold and cubed
- ½ cup (120ml) ice-cold water
- 4 cups fresh cherries, pitted and halved
- ¾ cup (150g) granulated sugar
- 2 tbsp cornstarch
- 1 tbsp fresh lemon juice
- ½ tsp almond extract (optional)
- ½ tsp ground cinnamon
- 1 egg, beaten (for egg wash)
- 1 tbsp coarse sugar (for sprinkling on top)
Instructions
- Make the Dough (15-20 minutes): In a large bowl, whisk together the flour, salt, and sugar. Add the cold, cubed butter. Using a pastry cutter or your fingers, quickly work the butter into the flour until the mixture resembles coarse crumbs with pea-sized pieces of butter. Slowly add the ice-cold water, one tablespoon at a time, mixing gently just until the dough starts to come together. Avoid overworking it.
- Chill the Dough (at least 1 hour): Form the dough into two disks, wrap in plastic, and refrigerate.
- Prepare the Cherry Filling (10 minutes): In a medium bowl, combine the pitted cherries, sugar, cornstarch, lemon juice, almond extract, and cinnamon. Toss gently to coat all cherries evenly. Set aside to macerate while the dough chills.
- Roll Out the Dough (10 minutes): Remove one dough disk from the fridge. On a lightly floured surface, roll it out to about 1/8 inch (3mm) thickness. Using a 4-inch (10cm) round cutter or a glass, cut out circles for the pie bases. Re-roll scraps as needed.
- Assemble the Pies (15-20 minutes): Place a heaping tablespoon of cherry filling onto the center of each dough circle. Roll out the second dough disk and slice into thin strips (about ¼ inch/6mm wide). Lay strips over the filling in a lattice pattern. Press edges gently to seal, then crimp with a fork.
- Apply Egg Wash and Sugar (5 minutes): Brush the tops with beaten egg and sprinkle with coarse sugar.
- Bake (20-25 minutes): Preheat oven to 375°F (190°C). Bake the pies on a parchment-lined baking sheet until golden brown and bubbly, about 20-25 minutes. Cover edges with foil if browning too fast.
- Cool and Enjoy: Let the hand pies cool on a wire rack for at least 10 minutes before serving.
Notes
Keep butter and water ice cold to ensure flaky crust. Do not overwork the dough to avoid toughness. Use fresh cherries when possible; if using frozen, thaw and drain well. Chill dough before rolling and baking. Cover edges with foil if browning too fast. Reheat leftovers in oven to maintain crispness. Dough can be made ahead and refrigerated or frozen.
Nutrition
- Serving Size: 1 hand pie
- Calories: 275
- Sugar: 18
- Sodium: 150
- Fat: 15
- Saturated Fat: 9
- Carbohydrates: 32
- Fiber: 2
- Protein: 3
Keywords: cherry hand pies, lattice crust, fresh cherry dessert, homemade hand pies, cherry pie, easy cherry dessert, flaky crust, summer dessert


