Love this? Save it for later!
Share the inspiration with your friends
“I wasn’t even planning on meal prepping that Sunday,” I confessed to my friend as I spilled half a jar of sauce trying to squeeze it into a container that just wouldn’t close. It was chaos in my tiny kitchen, and honestly, I thought meal prep was supposed to make life easier, not messier. Then my neighbor, Mr. Patel, popped by with his usual calm demeanor and a stack of perfectly packed meal prep containers. He joked, ‘You gotta have the right containers if you want your week to run smooth.’ That little moment sparked a full-on obsession with organizing meal prep containers for perfect portioning.
You know that feeling when you open your fridge and instead of a jumble of mismatched plastic tubs, you see a lineup of neat, uniform containers, each one holding the exact right amount of food? It’s oddly satisfying. And honestly, it makes those busy weekday lunches feel less like a chore and more like a treat you actually look forward to. Maybe you’ve been there—standing in front of your fridge wondering if you grabbed too much or too little, or if that container will leak mid-commute.
Well, let me tell you, this guide isn’t just about picking any old container. It’s about finding the best setup that fits your lifestyle, your appetite, and your sanity. I learned this the hard way, juggling sizes and shapes until I found the perfect match that made planning meals a breeze. So, if you’re ready to say goodbye to mealtime guessing games and hello to organized, perfectly portioned meal prep containers, keep reading—I’ll walk you through everything you need to know.
Why You’ll Love This Recipe
Having tried countless containers and tested different portioning systems, I’m confident this organized meal prep containers guide will transform how you approach your weekly meals. Here’s why it’s become my go-to method:
- Quick & Easy: Setting up your containers takes less than 20 minutes, making it ideal for those busy Sunday preps or last-minute meal plans.
- Simple Ingredients: No complicated tools or fancy gadgets—just containers designed for practicality and durability.
- Perfect for Any Occasion: Whether you’re meal prepping for work, school lunches, or weekend get-togethers, this system adapts to your needs.
- Crowd-Pleaser: Friends and family always ask how I manage to keep food fresh and portions just right, making this guide a hit in my circle.
- Unbelievably Functional: The containers stack neatly, seal tightly, and help eliminate food waste by encouraging portion control.
What makes this guide different? It’s not just about the containers—it’s about the approach. For example, I recommend using containers with divided sections for balanced meals and choosing sizes that align with your nutritional goals. Plus, I’ve included tips on how to prep efficiently and avoid common pitfalls, so you don’t end up with soggy salads or crushed sandwiches.
Honestly, this isn’t just a system; it’s a lifestyle shift that helps me feel more in control, less stressed, and more excited about what’s in my fridge. I bet once you try these tips, you’ll feel the same.
What Ingredients You Will Need
This guide uses simple, practical items to keep your meals organized and perfectly portioned without fuss. Most of these are pantry staples or easy to find in stores, and many have versatile uses beyond meal prep.
- Meal Prep Containers: Choose BPA-free, microwave-safe options. I personally prefer containers with snap-lock lids for spill-proof transport—brands like Glasslock or Prep Naturals have served me well.
- Divided Containers: Ideal for separating proteins, carbs, and veggies. These prevent flavor mixing and keep your meals balanced.
- Reusable Silicone Lids or Wraps: Great for covering bowls or odd-shaped containers when you don’t have a matching lid.
- Measuring Cups and Digital Scale: For portion control, these tools help you get consistent servings, especially when tracking macros.
- Labels and Marker Pens: To date your meals or note ingredients, making it easier to track freshness.
- Insulated Lunch Bag or Cooler: Keeps your meals fresh if you’re eating on the go.
Substitution tips:
- If you prefer glass containers, opt for tempered glass to avoid breakage and for easy cleaning.
- For a budget-friendly route, BPA-free plastic containers with simple lids work fine—just avoid those that stain easily or warp in the microwave.
- Consider stackable containers with uniform sizes so they nest neatly in your fridge and bag.
Equipment Needed
While the stars of this guide are the containers, a few kitchen tools make the process smoother. Here’s what I use and recommend:
- Digital Kitchen Scale: I can’t stress enough how much this helps in portion control. It’s a kitchen staple for anyone serious about meal prep.
- Measuring Cups and Spoons: Useful for liquids and dry ingredients alike.
- Sharp Chef’s Knife: Efficient chopping saves time and keeps your ingredients uniform.
- Cutting Board: Preferably one with a non-slip base for safety.
- Silicone Spatula: Great for scraping bowls clean and distributing ingredients evenly.
If you don’t have a digital scale yet, you can start with measuring cups, but I promise the scale’s accuracy is worth the investment. Also, I’ve found that using containers with airtight lids reduces mess and keeps food fresher longer—something that pays off in the long run.
Preparation Method
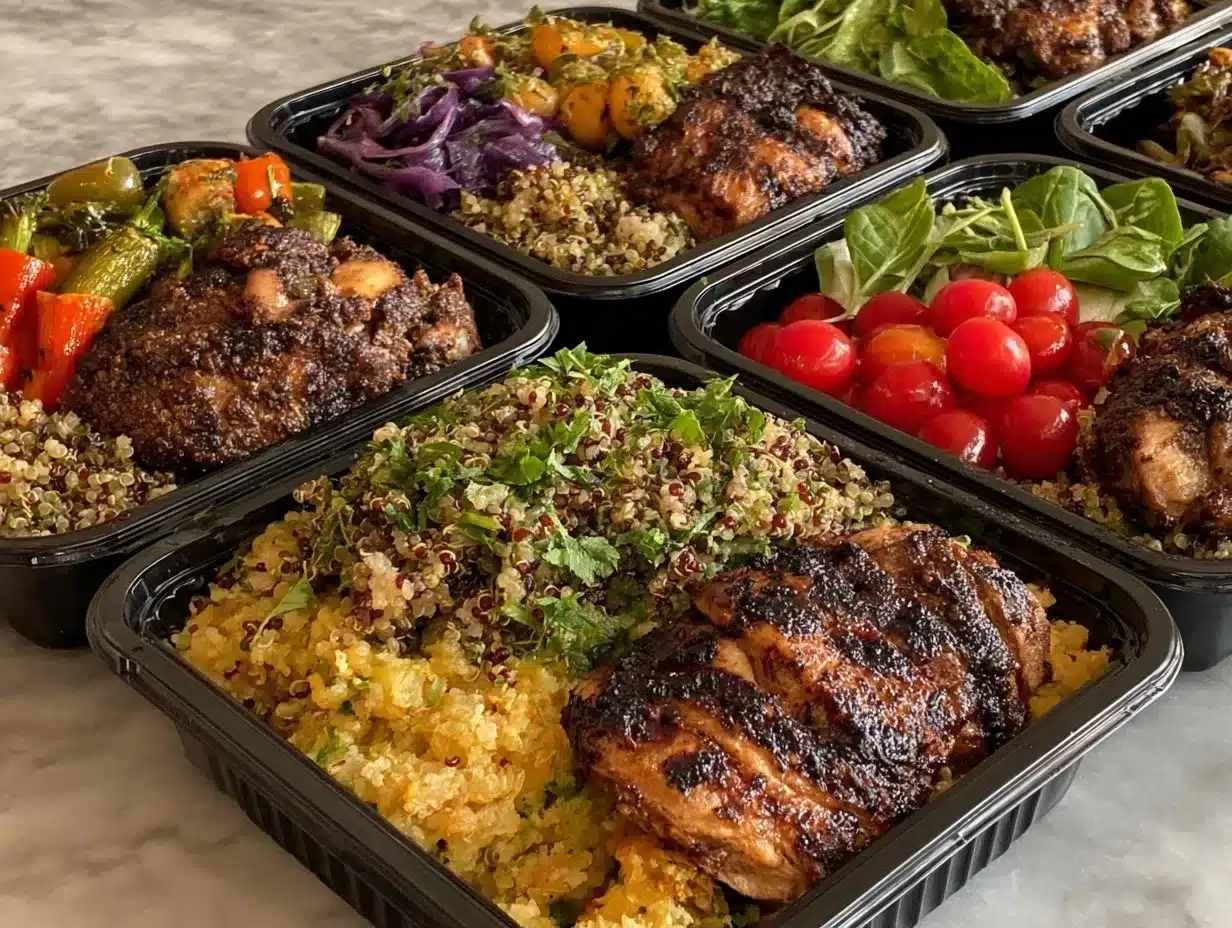
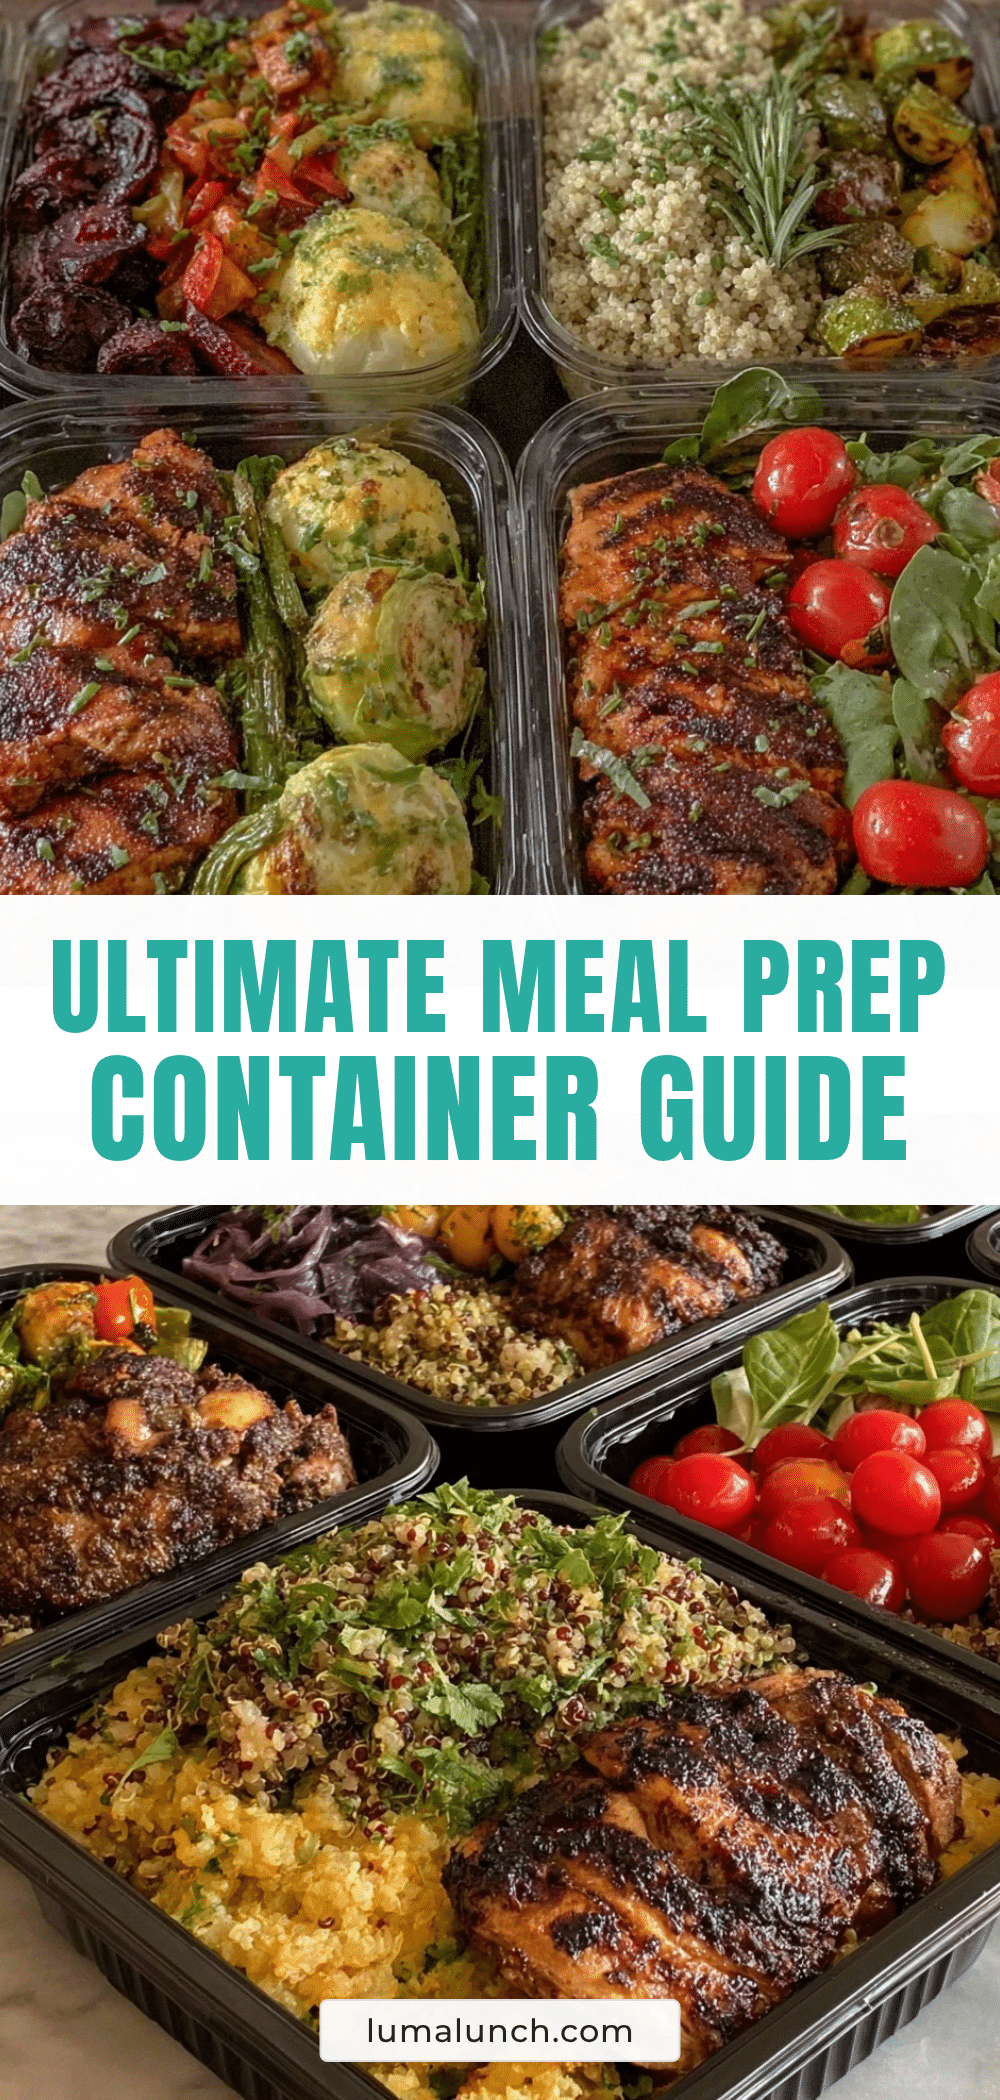
- Choose Your Containers: Select containers based on your meal plan. For example, use 3-compartment containers for balanced meals or smaller single-section containers for snacks. (Tip: I use 24-ounce (700 ml) containers for main meals and 12-ounce (350 ml) for sides.)
- Weigh and Measure Ingredients: Use your kitchen scale and measuring cups to portion proteins, carbs, and veggies according to your dietary goals. For instance, 4 ounces (113 g) chicken breast, 1 cup (150 g) cooked rice, 1 cup (90 g) steamed broccoli.
- Cook and Cool Ingredients: Prepare your meals as planned. Let hot foods cool slightly before packing to avoid condensation, which can make food soggy.
- Pack Strategically: Place proteins in one section, carbs in another, and veggies or fruits in the last. For containers without dividers, use silicone baking cups to separate items.
- Seal and Label: Snap lids tightly and write the prep date on the container with a marker or label. This helps you keep track of freshness and avoid food waste.
- Store Properly: Stack containers in your fridge or freezer neatly. If freezing, leave a little headspace to allow for expansion.
- Reheat Safely: When ready to eat, remove lids and microwave on medium heat in 1-2 minute increments until steaming hot. (Note: glass containers are microwave safe, but check your lids.)
Pro tip: Keep a small container of dressing or sauce separate to add just before eating, preserving freshness and texture.
Cooking Tips & Techniques
Getting the most out of your meal prep containers requires a few tricks I’ve picked up over time. Here are some tips to help you avoid common pitfalls:
- Avoid Overfilling: Leave a little space at the top of containers to prevent spills and allow for easy sealing. I learned this the hard way after a sauce explosion in my bag once.
- Use Dividers or Silicone Cups: These keep wet ingredients separate from dry ones, especially for salads or meals with sauces.
- Cool Foods Before Packing: Packing hot food can cause condensation, which leads to sogginess. Patience here really pays off.
- Stack Smart: Place heavier containers at the bottom of your fridge or bag to avoid crushing delicate items.
- Prep in Batches: Cook staples like grains and proteins in bulk, then mix and match ingredients to keep things interesting throughout the week.
When I first started meal prepping, I’d try to cram everything into one container—big mistake. Portioning and using the right containers made all the difference for freshness and enjoyment.
Variations & Adaptations
This guide is flexible and can be adjusted to fit your lifestyle or dietary needs. Here are some ways to customize:
- Gluten-Free or Low-Carb: Swap grains for cauliflower rice or spiralized veggies. Use containers with smaller compartments to hold varied low-carb sides.
- Vegan or Plant-Based: Load containers with legumes, tofu, and roasted vegetables. Consider containers with leak-proof lids if packing saucy dishes like curries.
- Seasonal Ingredients: Change your meal prep contents based on the season—berries and fresh greens in summer, root vegetables in winter. Containers that stack well help keep your fridge organized regardless.
- Alternate Cooking Methods: Try cold meal preps like overnight oats or salads stored in mason jars; just swap the containers accordingly.
I once tried prepping a Mediterranean-inspired meal with falafel and tabbouleh in divided containers—worked like a charm and kept everything tasting fresh.
Serving & Storage Suggestions
Serving your meal prep containers right makes a world of difference. I usually recommend eating meals within 4 days when refrigerated, or freezing portions for up to 3 months.
- Serving Temperature: Most meals are best reheated until hot, but some items like salads or fruits should be eaten cold or at room temperature.
- Presentation: When reheating, use microwave-safe containers and remove lids to avoid steam buildup. Adding fresh herbs or a squeeze of lemon right before eating can brighten flavors.
- Storage Tips: Stack containers with labels in your fridge for easy grab-and-go meals. For freezing, choose freezer-safe containers and thaw overnight in the fridge.
- Flavor Development: Some dishes like stews or chili taste even better the next day, so portioning them in meal prep containers is a win.
Nutritional Information & Benefits
Portion-controlled meal prep containers help manage calorie intake and ensure balanced meals. Typical servings might average 400-600 calories per container, depending on ingredients.
Key benefits include:
- Balanced Nutrition: Divided containers encourage including protein, complex carbs, and vegetables in the right amounts.
- Reduced Food Waste: Proper portioning means less leftover food that goes bad in the fridge.
- Dietary Flexibility: Easy to tailor meals for gluten-free, vegetarian, or low-carb diets.
Watch out for allergens by labeling meals clearly, especially if sharing with others. For me, this system supports my wellness goals by making healthy eating practical and stress-free.
Conclusion
This organized meal prep containers guide offers a straightforward way to perfect portioning without the usual headaches. Whether you’re new to meal prepping or looking to upgrade your system, these tips help make your meals fresher, tastier, and more enjoyable.
Feel free to customize the container sizes and meal components to fit your tastes and schedule—you’ll find your own flow as you go. I keep coming back to this approach because it salvages my busy weeks and keeps me eating well without overthinking.
If you try out these tips, drop a comment below sharing your favorite container brand or portioning hack—I love hearing how others make meal prep work for them! Happy prepping, and here’s to stress-free, perfectly portioned meals every day.
FAQs
What size meal prep containers are best for portion control?
Containers between 24 to 32 ounces (700–950 ml) work well for main meals, with smaller 12-ounce (350 ml) containers ideal for sides or snacks.
Can I use glass containers for meal prep?
Absolutely! Tempered glass containers are microwave and dishwasher safe, sturdy, and don’t retain odors. Just make sure lids seal tightly for transport.
How long can I store meals in meal prep containers?
Refrigerated meals typically last 3-4 days. For longer storage, freeze meals in freezer-safe containers for up to 3 months.
How do I prevent food from getting soggy in meal prep containers?
Cool hot foods before packing, use containers with dividers, and keep dressings or sauces separate until serving.
Are BPA-free plastic containers safe for meal prep?
Yes, BPA-free containers are generally safe. Look for those labeled microwave-safe and dishwasher-safe for convenience.
Pin This Recipe!
Organized Meal Prep Containers Guide 5 Easy Tips for Perfect Portioning

This guide offers practical tips and recommendations for selecting and using meal prep containers to achieve perfect portioning, reduce food waste, and simplify weekly meal planning.
- Prep Time: 15 minutes
- Cook Time: Varies depending on meal components
- Total Time: 20 minutes (container setup and portioning)
- Yield: Varies depending on number of containers prepared
- Category: Meal Prep Guide
- Cuisine: General / Multi-cuisine
Ingredients
- Meal Prep Containers (BPA-free, microwave-safe, preferably with snap-lock lids)
- Divided Containers for separating proteins, carbs, and veggies
- Reusable Silicone Lids or Wraps
- Measuring Cups and Digital Kitchen Scale
- Labels and Marker Pens
- Insulated Lunch Bag or Cooler
Instructions
- Choose your containers based on your meal plan, using 3-compartment containers for balanced meals or smaller single-section containers for snacks.
- Weigh and measure ingredients using a kitchen scale and measuring cups to portion proteins, carbs, and veggies according to your dietary goals.
- Cook and cool ingredients before packing to avoid condensation and sogginess.
- Pack strategically by placing proteins, carbs, and veggies/fruits in separate sections or use silicone baking cups if containers lack dividers.
- Seal containers tightly and label with the prep date to track freshness.
- Store containers stacked neatly in the fridge or freezer, leaving headspace if freezing.
- Reheat safely by removing lids and microwaving on medium heat in 1-2 minute increments until steaming hot.
Notes
Avoid overfilling containers to prevent spills; use dividers or silicone cups to separate wet and dry ingredients; cool foods before packing to avoid sogginess; stack containers smartly to avoid crushing; prep staples in bulk for efficiency; keep dressings separate until serving.
Nutrition
- Serving Size: One meal prep contai
- Calories: 400600
Keywords: meal prep, portion control, meal prep containers, organized meals, food storage, meal planning, BPA-free containers, divided containers, meal prep tips