Love this? Save it for later!
Share the inspiration with your friends
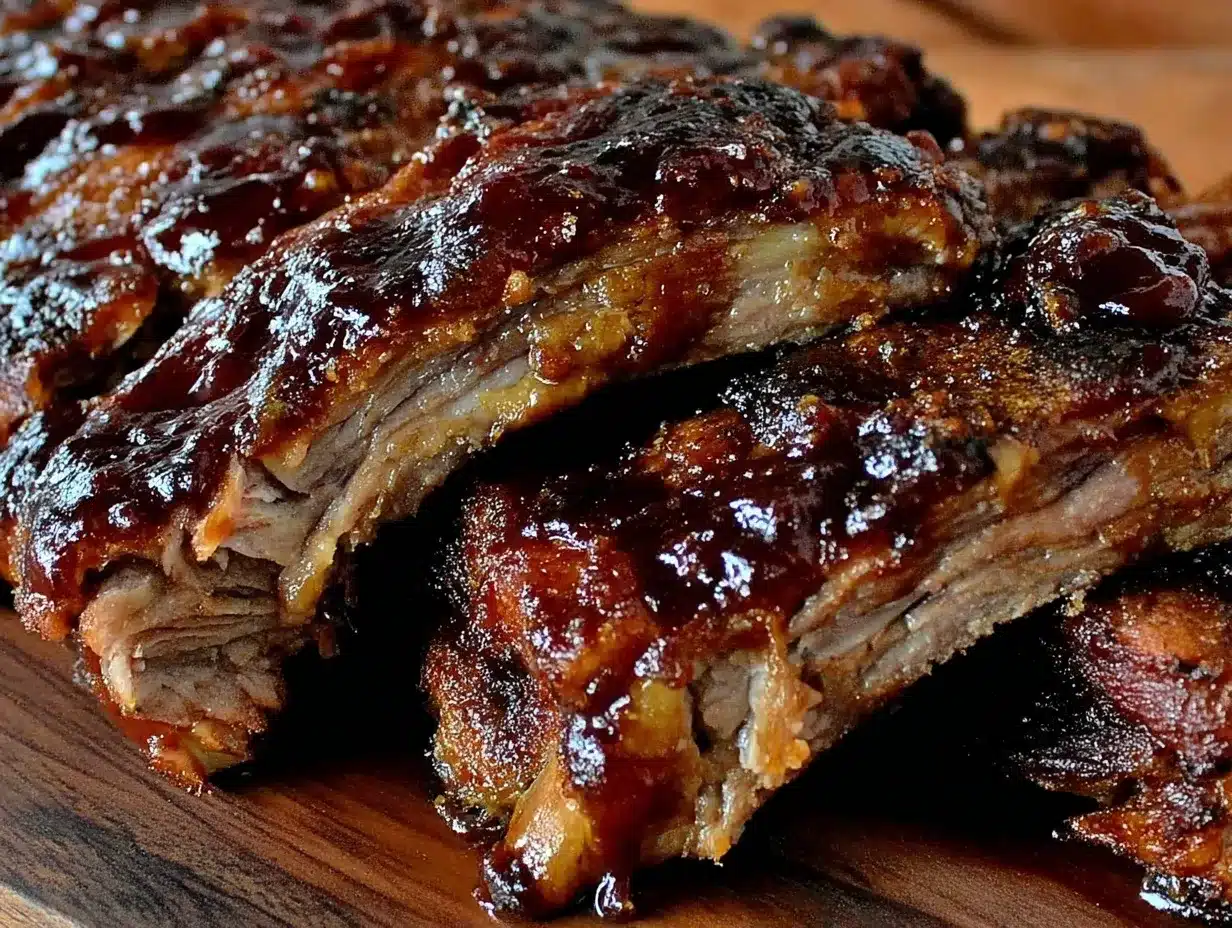
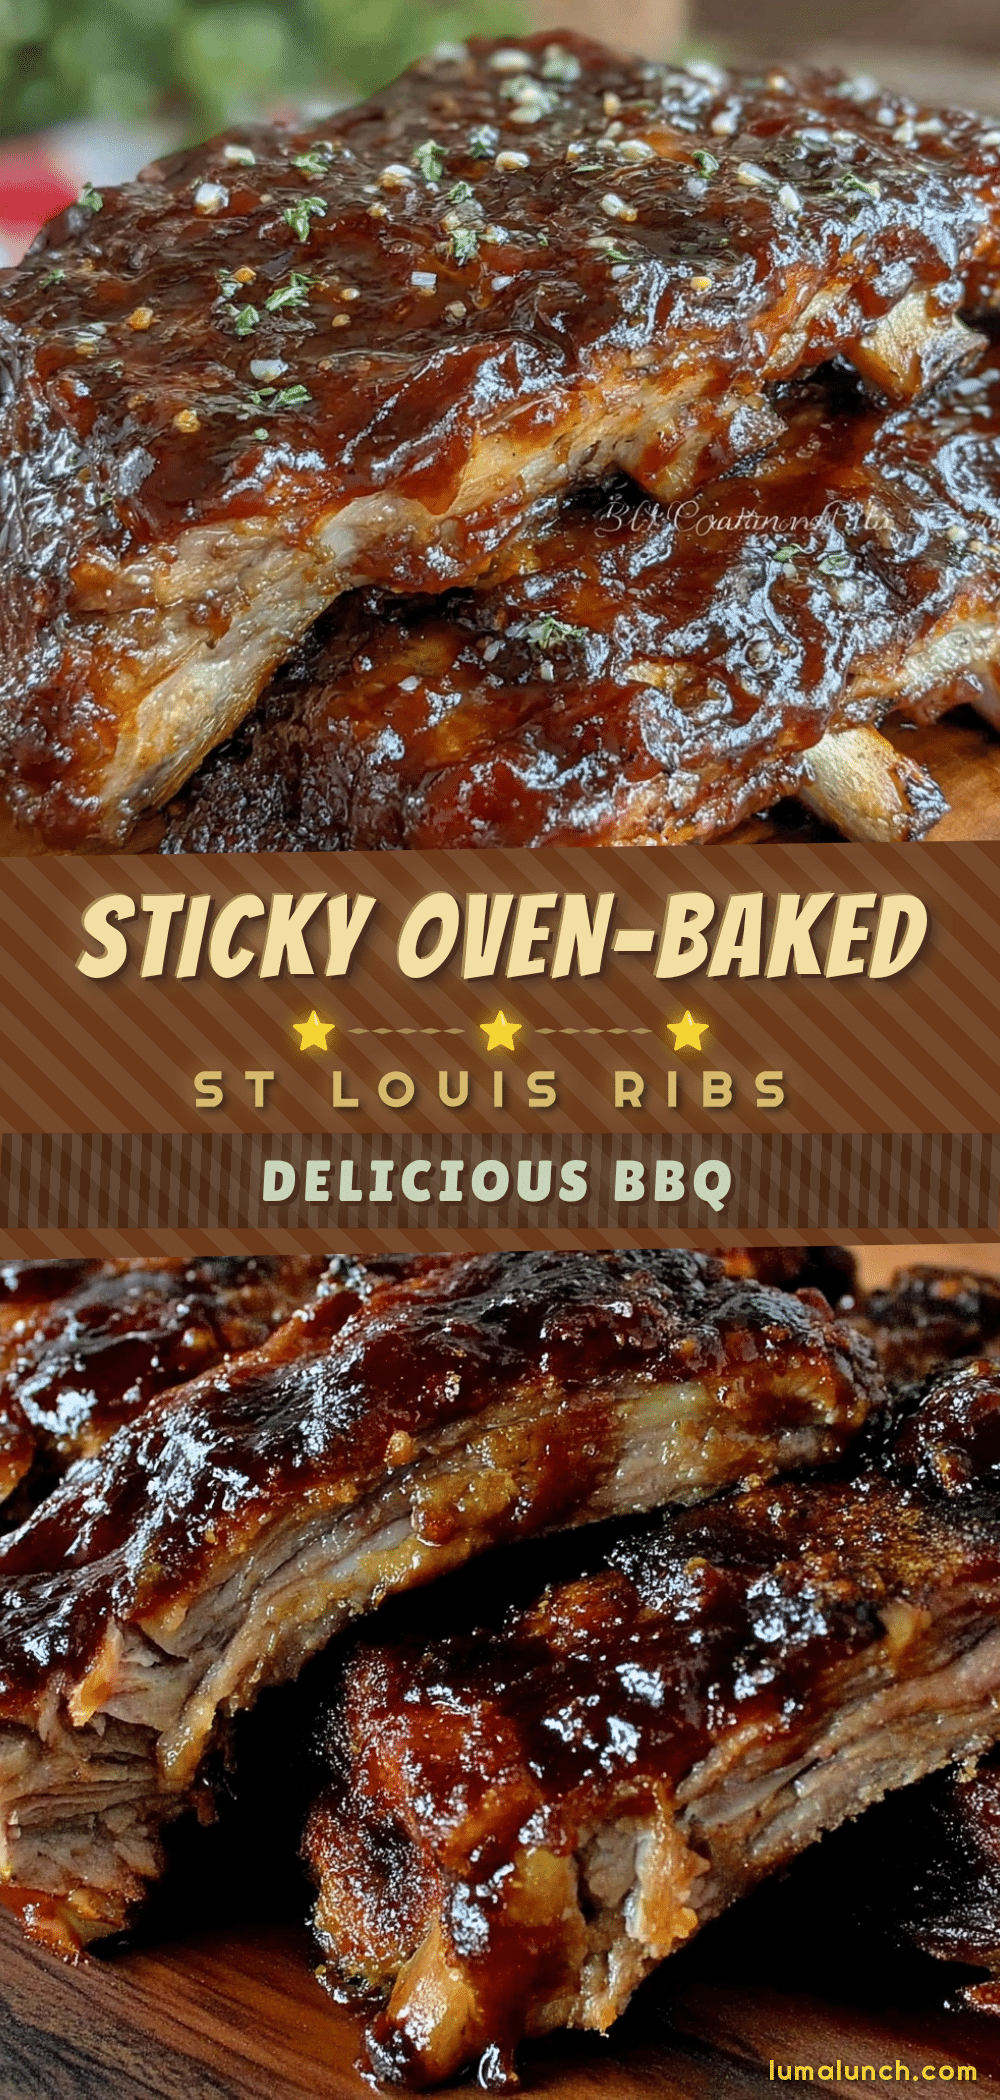
“You know that moment when a recipe just sneaks up on you, completely unplanned, and then refuses to leave your taste buds alone?” That was exactly how these flavorful oven-baked St. Louis ribs with sticky Dr Pepper BBQ sauce came into my life. It all started one rainy Saturday afternoon when I was rummaging through my fridge, hoping to salvage dinner without a grocery run. I spotted a forgotten bottle of Dr Pepper hiding behind the condiments and a rack of ribs that urgently needed attention.
I wasn’t planning a full-blown BBQ feast, honestly. The oven was already half-occupied with a batch of roasted veggies, and I was juggling a few other things. Somehow, between the chaos and a few kitchen messes (yes, I accidentally knocked over the spice jar—classic!), this sticky Dr Pepper BBQ sauce came together. The ribs turned out tender, packed with a perfect balance of sweet and tangy, and that soda-infused glaze? Wow, just wow.
Maybe you’ve been there—scrambling for dinner with barely any time but craving something that feels like a weekend treat. This recipe stuck with me because it’s simple, accessible, and downright delicious. It’s that kind of dish you want to make again and again, especially when the craving for rich, comforting ribs hits.
Why You’ll Love This Recipe
Having tested this oven-baked St. Louis ribs recipe multiple times (including during a hectic weeknight and a casual Sunday cookout), I can confidently say it’s a keeper. The sticky Dr Pepper BBQ sauce is a game-changer, delivering flavor depth that’s both nostalgic and exciting. Here’s why this recipe stands out:
- Quick & Easy: The ribs bake in the oven without needing a grill, making it perfect for any season.
- Simple Ingredients: You likely have everything on hand, plus that secret weapon—Dr Pepper soda.
- Perfect for Casual Gatherings: Great for family dinners, potlucks, or game day feasts.
- Crowd-Pleaser: Kids and adults alike love the sticky, flavorful finish.
- Unbelievably Delicious: The soda adds a subtle sweetness and caramelization that’s hard to beat.
What makes this recipe different? Instead of a complicated marinade or hours of slow smoking, the oven method is straightforward but doesn’t sacrifice tenderness or flavor. The sticky Dr Pepper BBQ sauce is my own twist—combining classic spices with that fizzy sweetness to create a sauce that clings perfectly to the ribs.
This recipe isn’t just about feeding hungry stomachs; it’s about sharing a meal that feels special without hassle. I promise, after the first bite, you’ll understand why these ribs have earned a permanent spot in my recipe rotation.
What Ingredients You Will Need
This recipe uses simple, wholesome ingredients to deliver bold flavor and satisfying texture without the fuss. Most of these are pantry staples, with the Dr Pepper soda adding a fun twist. Feel free to swap ingredients based on what’s available or your dietary preferences.
- St. Louis Style Pork Ribs: 2 racks (about 3-4 pounds total), trimmed of excess fat and membrane removed for tenderness.
- Dr Pepper Soda: 12 ounces (355 ml) – the star of the BBQ sauce, providing sweetness and depth.
- Ketchup: 1 cup (240 ml) – forms the tangy base of the sauce.
- Brown Sugar: ¼ cup (50 grams), packed – adds caramel notes and balances acidity.
- Apple Cider Vinegar: 2 tablespoons (30 ml) – brings brightness and cuts through richness.
- Worcestershire Sauce: 1 tablespoon (15 ml) – for umami complexity.
- Garlic Powder: 1 teaspoon – for savory depth.
- Onion Powder: 1 teaspoon – complements garlic with subtle sweetness.
- Smoked Paprika: 1 teaspoon – adds smoky warmth without needing a smoker.
- Chili Powder: ½ teaspoon – gentle heat to balance sweetness.
- Salt: 1 teaspoon – enhances all flavors.
- Black Pepper: ½ teaspoon, freshly ground – for mild pungency.
- Olive Oil: 1 tablespoon – helps lock in moisture during baking.
Pro tip: For the best results, I recommend using a quality ketchup like Heinz or Hunt’s, and a natural brown sugar that’s moist for richer flavor. If you’re looking to make the sauce gluten-free, double-check your Worcestershire sauce brand (I trust Lea & Perrins). You can substitute coconut sugar for brown sugar if you prefer a less refined sweetener.
Equipment Needed
- Baking Sheet: A sturdy rimmed sheet pan to catch drippings and hold the ribs comfortably.
- Aluminum Foil: Essential for wrapping the ribs tightly to keep them moist during baking.
- Mixing Bowl: To whisk together the sticky Dr Pepper BBQ sauce.
- Brush or Spoon: For coating the ribs evenly with sauce.
- Measuring Cups and Spoons: For precision in spices and liquids.
- Sharp Knife: To trim any excess fat or remove the silver skin membrane.
- Wire Rack (optional): Placing ribs on a wire rack inside the baking sheet helps air circulate, but you can bake directly on foil if needed.
If you don’t have a wire rack, no worries—just be sure to line your baking sheet well to prevent sticking. For budget-friendly options, standard kitchen foil and any oven-safe pan will do just fine. I’ve found that a good foil wrap is the real key to tender ribs here, so don’t skip that step!
Preparation Method
- Preheat Your Oven: Set to 300°F (150°C). This moderate temperature ensures slow cooking for tender ribs without drying out.
- Prep the Ribs: Pat the ribs dry with paper towels. Use a sharp knife to remove the thin silver skin membrane on the bone side if it’s still attached—this helps the sauce penetrate and the ribs become tender.
- Apply Olive Oil and Seasonings: Lightly brush both sides of the ribs with olive oil. In a small bowl, mix salt, black pepper, smoked paprika, chili powder, garlic powder, and onion powder. Rub this spice blend evenly over the ribs on both sides.
- Wrap the Ribs: Place each rack on a large piece of aluminum foil. Wrap tightly to create a sealed pouch. This traps steam and keeps the ribs moist during baking.
- Bake Low and Slow: Set the foil-wrapped ribs on a baking sheet and place in the oven. Bake for 2.5 to 3 hours, depending on thickness. You’ll notice the meat will pull away slightly from the bones and be tender when done.
- Prepare the Sticky Dr Pepper BBQ Sauce: While the ribs bake, combine Dr Pepper, ketchup, brown sugar, apple cider vinegar, Worcestershire sauce, and remaining spices in a saucepan over medium heat. Stir frequently and simmer gently for 15-20 minutes until thickened to a sticky glaze consistency. Watch closely to prevent burning.
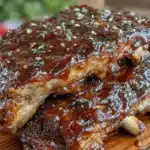
- Glaze and Broil: Remove ribs from the oven and carefully unwrap. Brush a generous layer of the sticky Dr Pepper BBQ sauce on both sides of each rack. Switch your oven to broil on high.
- Broil for Caramelization: Place ribs back on the baking sheet (uncovered) and broil for 3-5 minutes, watching closely. The sauce should bubble and caramelize but not burn. Rotate as needed for even browning.
- Rest and Serve: Let ribs rest for 5 minutes before slicing between the bones. Serve with extra sticky Dr Pepper BBQ sauce on the side.
Note: Oven times can vary, so test tenderness by gently lifting a rib; it should bend easily without resistance. If you want fall-off-the-bone ribs, add 15-20 minutes to baking time, but watch the sauce during broiling carefully.
Cooking Tips & Techniques
Getting perfectly tender and flavorful ribs in the oven isn’t rocket science, but a few tricks make all the difference. First, removing the membrane is non-negotiable for me; it’s a simple step that really helps the spices and sauce soak in.
Low and slow baking is the secret for tenderness. I’m not a fan of rushing ribs with high heat—that usually leads to dry meat. Wrapping the ribs tightly in foil locks in moisture, creating a gentle steam bath inside the pouch.
When simmering the Dr Pepper BBQ sauce, stirring is essential to keep the sugars from scorching. Honestly, I’ve burned batches trying to multitask in the kitchen, so don’t wander too far!
Broiling at the end adds that irresistible sticky crust, but keep your eyes peeled. The difference between perfectly caramelized and burnt is seconds. If you want to save time, you can skip broiling and just bake with sauce on top, but you’ll miss that signature sticky texture.
Finally, resting the ribs after cooking lets the juices redistribute. I’ve learned this the hard way—cutting too soon means juice loss and drier meat. Patience pays off!
Variations & Adaptations
- Spicy Kick: Add ½ teaspoon cayenne pepper to the spice rub and a splash of hot sauce to the BBQ glaze for a fiery twist.
- Gluten-Free Version: Use gluten-free Worcestershire sauce and verify ketchup ingredients to keep the recipe safe for gluten sensitivities.
- Smoky Flavor: Incorporate a few drops of liquid smoke into the BBQ sauce if you want that smoky BBQ vibe without firing up a smoker or grill.
- Slow Cooker Alternative: Brown ribs briefly in a pan, then transfer to a slow cooker with sauce ingredients, cook on low 6-8 hours, and finish under the broiler for caramelization.
- Healthier Swap: Swap brown sugar with coconut sugar or maple syrup and use a low-sodium ketchup to lighten the sauce.
Once, I even tossed in fresh pineapple juice alongside the Dr Pepper for a tropical hint. It was surprisingly good and made the ribs even juicier. Feel free to experiment and make this your own!
Serving & Storage Suggestions
These ribs are best served warm, straight from the oven with a generous brush of that sticky Dr Pepper BBQ sauce. For a classic pairing, I love serving them alongside creamy coleslaw and buttery cornbread. A cold beer or iced tea complements the sweet and tangy flavors beautifully.
To store leftovers, wrap ribs tightly in foil or place in an airtight container and refrigerate for up to 4 days. Reheat gently in the oven at 275°F (135°C) covered with foil to keep moisture. For longer storage, ribs freeze well for up to 3 months—just thaw overnight in the fridge before reheating.
Reheating with a little extra sauce helps revive that sticky goodness. Over time, the flavors meld even more, so leftover ribs often taste even better the next day if you have the patience.
Nutritional Information & Benefits
Each serving of these oven-baked St. Louis ribs packs approximately 450-500 calories, with a good balance of protein and fats. The pork provides essential amino acids and B vitamins, supporting muscle health and energy.
The Dr Pepper BBQ sauce adds sugar and calories, but using it as a glaze rather than a heavy coating keeps it reasonable. You can control sodium levels by choosing low-sodium ketchup and Worcestershire sauce options.
This recipe is naturally gluten-free if you select gluten-free condiments and is free from artificial preservatives. It’s a satisfying comfort food that fits well within a balanced diet when enjoyed in moderation.
Conclusion
If you’re looking for a no-fuss, flavorful way to enjoy ribs any time of year, these oven-baked St. Louis ribs with sticky Dr Pepper BBQ sauce are the answer. They combine simplicity with a unique flavor twist that keeps me coming back for more. I love how this recipe turns humble ingredients into a meal that feels celebratory and comforting all at once.
Give it a try, tweak the spices to suit your palate, and don’t be shy about adding your personal touch. I’d love to hear how your ribs turn out—drop a comment or share your tips below. Happy cooking, and here’s to many delicious dinners ahead!
FAQs
- Q: Can I use baby back ribs instead of St. Louis ribs?
A: Absolutely! Baby back ribs work well but may require slightly less cooking time (about 2 to 2.5 hours). - Q: What if I don’t have Dr Pepper—can I substitute?
A: You can use any cola or root beer, but Dr Pepper gives a unique flavor that’s hard to replicate exactly. - Q: How do I know when the ribs are done?
A: The meat should be tender and pull back from the bones slightly. A gentle bend test also helps—ribs should bend without breaking abruptly. - Q: Can I make the BBQ sauce ahead of time?
A: Yes! The sauce stores well in the fridge for up to a week and tastes even better after resting. - Q: Is it necessary to broil the ribs at the end?
A: Broiling adds caramelized stickiness, but if you prefer, you can skip it and bake longer with sauce on—just expect a softer finish.
Pin This Recipe!
Flavorful Oven-Baked St Louis Ribs with Easy Sticky Dr Pepper BBQ Sauce
Tender oven-baked St. Louis ribs glazed with a sweet and tangy sticky Dr Pepper BBQ sauce, perfect for a quick and delicious meal without a grill.
- Prep Time: 15 minutes
- Cook Time: 3 hours 20 minutes
- Total Time: 3 hours 35 minutes
- Yield: 4 servings 1x
- Category: Main Course
- Cuisine: American
Ingredients
- 2 racks St. Louis Style Pork Ribs (about 3–4 pounds total), trimmed of excess fat and membrane removed
- 12 ounces (355 ml) Dr Pepper Soda
- 1 cup (240 ml) Ketchup
- ¼ cup (50 grams) Brown Sugar, packed
- 2 tablespoons (30 ml) Apple Cider Vinegar
- 1 tablespoon (15 ml) Worcestershire Sauce
- 1 teaspoon Garlic Powder
- 1 teaspoon Onion Powder
- 1 teaspoon Smoked Paprika
- ½ teaspoon Chili Powder
- 1 teaspoon Salt
- ½ teaspoon Black Pepper, freshly ground
- 1 tablespoon Olive Oil
Instructions
- Preheat your oven to 300°F (150°C).
- Pat the ribs dry with paper towels. Use a sharp knife to remove the thin silver skin membrane on the bone side if attached.
- Lightly brush both sides of the ribs with olive oil.
- In a small bowl, mix salt, black pepper, smoked paprika, chili powder, garlic powder, and onion powder. Rub this spice blend evenly over both sides of the ribs.
- Place each rack on a large piece of aluminum foil and wrap tightly to create a sealed pouch.
- Place the foil-wrapped ribs on a baking sheet and bake for 2.5 to 3 hours until tender and meat pulls away slightly from the bones.
- While ribs bake, combine Dr Pepper, ketchup, brown sugar, apple cider vinegar, Worcestershire sauce, and remaining spices in a saucepan over medium heat. Stir frequently and simmer gently for 15-20 minutes until thickened to a sticky glaze consistency.
- Remove ribs from oven and carefully unwrap. Brush a generous layer of the sticky Dr Pepper BBQ sauce on both sides of each rack.
- Switch oven to broil on high. Place ribs back on the baking sheet uncovered and broil for 3-5 minutes, watching closely to caramelize the sauce without burning. Rotate as needed for even browning.
- Let ribs rest for 5 minutes before slicing between the bones. Serve with extra sticky Dr Pepper BBQ sauce on the side.
Notes
Remove the membrane for better tenderness and flavor absorption. Wrap ribs tightly in foil to lock in moisture. Stir sauce frequently while simmering to prevent burning. Broil at the end for a sticky caramelized crust but watch closely to avoid burning. Let ribs rest before slicing to retain juices. For fall-off-the-bone ribs, add 15-20 minutes to baking time.
Nutrition
- Serving Size: 1/4 of total ribs (a
- Calories: 475
- Sugar: 20
- Sodium: 700
- Fat: 30
- Saturated Fat: 10
- Carbohydrates: 25
- Fiber: 1
- Protein: 35
Keywords: oven-baked ribs, St Louis ribs, Dr Pepper BBQ sauce, sticky ribs, easy BBQ sauce, oven ribs recipe, tender ribs, sweet and tangy ribs